Extreme Restoration – Coleman 10 Gauge Shotgun

10-Gauge-breech-open

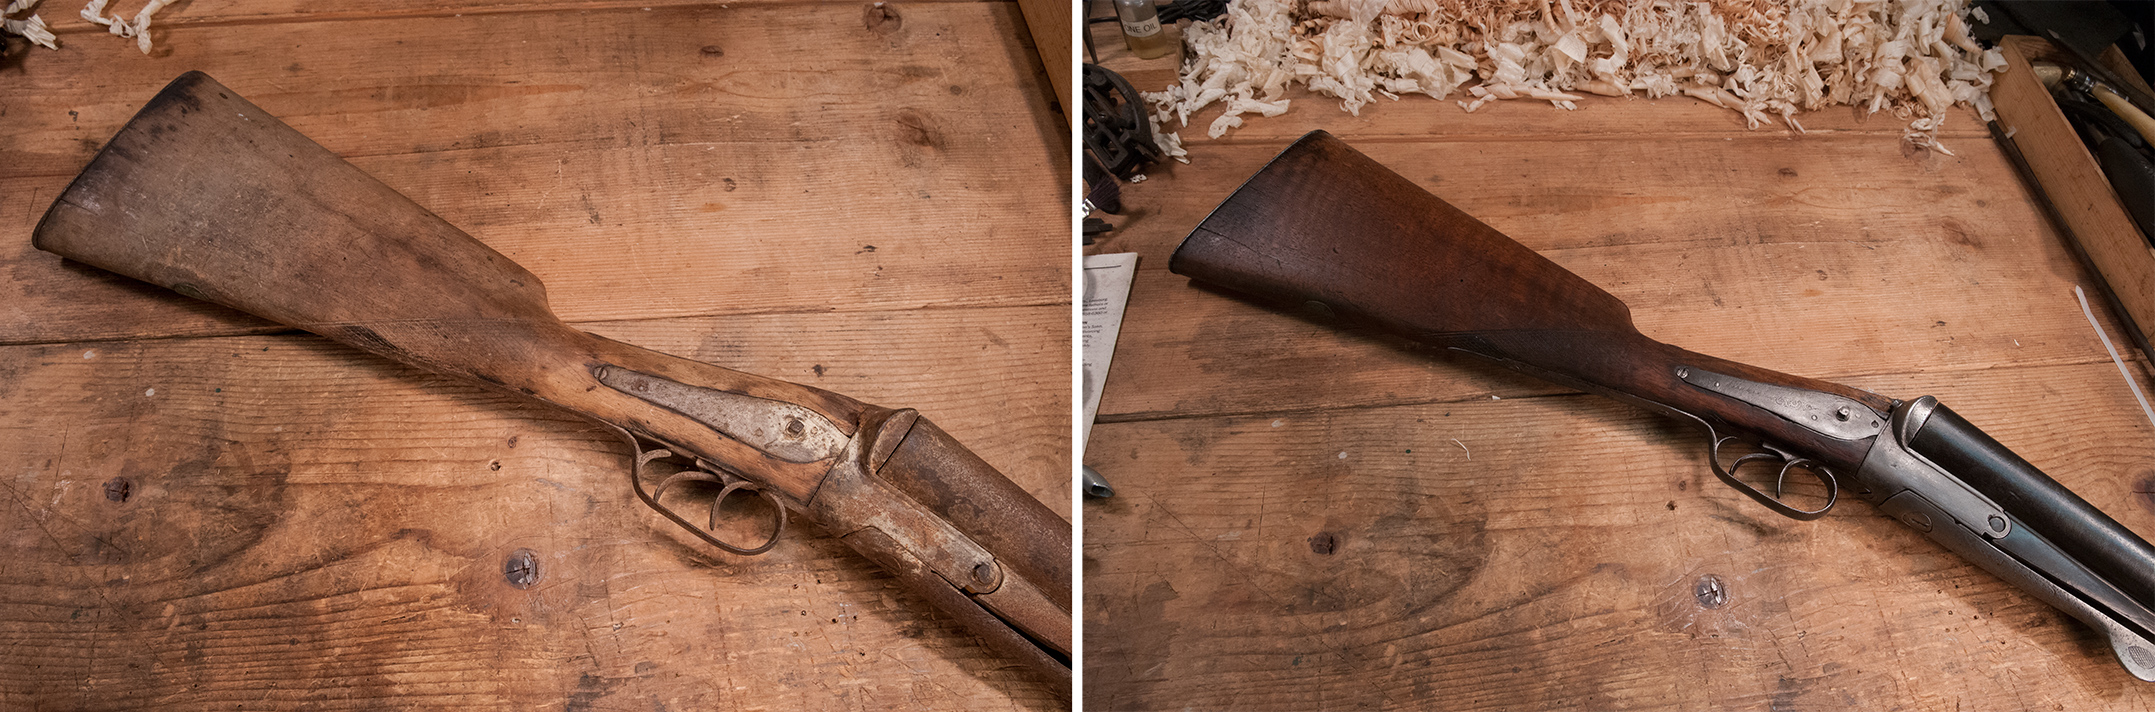
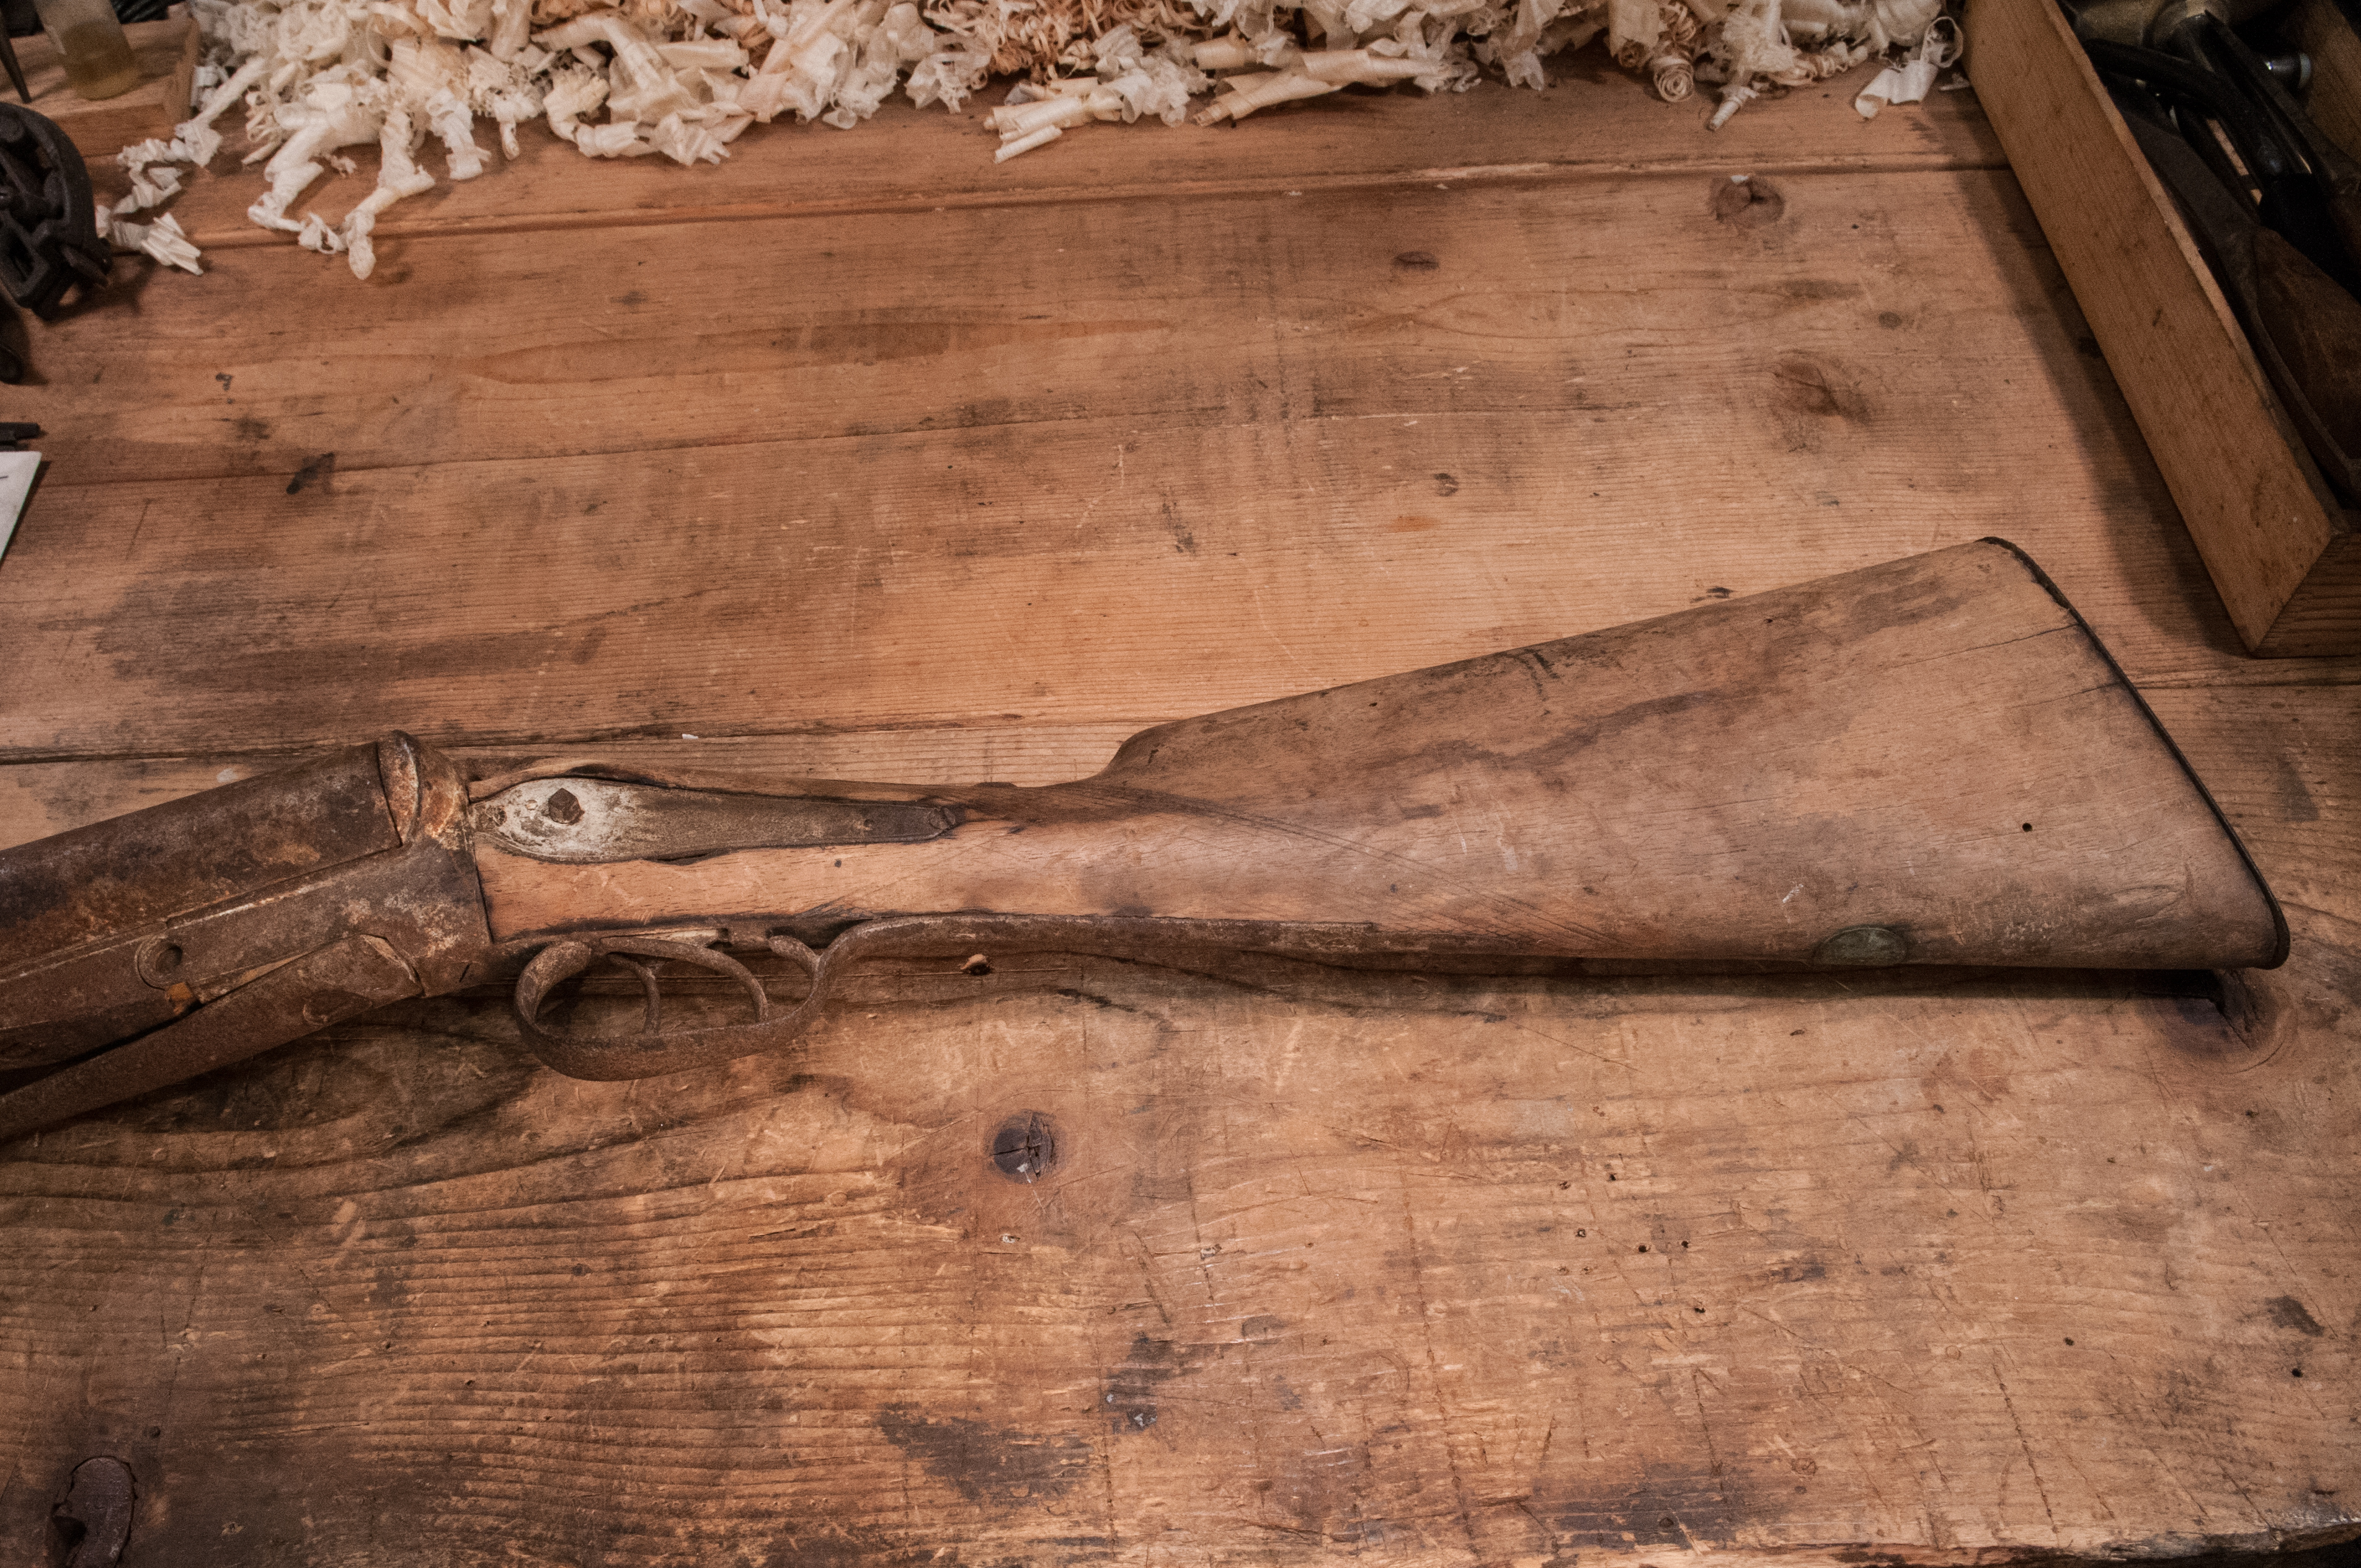
Coleman 10 Gauge Shotgun Before Restoration


This old Coleman 10 gauge shotgun has been in my family for over 100 years, originally belonging to my great-grandfather. When I was growing up, I remember seeing it in the “meat house” on my grandmother’s farm. The meat house was really nothing more than a shed, a precarious structure that had a dirt floor and a pretty serious lean to one side. Even then, the gun was little more than rust and bleached wood.  In the late 1970s, out of safety concerns, the meat house was emptied and demolished (actually, a couple of us just gave it a good push and it collapsed). The shotgun was one of the many items removed and it found a new home in my parent’s attic. There it stayed for another 30 years until my mom finally sold her house and moved into a senior home. The gun was passed around a little over the last 8 years until finally finding its way back to me earlier this year.

10-Gauge-3-quarter-right

Coleman Side View

I wasn’t able to find out anything about the Coleman brand, and assume it was one of the many mail order or hardware store branded guns available back around the turn of the 20th century. Many of these were inexpensive imports, usually from Belgium. As you can see in the photos, the gun was in pretty bad shape, with decades of exposure and rust damage. It was also missing both hammers. I’m not a gunsmith, but it was clear that this gun would never shoot again. Still, being a family piece I figured it might be restorable as a wall hanger. With little to lose, I dove in.

20140428_172515

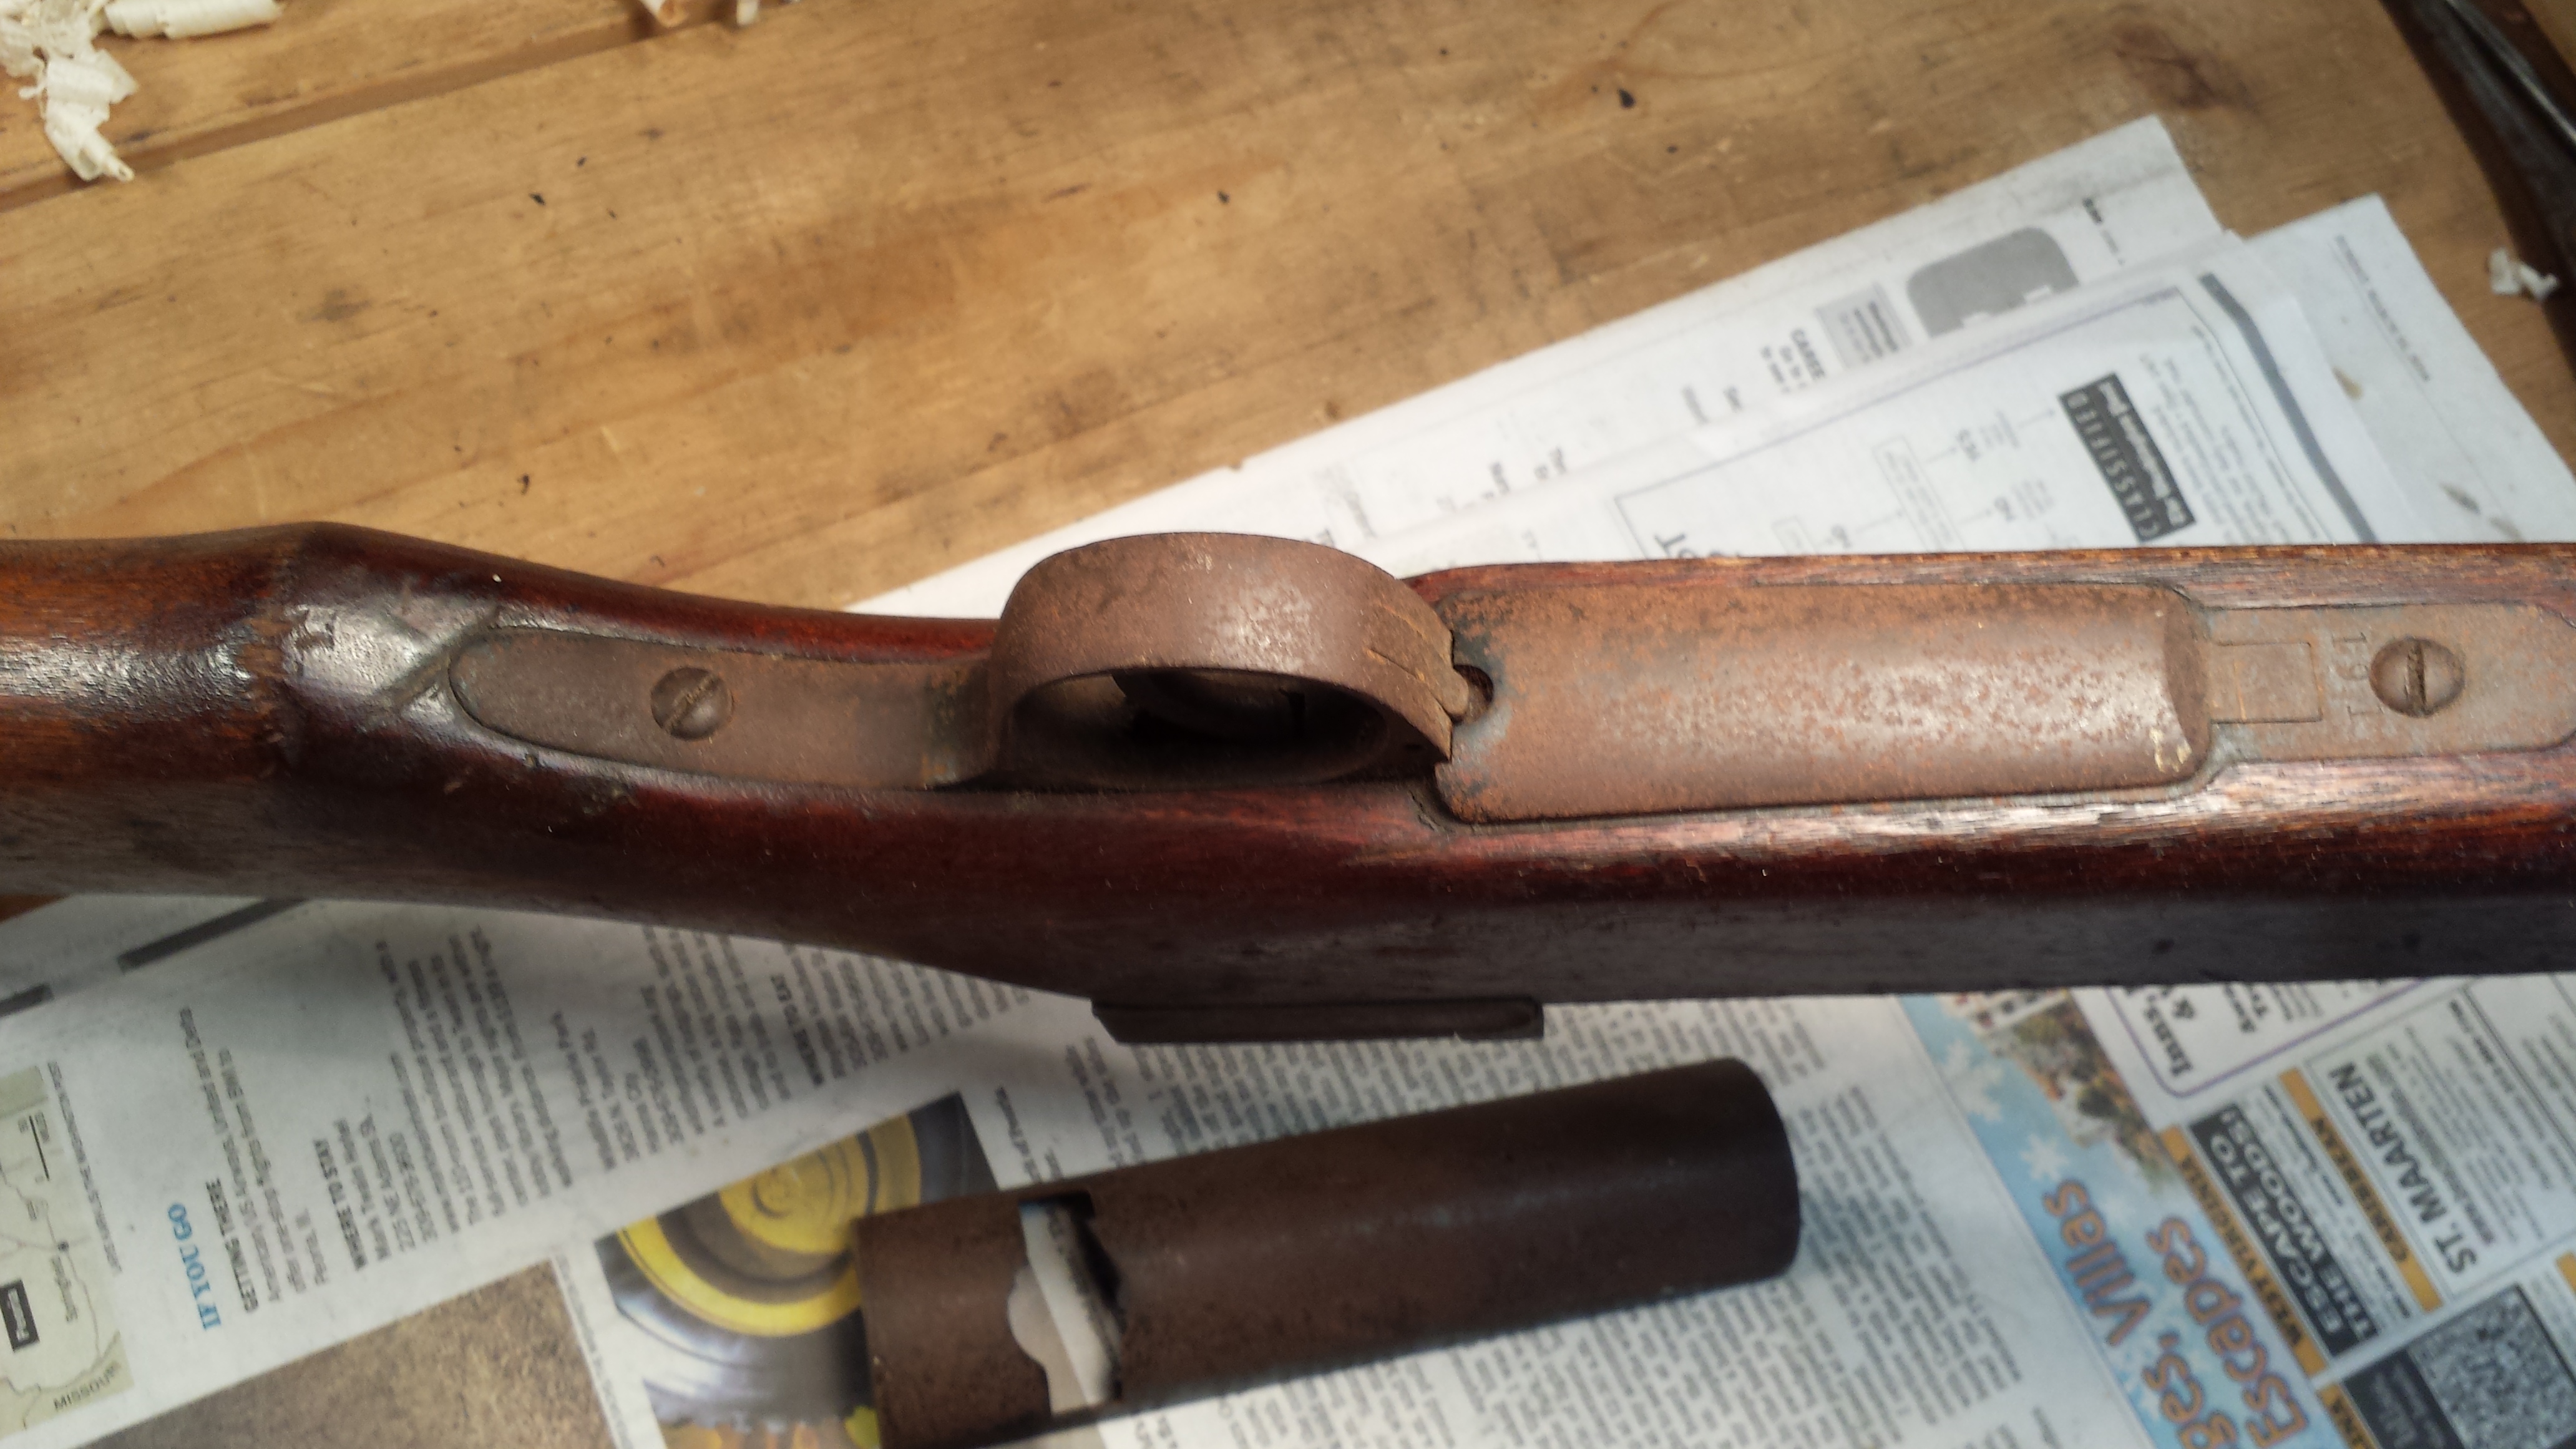
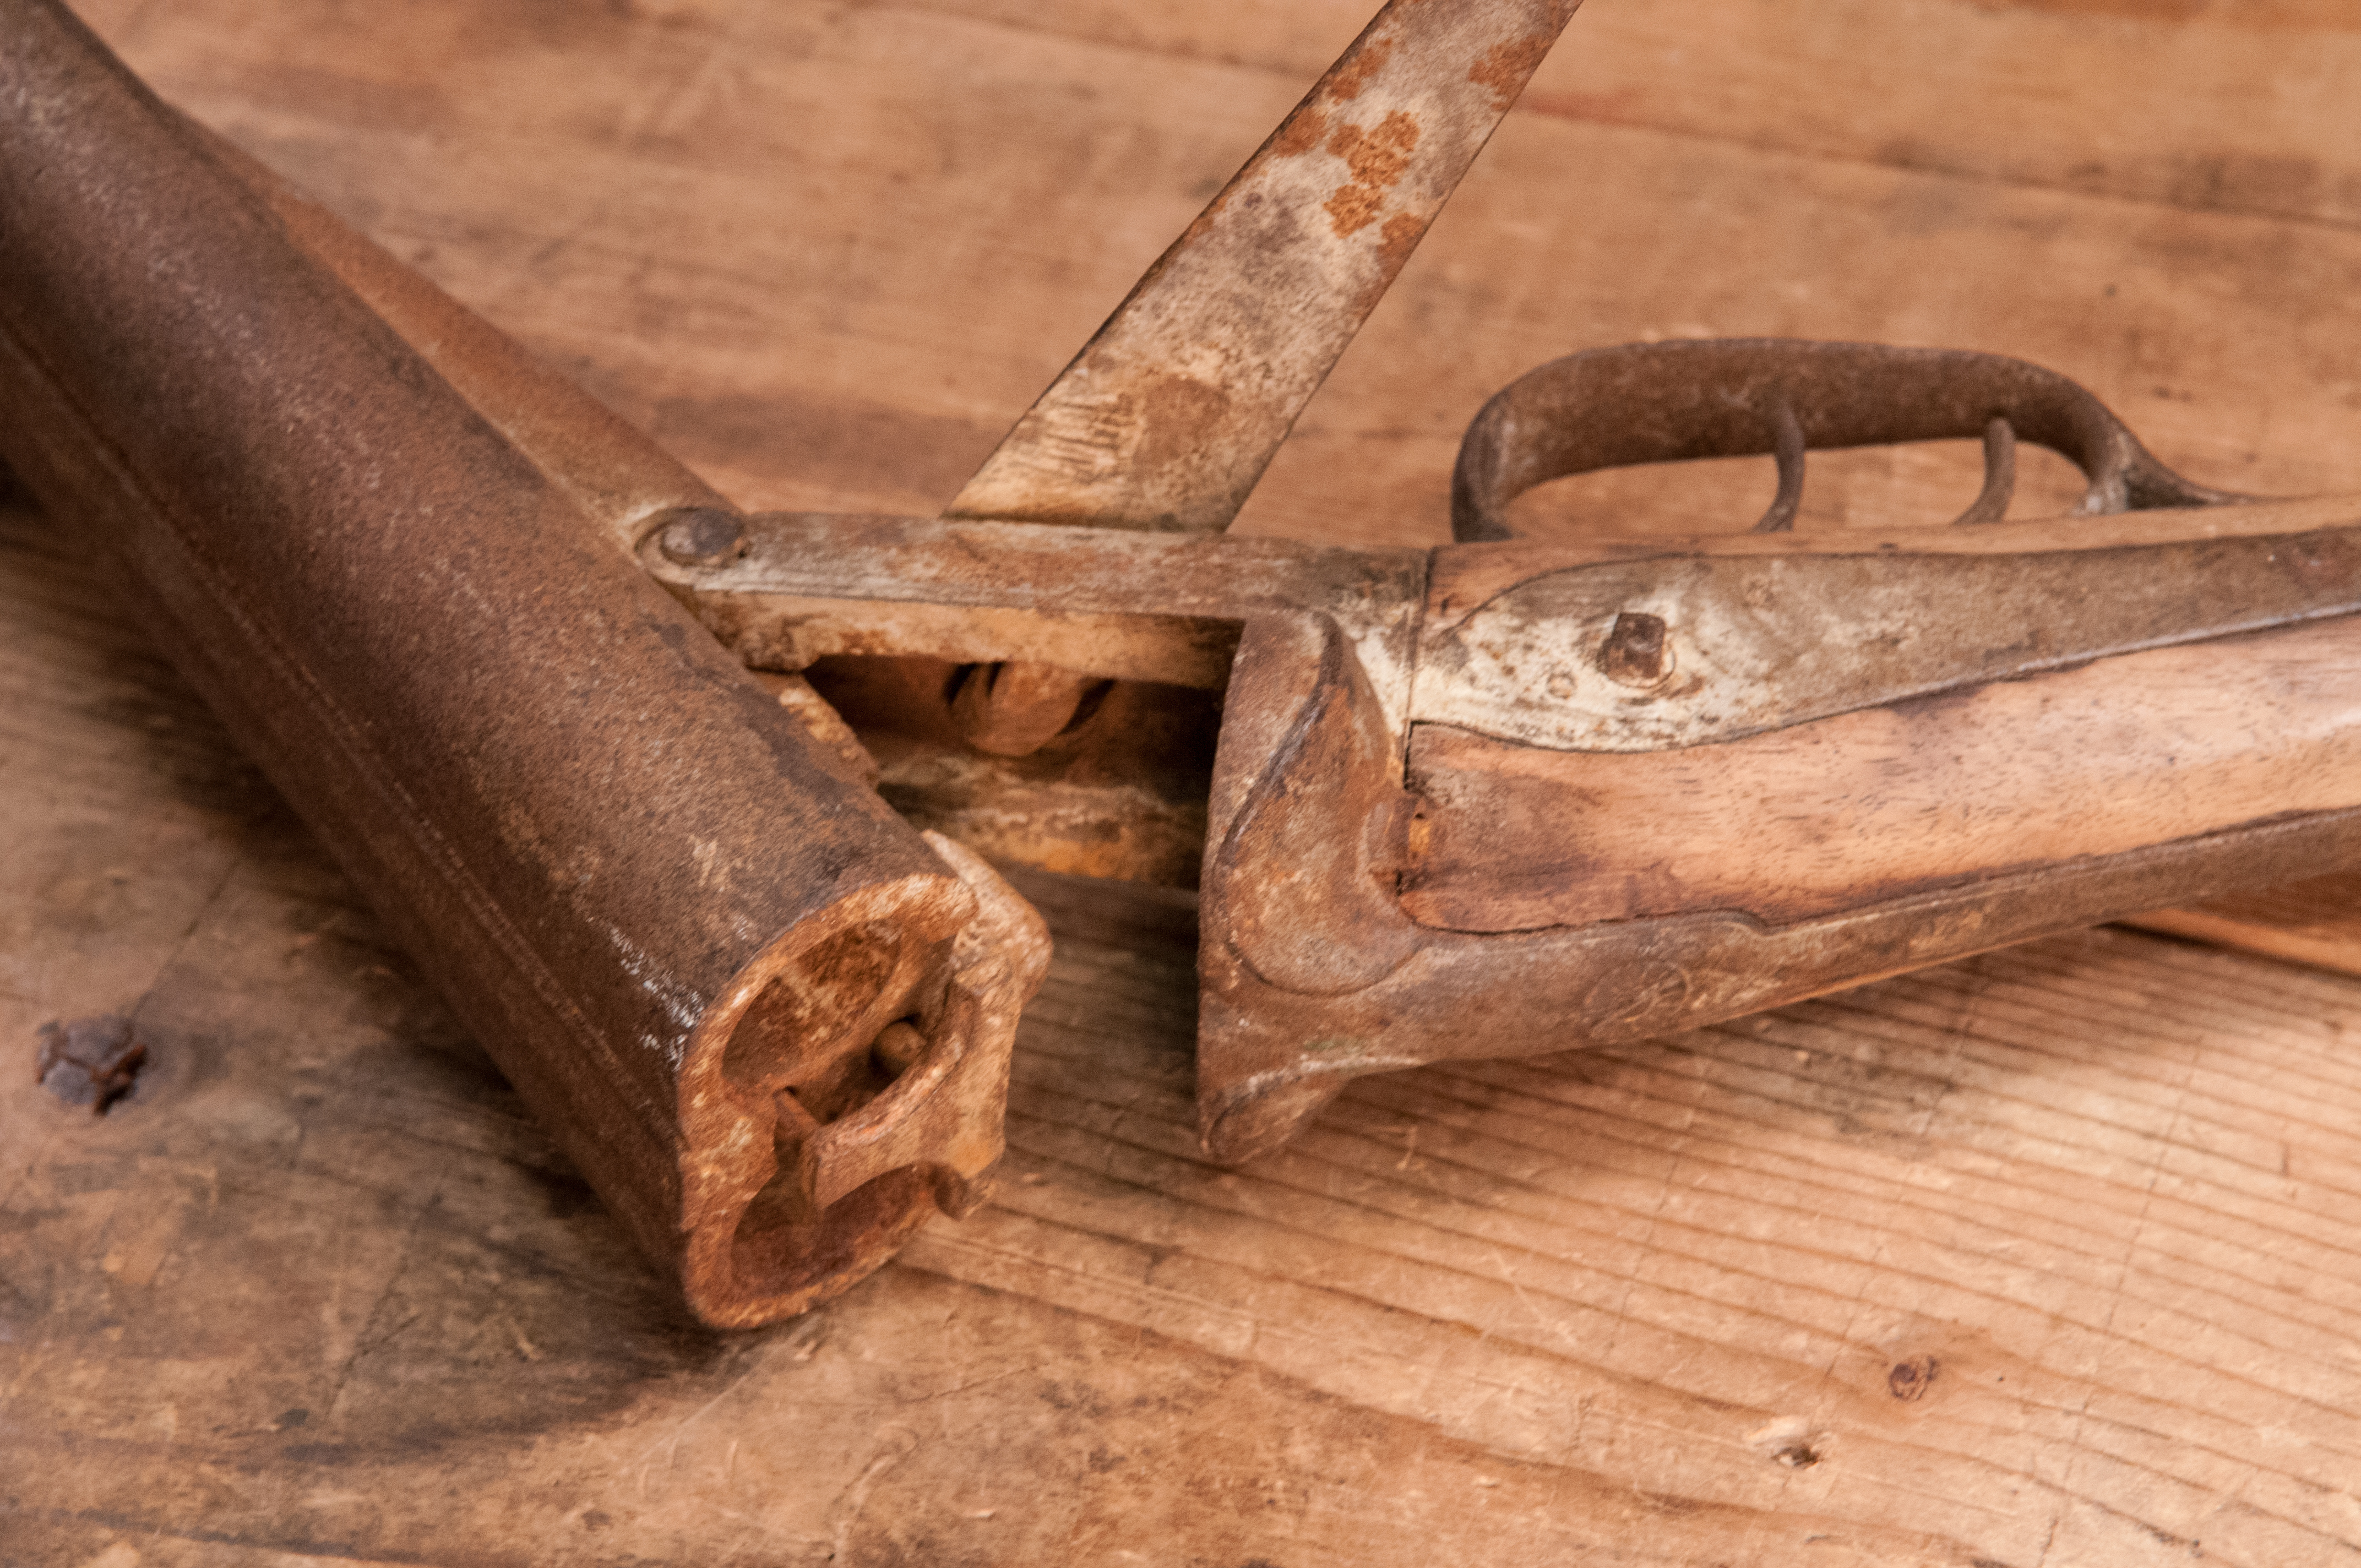
Extremely Worn Lever Mechanism

The first order of business was disassembly. This proved more difficult than I had hoped. I was able to remove the side panels but a couple of key screws were completely frozen, making the rest of the action inaccessible. Believe me, I tried every trick in the book. There was just too much rust and some parts were simply fused together. Someone long ago tried to take the lever lock assembly apart to fix it and really buggered the whole thing up, even bending the lever. The wear on the lever’s locking mechanism was severe, and the lever is so loose it just flops around.

10-Gauge-muzzle

The Business End with Small Dent on the Left Edge

Cleaning up the barrels was relatively straightforward. I removed the rust using a soft steel wheel brush on a large powered grinder, finishing up with more brushing by hand. You see in the photo below the pitting from years of rust and neglect. I applied a little cold blue to darken the metal to approximate a pretty nice looking aged patina. Although the photo flattens it out, there’s actually a pretty nice luster to the metal. There was one small dent at the very end of one barrel that was easy to hammer out using a wooden dowel and a nylon hammer. I ran a brush and then a rag through both barrels to clean out the loose rust.

barrel post rest

The Barrels After Restoration – You Can See the Pitting from Years of Rust


Since I couldn’t separate the stock from the receiver thanks to one extraordinarily frozen bolt, I just had to do the best I could with it all in one piece. I managed to remove the action on both sides, despite one screw with a broken head. The actions were in surprisingly good condition compared to the rest of the gun. I cleaned up the rest of the receiver and trigger guard as much as possible. The damage to the metal was fairly severe so there were limits as to just how much I could do.

10-Gauge-stock-&-receiver-left

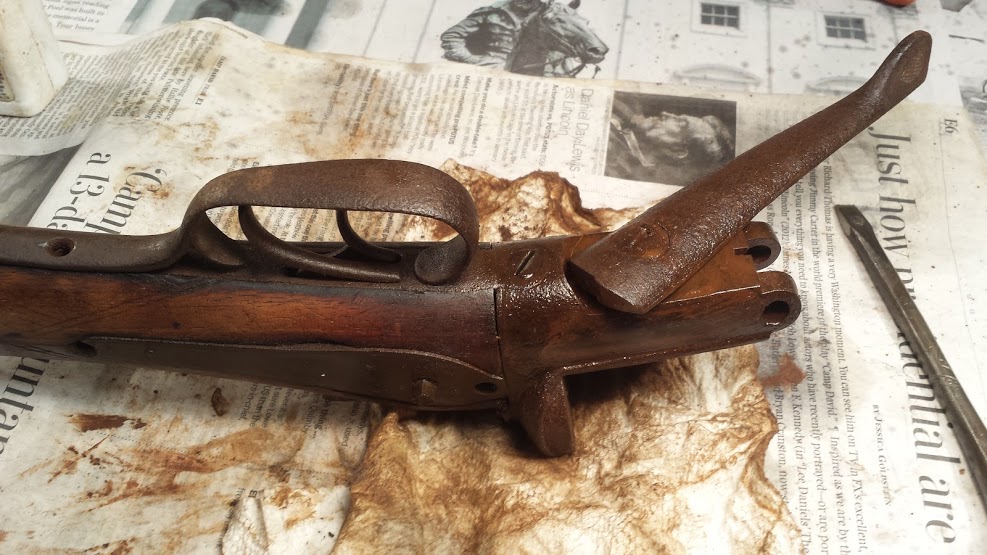
The Stock and Action Before Restoration

The stock had just a few trace spots of the original finish, and suffered from prior water and insect damage as well as some chipping around the receiver. I gave it a good scrubbing with mineral spirits and then applied several coats of Watco oil finish. I used a combination of both walnut and mahogany tints to get the color I wanted. The reddish mahogany adds a little warmth that I like.

With the action cleaned and oiled, I reassembled everything, made a screw to replace the one that was broken. And when I say make, I mean I took a screw of comparable size, shaped and finished it to match the original as close as possible.

10-Gauge-stock-&-receiver-right Post 1

The Stock and Action After Restoration, Awaiting Hammers


Since the gun was missing both its hammers, I had to source replacements. This would have been a more critical endeavor if this were a shootable gun, but being a wall hanger, I only needed hammers for cosmetic reasons. I searched for vintage hammers, but finding a matched pair that were the right size was difficult and I didn’t want to spend a lot. I ended up ordering a new pair from Dixie Gunworks. Being new castings, they required a considerable amount of work filing, drilling, sanding and polishing. Given the condition of the rest of the gun, I didn’t go overboard making them look perfect. I debated whether or not to blue them and in the end went ahead. I like the contrast with the rest of the receiver. Attachment to the gun appeared to be friction fit. I have no idea if this was how the originals were attached, but the posts (or whatever you call them) were solid. So friction fit them I did. I filed them for a tight fit and pounded them on using a wooden dowel to protect the finish.

All in all, considering the condition when I started, I think it turned out pretty well. It’s still a rough looking piece, but it looks a darn sight better than when I started, and at least now is presentable enough to hang somewhere.

10 Gauge Complete DSC_1562

***

Professional Services Now Offered by Virginia Toolworks!

VA Toolworks Condensed Logo - LetterheadI am pleased to announce that Virginia Toolworks is now offering professional restoration, identification, and valuation services at very competitive prices!  While the primary focus is, and has always been, on vintage hand tools, I also offer restoration of faded and damaged photographs, as well as cosmetic restoration of firearms.

Restoration

Tools – Adhering to the archival principles of restoration that have always been the foundation of Virginia Toolworks, we now offer archival cleaning and rust removal, and tuning and sharpening (if desired), with starting prices as low as $25.  For more information please see the Services Page.

Photographs – With 35 years of experience as a photography enthusiast, including considerable darkroom exposure (see what I did there?) before transitioning exclusively to digital approximately 16 years ago, I offer digital restoration of old damaged and faded photographs with prices starting at $50.  Examples of my work can be viewed on the Photo Restoration page.

Firearms – As most followers of this blog have seen, I occasionally do restoration work on firearms.  This work is primarily cosmetic – I am not a gunsmith. I offer cleaning of the action, restoration of wood, and light (cold blue) refresh of metal surfaces.  I can also help with missing parts.  However, to verify or ensure safe functionality before firing, you should see a qualified gunsmith for a safety inspection.

Identification

Virginia Toolworks now provides simple assistance identifying tools for a nominal charge of $10 per tool.  For more information please see the Identification Page

Valuations (Appraisals) & Research

Virginia Toolworks now provides written valuations (retail value) and historical research at a rate of $50 per hour with a one hour minimum.  For more information on Valuations, please see the Valuations/Appraisals page.

For more detailed information on these and other services provided by Virginia Toolworks, please see the Services Offered page.

***


Off Topic – Kestrel Holster Review

DSC_1207

Kestrel IWB Belt Clip Holster

I’ve been looking all summer for an easy on and off IWB holster for my 1911. My criteria was pretty simple – a kydex holster with a 1-1/2″ belt clip, full body shield, and adjustable retention (most of the holsters I found used non-adjustable rivets). I looked at Blade Tech and some others, but their prices were much higher than I wanted to spend for a plain kydex holster. After considerable research and due diligence, I found a seller on eBay who offered what I was looking for – Kestrel Holsters. Kestrel also has a website at kestrelholsters.com with the full selection of colors and models, including both IWB and OWB.  If you don’t see your gun listed, contact them for availability.

Kestrel sells two flavors of IWB holsters, both for $30, shipping included. One has the standard thumb belt clip at a 10 degree cant, the other comes with a tuckable strut belt clip. They offer a variety of colors, and I went with the Olive Drab and thumb clip. Kestrel appears to make their holsters to order, but the lead time was less than 2 weeks. I received an email with the tracking number when it shipped, a nice touch. The holster showed up a couple of days later. 

DSC_1208

Replaced holster with safety on

I was immediately impressed with the workmanship of the holster, but soon realized the mold was made with the safety in the off position instead of on. In my experience, 1911s are designed to be carried with the hammer cocked with the safety on. There was no provision on the order form one way or the other, and it never occurred to me to ask or specify. I contacted Sean at Kestrel with the problem, and he responded within an hour with instructions to return the holster in exchange for a new one. He also paid my return shipping. The shipping was refunded immediately, I returned the first holster, and the replacement arrived 4 days later. 

The solution is always more memorable than the problem. Score one for service excellence!

DSC_1209

Super slim profile for minimal bulge

Had I ordered one of these holsters for a specific manufacturer and model, I would have expected it to be a perfect fit right out of the package. But ordering a holster for a 1911 in the generic sense necessitates a little flexibility in the expectations. I expected to have to do a little fine tuning for my specific gun, so was neither surprised nor disappointed when the holster didn’t “fit like a glove.” For one thing, the front slide serrations and sharp edges on my Colt are problematic with every holster I’ve tried. So, I did a little filing and smoothing here and there, and after 15 minutes or so, my gun was in and out without a dusting of olive drab shavings coming with it. Retention is extremely good – the gun is held very securely yet draws without hanging. Because it provides such a thin profile, it’s also surprisingly comfortable! I can easily wear this all day.

Overall, I am very impressed with this holster and even more so with the service I received from this small company. For $30, you’re not going to find a better kydex solution. Is it a perfect fit for my particular 1911? No, but it’s close enough. Would a $75 dollar holster from Blade Tech fit better?  Perhaps, I don’t know.  The 1911 platform has so many different variations, a one-size-fits-all holster is going to come with some small compromises. I honestly don’t think this would even be a thought with most other handguns. Nevertheless, at $30 each I will have no hesitation ordering more holsters from Kestrel for a couple of my other pistols. Sean confirmed they have holsters for more models coming.

To sum it up, if you’re looking for a simple kydex IWB belt clip holster, give Kestrel a close look. It might just be the best $30 holster you’ll ever buy!

DSC_1211

Shown with t-shirt tucked in. Easily conceals with shirt out.


Thoughts on the Art of Restoration

10-Gauge-stock-&-receiver-right-Comp-1

There are definitely artistic elements to restoration, and while mostly technical, I would argue that compositional elements also come into play in an unconventional sense. It’s very much like creating something with found objects. I approach restoration projects with the objective of finding the fine, although often fuzzy, line between age and damage, removing the latter while keeping the former. Instead of graphite, ink, or paint, the media used here were a variety of abrasives, lubricants, and chemicals that effect specific desired changes in metal and wood.

***

Japanese Arisaka Restoration

The recent successful completion of the Lee-Enfield restoration has me inspired to work on a couple of other neglected firearms that have been in the family for decades.

My dad was in the navy in WWII and brought home a Japanese Arisaka rifle from the Philippines.  He never talked much about the war, and all he had to say about the rifle was that there was a pile of them that were free for the taking.  So, he brought one home.  Fortunately, he never tried to shoot it; more on that in a moment.

1930s-40s Japanese Arisaka before restoration (bolt removed)

1930s-40s Japanese Arisaka before restoration (bolt removed)

The rifle was stored in our attic from the time the house was built in the late 1950s until 1983, when my mother moved closer to town.  It went straight into that attic until 2006, when she moved into a retirement facility.  Unbeknownst to my brother and me, she gave it to a family friend.  Since each of us thought the other had it, the rifle never came up in conversation until last summer, when I happened to ask about it.  Long story short, the family friend graciously returned it to us, along with a side by side shotgun that is in horrendous condition.

I don’t know the rifle’s condition when my dad picked it up in the Philippines, but having spent 70 years in attics since, the Arisaka accumulated a lot of dust and rust.  The wood was in fair condition, but very dry; all the metal surfaces were rusty and most of the original bluing was gone.

Detail of the receiver and rear sight

Detail of the receiver and rear sight

After doing some research, I’m 90% sure this particular Arisaka was strictly a training rifle, and was never shootable. It appears to be some sort of type 38/type 99 hybrid with a mixture of parts from both designs. The biggest giveaways are lack of a serial number and proper hallmarks, and the fact that the barrel isn’t rifled. It is interesting, however, that it does seem to have all the correct mechanical parts of a fully functional rifle, including the firing pin, magazine spring, and the action dust cover, which is normally missing from all Arisakas. That one part, seen in the photo below, is probably worth as much as the rest of the rifle.

Detail of the bottom, trigger guard and magazine floor plate

Detail of the bottom, trigger guard and magazine floor plate

These training rifles are not uncommon, but they were not constructed to handle live ammo and are likely to explode if shot. The receivers were made of cast iron and intended for either wooden rounds or low power blanks.  Because they are virtually indistinguishable from the real rifles, a lot of GIs who brought them home after the war tried to shoot them. The consequence of doing this was not pretty.  This earned the later Arisakas a reputation for being poorly made and these are sometimes (incorrectly) referred to as Last Ditch guns.

Since I didn’t have to worry about shooting it or compromising its value (it’s a $50-$100 gun at best), the restoration focused primarily on the cosmetic, with mechanical function a secondary concern.  Fortunately, none of the screws were seized and the rifle disassembled quickly.  Compared to the Enfield, taking this one apart was a breeze.  The rust turned out to be mainly superficial, and came off pretty easily with some CLP and light brushing.  The receiver and barrel required a little more aggressive scrubbing with the CLP and steel wool, but cleaned up very nicely.

Arisaka-Comp-5Once cleaned and degreased, I used a cold blue oxidizing agent to darken the metal areas that were overly brightened by the cleaning.  This toned it down to a perfect match to the overall patina of this 70-year-old firearm.  With a little light surface toning, the result was a rich and lustrous dark blue/gray finish that accurately reflects the age and matches the remaining patina.

Arisaka receiver before & after restoration

Arisaka receiver before & after restoration

The stock, as I said, was overall pretty good, but the wood was very dry and splintery, and there were a lot of scratches and dings from laying bare in attics, etc.  A few applications of Kramer’s Best had it looking much better, but I still wasn’t satisfied with the result.  After looking at it and thinking about it for a few days, I decided to give it a light application of Watco Danish Oil, which is thin and penetrates well, and is great stuff overall.  Unlike many finishes, it builds up very slowly with a low sheen, and plays nice with other existing finishes in my experience.  I used a mahogany tint that matched the original finish on the rifle, and gave it just a single application.  The result was a remarkable improvement.  Scratches faded, tone evened out, and the overall surface just felt better in the hand.

Reassembled, the rifle looks great.  Since it’s not shootable, it will never be anything other than a wall hanger, but that’s okay.  It’s a piece of history and a link to my dad.

Arisaka after restoration

Arisaka after restoration

The Complete Lee Enfield No. 1 MKIII Restoration

Lee-Enfield SMLE No. 1 MKIII

Lee-Enfield SMLE No. 1 MKIII

For those of you who have followed along, I finally finished up the Lee-Enfield this past weekend, and I’m pretty pleased with the results. To recap, this rifle was given to me by my father-in-law back in early January. It’s a Lee-Enfield SMLE (Short Magazine Lee-Enfield) model No. 1 MKIII (.303 British caliber) produced at the Birmingham Small Arms Co. in England in 1940. Lee-Enfields were manufactured from 1888 to the early 1970s, and total production was nearly 14 million rifles. This one appeals to me because it was made in England during the Battle of Britain, and shows evidence of actual deployment in combat.

The WWII No. 1 MKIII rifles are plentiful even today, and not particularly valuable. I probably exceeded the value of this one in the parts alone that I purchased, but I didn’t restore it to sell. It’s a keeper and a shooter that will be enjoyed and passed down.  As it happens, the first high-powered rifle I ever shot as a kid was an old WWI vintage Enfield that belonged to my uncle.  I remember that .303 kicked like a 12 gauge.  I may even still have that first casing somewhere in a box of my childhood stuff.

The Enfield before restoration with new forestock and hand guard above

The Enfield before restoration with new forestock and hand guard shown above

As I wrote in earlier posts, the rifle had been ‘sporterized’ at some point, or at least someone started that process. Unfortunately, this was a popular practice in the post war years. The guns were plentiful and cheap, and guys who bought them apparently preferred the look of a traditional hunting rifle. Since the Enfield featured a barrel fully shrouded in wood, sporterizing them usually began with removing the nosecap and hardware, the upper hand guard, and cutting off the front part of the forestock.  Sometimes the rear sights were removed or altered to accept a scope, but fortunately the bubba who hacked away at this rifle didn’t get that far.

The forestock had been cut and the upper hand guard removed

The forestock had been cut, the hand guard missing

The forearm on this rifle had been cut just behind the swivel band. The entire nosecap assembly at the front was missing, along with the swivel band, forward swivels and a variety of related hardware, and the upper hand guard. The rear hand guard was still there, but its ears had been cut off and so it needed to be replaced. It appeared all of the remaining wood on the rifle was scrubbed with a heavy wire brush, leaving the surface pretty rough and scarred with brush marks. All of the original finish was long gone.

After the initial disassembly and inspection, I was happy to find the action and barrel in surprisingly good condition. Areas of rust were minimal and superficial. All the serial numbers thankfully matched, so I knew everything was likely original. The action and barrel had significant areas of olive drab paint, which I discovered was routinely applied to rifles used in tropical climates during WWII to help prevent rust. I was careful to leave that intact.

Enfield Serial

Receiver with bolt removed – original forestock still on the rifle (note the olive drab paint)

I was able to identify and source all the missing parts without too much trouble. Since there was such a long bedding space on the Enfield’s full length forestock, I decided to go with an unissued but old forestock and hand guard assembly. With so much hand fitting required, I didn’t want to take a chance on a stock that had already been on another rifle. I may have been misguided in this assumption, but that’s what I did. I left the original buttstock on the rifle since there was no need to replace it other than the aesthetic contrast between it and the new wood. I preferred to keep the rifle as close to original as possible.

Enfield New Stock Fit 1

Fitting the new forestock to the receiver – completed

The new wood required quite a bit of fine tuning and adjustment to get it to fit the receiver and barrel correctly. There are several fairly critical areas on Enfield rifles where the wood needs to fit very flush against the metal, so the work was slow and cautious. With so many parts all needing to come together and a half-dozen attachment points that all had to be aligned, I spent more than a few hours wondering why I ever started this project. But in the end, it all finally came together and I feel really good about the fit. It seems to fit like a glove where it’s supposed to, with the appropriate generosity in the other areas where called for.

The hand guard sat too high for the nosecap to slide on

The hand guard sat too high for the nosecap to slide on

Of everything on the rifle, the nosecap I sourced ended up being the most difficult part to get properly installed. Initially the upper hand guard sat too high for the nosecap to slip over it properly. That required carefully reducing the height of the guard along its full length, but not so much that the top of the barrel would bottom out preventing it from seating against the forearm. Once that problem was resolved, I then found that the screw holes through the forearm were just lightly out of alignment, preventing the front nosecap screw from engaging the threads on the opposite side of the nosecap. Eventually, with a lot of patience and careful filing, everything fell into place and the wood was ready for the finish.

While not the most practical by today’s standards, I wanted to keep this rifle as true to original form as possible, and so went with the tried and true linseed oil finish. This is what was used when the rifle was made. Since boiled linseed oil is chemically different, I used raw linseed oil. Or at least I assume it’s raw. I had a can of artist’s grade linseed oil that I bought when I was in college 30 some years ago and never opened. I cut it with 50% turpentine to help ensure it would dry sometime this decade. Following the old adage, once a day for a week, once a week for a month, I’ve applied about 8 ‘coats’ and the results look great. The wood has a nice rich low luster and even the contrast between the new wood and the old stock doesn’t jump out too much.

Enfield Complete 4

Rear Sight with new upper guard in place


I completed the restoration with an original WWII vintage Enfield sling, also dated 1940, that I found on eBay. That and the war vintage bayonet I previously wrote about are the icing on the cake. Not that I need a bayonet, but it’s in unissued condition and the price was too good to pass up. I’m looking forward to putting a couple dozen rounds down range sometime in the next few weeks.

Lee-Enfield SMLE No. 1 MKIII

Lee-Enfield SMLE No. 1 MKIII

***

Restoring a WWII Vintage Lee-Enfield Rifle – Part 3 (Bayonet)

I bought this WWII vintage Enfield Bayonet to go with the rifle, because… well… who doesn’t want a bayonet?  This one is date stamped 1943, so it was made three years after the rifle, but it’s period correct and close enough.  Besides, it was never used and still caked in 70 year old cosmoline.  As you can see below, while the bayonet was in pristine condition, the scabbard looked pretty rough.

Enfield Bayonet, c. 1943

Enfield Bayonet, c. 1943 ~ Before cleaning

As I’m prone to do, I researched how best to clean leather scabbards, and of course came up with a whole lot of opinions that varied considerably.  In the end, I decided to use saddle soap.  The scabbard is 70 years old and will never again see a hard life, so I don’t think saddle soap is going to do it much harm.

Starting with the bayonet itself, I used mineral spirits with a cotton rag and toothbrush to clean the cosmoline off the metal surfaces.  Using a non-abrasive brush ensured I didn’t scratch the bluing, which is absolutely perfect.  The cosmoline melted right away and I was quickly rewarded with a stunning mint condition WWII vintage bayonet.  If the wooden scales ever had any finish on them, it was long gone, so after everything was dry and wiped clean, I rubbed them down with some of the linseed oil finish I’ve been using on the stock.  The rest of the metal surfaces got a wipe with Kramer’s Best, which is a linseed oil, turpentine, and vinegar based solution that is an outstanding wood and metal conditioner.

After cleaning and conditioning

After cleaning and conditioning

The scabbard required some additional care since most of it is comprised of hard leather.  I cleaned the metal surfaces first, removing the cosmoline and leaving the natural patina of the metal.  Then I went to work on the leather surface itself using the saddle soap.  It was a very slow process with little apparent progress at first.  After a half dozen or so cycles of applying it, wiping it off, buffing it out, I felt like I had reached a point of diminishing returns.  At this point the leather was sufficiently clean, but very dull in appearance.  So I went out on a limb and rubbed it down with shoe crème (not shoe polish).  The shoe crème has always been recommended to me by the place that sells Allen Edmonds.  It’s basically a leather conditioner with some black dye.  It has no wax so it lends itself well to subsequent treatment.  I also doesn’t shine like wax, which is perfect in this case.

The result, which you can see in the image above as well as below, is pretty remarkable.  It’s hard to see in the photos, but the leather looks like it’s brand new.  Yours truly is a happy camper, and I’m looking forward to seeing my boys’ reaction to the transformation.

I’m cycling through the daily application of oil on the rest of the rifle’s furniture, and in fact think today is probably the last one.  I may just go ahead and reassemble the whole thing tomorrow and make sure everything fits properly.  I only wish I’d done a better job of labeling all those parts on my work table.

Bayonet and Scabbard completed

Bayonet and Scabbard completed

***

Restoring a WWII Vintage Lee-Enfield Rifle – Part 2

It’s been a couple of months since I first wrote about restoring the old 1940 vintage Lee Enfield no. 1 MKIII rifle.  (See the earlier post)  I managed to source all of the missing parts, including a new forearm and hand guard set.  I found an unused set of unknown date, but I figured I’d be better off fitting a new stock than buying an old one and hoping it would fit properly.  Enfields, especially the no. 1, are notoriously finicky when it comes to proper stock fit.

Relacement Wood

The Enfield with original furniture in place, just before disassembly

In the photo above, you can see the rifle in its original, butchered forearm.  The lower forearm was cut off and the hand guard discarded, along with the entire nose cap assembly.  The new replacement stock, forearm, and hardware are shown above the rifle.  The new wood appears darker in the photo, but once I work on the buttstock a little and the oil finish is applied, I think it will look okay.

After removing the entire lower forearm, I found that the action in excellent condition.  There was a couple of traces of light rust, but nothing of any consequence and no corrosion damage.  I tried to remove the buttstock, but the screw that attaches it is deep inside the stock itself, and requires a very long screwdriver. Unfortunately, the screw is locked up pretty tight, and rather than risk buggering up the slot, I decided to just leave it on and refinish the stock in place.

The first order of business was fitting the new stock. It wouldn’t seat at all on the first try and required some fine tuning to get it to slide over the receiver.  Going slow, I had it properly adjusted and fitting like a glove in short order.  Moving on to the upper hand guard, I had to take a little off the inside of the ears to get it to slide easily into place around the rear sight.  This is not supposed to be a tight fit, and I may have to take a little more off after it’s finished.

Enfield New Stock Fit

The new stock slides right into place after fitting

With everything looking good, I put both forearm and hand guard in place and slipped on the nose cap for a dry fit assessment.  As you can see in the photo below, the upper hand guard sits too high for the nose cap to slide on properly. Using some folded paper, I was able to determine that I had about 0.5mm of surplus height within the hand guard to work with.  By sanding the bottom edge of the hand guard on my trusty flat granite sharpening surface, I reduced the height enough to let that nose cap slide into place.   Everything looks good at this point, so onto cleaning the action and applying the finish.

The hand guard sits too high for the nose cap to slide on all the way

The hand guard sits too high for the nose cap to slide on all the way

All of the wood on this rifle was stripped at some point in its past and scrubbed with a heavy wire brush, leaving a lot of marks in the wood.  I lightly sanded the worst of these marks, but didn’t want to lose all the character of the wood, so I really did just enough to open the grain a little for the new finish.  At this point, I went ahead and cleaned the action and barrel thoroughly.  There was some crud, but not as much as one might expect from a gun this old.  Thankfully, I think the gun was cleaned after it was last shot, so it didn’t take a whole lot of effort to get it looking good.

Action cleaned up.  I'll lightly clean and oil it again before final assembly to remove any dust or grit that accumulated during finishing

Action cleaned up. I’ll lightly clean and oil it again before final assembly to remove any grit that accumulated during finishing

I decided a while back to use the original type of oil finish that was applied when this gun was made (or as close as I could reasonable come).  In WWII and earlier, most military gun stocks were finished with linseed oil, or something close to that.  Although not very effective against the elements, it is very easy to maintain. Rather than use Boiled Linseed Oil common today, which is modified with petroleum distillates to speed drying, I’m using artist grade linseed oil, which I assume is basically raw oil.  I happened to have an unopened can that is about 35 years old and it doesn’t specify.

Starting with a 50/50 ratio of oil to turpentine (to help it dry), I began applying coats with 4-0 steel wool.  I really hate steel wool.  It just makes a mess with steel wool fibers everywhere.  I abandoned the wool after the first application and just rubbed it on by hand after that.  Using the old adage, once a day for a week, once a week for a month, and once a month for a year, I’m on day three and the wood looks fantastic.  I don’t think I’m going to go for the full seven applications.  This morning I upped the ratio of oil to turpentine to about 70/30.  If it doesn’t dry within 24 hours or so, I might add a little japan dryer to the next batch.

The stock and hand guard with 3 coats of oil applied

The stock and hand guard with 3 coats of oil applied

The next update will cover cleaning up the 1940s vintage bayonet I found for this gun!

***

Something Different – Restoring a WWII Vintage Lee-Enfield Rifle

I’m starting a new restoration project this week, and a first for Virginia Toolworks – a firearm. This Lee-Enfield No. 1 MK III rifle chambered in .303 British was made in England in 1940, right smack in the middle of the Battle of Britain!  It quite literally was a rifle that helped save Great Britain from the Nazi onslaught, and then saw service throughout the war.  Pretty cool!

Enfield Receiver

Lee-Enfield No. 1 MK III (c. 1940)

Enfield Model MarkThe Lee-Enfield bolt-action, magazine-fed, repeating rifle was the British Army’s standard rifle from its official adoption in 1895 until 1957.  This one is in excellent condition overall, complete with matching serial numbers. If you look closely at the photos, you can see the barrel was painted olive drab. This was a common practice with WWII era Enfields that were used in humid climates such as Africa and the Pacific.

The only apology is the unfortunate attempt on someone’s part to “sporterize” it by removing the upper hand guard and cutting off the lower forearm. This was a common, albeit ill-conceived practice after decommissioning to make Enfields look more like hunting rifles.  Tens of thousands, if not more, of these rifles were converted in this manner, a practice that is not unheard of even today.  In fact, there are companies now making modern style synthetic stocks for these old rifles.  Enfields are among the most beautiful military rifles of the 20th century, and given its lineage and condition, this one deserves to be properly restored.

Enfield Armory Marks

The “40” stamp indicates the barrel is original

Enfield rifles have a somewhat distinct look in that the barrel is shrouded in wood from the receiver to the end of the barrel.  Since the wood on this one has been sawed off, I will need to replace the damaged and missing pieces and source another nose cap, which is also long gone. Since millions of these guns were made, wood of the correct model shouldn’t be too hard to find.  The nose cap is the most unfortunate missing part because they were stamped with the gun’s serial number, so it will always be that one mismatched part.

I am by no means a gunsmith, but I do know my way around weapons at little. Fortunately, there is very little rust, no visible rust damage that I can find, and the action and bore appears to only need a good cleaning.  The one part in the photo above that shows rust is a retention clip for the rear hand guard.  This is an easy fix.  I’m looking forward to putting this rifle back into its original condition, or at least as close as it can get.  Now, if I can just find some ammunition for it…

Enfield Cutoff

Bubba’d cutoff (ugh!) – Olive drab paint was applied in tropical climates to inhibit rust. It will stay!