Solving Those Pesky Blade Depth Frustrations

New users of hand planes frequently have trouble figuring out just how to get the iron (blade) to fit through the mouth on the plane’s body. I get this question in both emails and I also see it reflected in the search parameters for those who visit the site. The challenge is to get everything set so the iron extends through the mouth without jamming up at the front of the opening.

Well fear not, for here is a simple illustrated guide to getting it done quickly and hopefully without frustration!

There are basically 5 things that have to be set correctly in order for shaving wood to begin:

  1. The iron must be attached to the cap iron correctly, with the cap iron attached to the flat unbeveled side of the iron. This may very well be the greatest cause of problems. The cap iron should be positioned to within about 1/32″ to 1/16″ of the cutting edge of the iron. (Figures 1 and 2)
  2. The frog must be positioned correctly, neither too far forward or too far toward the rear.  There’s room for adjustment, of course, but it’s a good idea to start with it aligned with the rear edge of the mouth. You can then move it forward to fine tune the cut as appropriate. (Figures 3 and 4)
  3. The iron and cap iron assembly (once screwed together) must be positioned absolutely flat against the face of the frog. You may have to jiggle it around a little to make sure it falls into place over the frog’s adjust yoke. (Figure 5)
  4. The Lever Cap must be set with enough pressure to hold the iron firmly, but not so tight that the depth adjustment can’t work. There’s a sweet spot there, you just have to find it through trial and error.
  5. Use the lateral adjustment to align the cutting edge so it’s parallel to the mouth opening. In some cases you may have to tap the edge of the iron a little to get into a workable position. I use a small brass hammer so as not to mushroom the edge of the iron, but it’s not critical. (Figures 6 – 8)
Figure 1 - Note the cap iron is attached to the Unbeveled side of the iron

Figure 1 – Note the cap iron is attached to the Unbeveled side of the iron

Figure 2 -

Figure 2 – View from the bottom, the attachment screw should be on the same side as the iron’s beveled edge

Figure 3 - Loosed the frog bolts (blue arrow) and position the frog so it aligns with the rear edge of the mouth (red arrow)

Figure 3 – Loosen the frog bolts (blue arrow) and position the frog so it aligns with the rear edge of the mouth (red arrow)

Blade Set 4

Figure 4 – Stanley planes made after 1907 have a frog adjustment screw, which is used to easily fine tune the position of the frog.

Blade Set 5

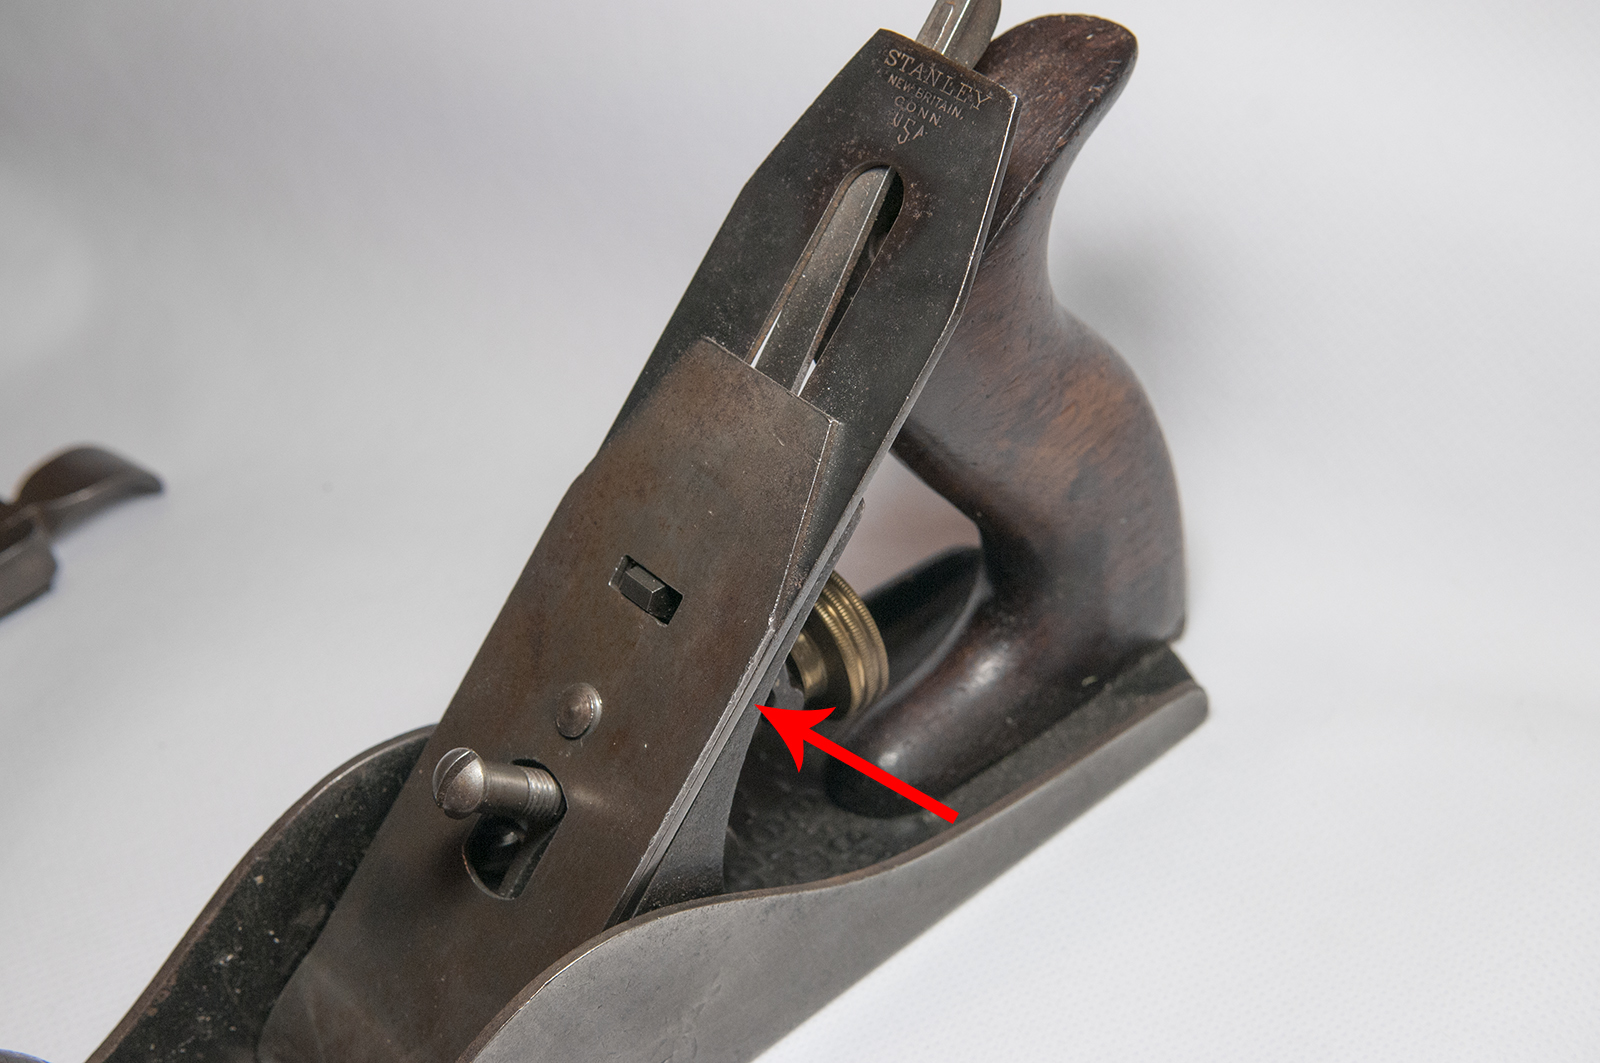
Figure 5 – Ensure the iron seats flush against the face of the frog

Figure 6 - The edge of the iron should extend over the mouth opening as shown

Figure 6 – The edge of the iron should extend over the mouth opening as shown

Figure 7 - Viewed from the bottom, the iron when retracted should look like this

Figure 7 – Viewed from the bottom, the iron when retracted should look like this

Figure 8 - As you turn the big brass adjustment knob, the iron will move forward and extend down through the mouth opening just enough to shave wood!

Figure 8 – As you turn the big brass adjustment knob, the iron will move forward and extend down through the mouth opening just enough to shave wood!

Note that if you’re doing fine finishing work you may need to go back and move the frog forward slightly to reduce the space between the front of the mouth opening and the cutting edge. This space should approximate the thickness of the shavings you expect to produce, so it’s typically very small on smoothing planes, while a little larger on jointer and fore planes.

Hopefully this provides answers to questions and solves one of the initial frustrations when using hand planes for the first time!

***


Photographing Tools for eBay

Good photos make all the difference

Good photos make all the difference

Good photos and a clear, detailed description make all the difference when you’re buying and selling on eBay. The eBay seller I bought this Stanley Bailey No. 3, Type 14 from provided the photo shown at the top. I have no idea what they were doing to have the photo come out purple, but it sure didn’t make for a very compelling presentation. Looks like some bizarre combination of lighting sources, probably a mix of flash and fluorescent, or perhaps their camera was inadvertently set to some creative “mode.” Additionally, the description was virtually non-existent.  Something like “Old Stanley plane in good condition.” Didn’t really tell me much. Not surprising, the bidding activity was low and I got it for a bargain.

After doing a light restoration on the plane, primarily just cleaning the crud off of it, I took the photo at the bottom using a 12 year old digital camera, cheap tripod, natural daylight, with the plane sitting on my kitchen table. You don’t have to be a professional photographer or have expensive equipment to get good results. You just have to make an effort and think about what you’re doing.

Photography Guidelines

While better equipment can certainly produce superior photographs in the hands of a skilled photographer, even a cell phone or tablet can provide surprisingly good results if you follow a few simple guidelines:

  1. Use Natural Light – Whenever possible, use natural light (daylight) for your light source. Avoid direct sunlight, stay in the shade or better yet, wait for an overcast day. Incandescent and fluorescent lights each produce a very different color balance, resulting in a yellowish cast or bluish cast respectively. While modern cameras usually do a fair job of compensating for this, the photos still look unnatural. If you must use artificial light, stick to either incandescent or fluorescent (don’t mix them) and try to set your camera for that corresponding light. Finally, make sure you turn off any sort of creative effects mode.
  2. Turn off the Flash – Flash photography, especially of stationary objects, is a tricky thing to get right. Flash tends to blast everything in light, flattening details and causing unnatural highlights and shadows. It’s not a good look. Find a place where there is plenty of natural ambient light as described above.
  3. Compose Your Shot – Fill the frame with your subject and think about your platform and background, everything that will be in the photo. Avoid patterned fabrics and anything that might be a distraction. Try to find a spot that is visually appealing, and ideally shows your item in its natural environment. If you’ve ever looked at my auctions, I photograph my tools right on my workbench, because ultimately that’s where they belong. (See photo below) Even then, I remove as much of the clutter as possible so the tool will be the focal point.
  4. Image Size – All modern cameras, even the cameras on phones, produce relatively high resolution images. Make sure that your photos are at least 1600 pixels on one axis (either horizontal or vertical). Square format photos make the most of eBay’s available real estate, but are not always practical for your subject. Again, make sure you fill your frame like I did in the photo below.
  5. Other Equipment – A tripod is nice, but you really only need one if you’re using manual exposure controls with a slow shutter speed (slower than 1/60 sec) , where if the camera were hand held, the photo would be fuzzy from camera shake. A tripod, however, can be advantageous if you need to photograph in low light. You can take very long exposures without camera movement causing a fuzzy photo mess.
  6. Software – This is also optional, but a good photo editor like Photoshop can make a mediocre photo really pop. With a little practice, you can learn to correct color balance and fix minor exposure problems. If nothing else, you will likely need to crop the photo that comes straight from the camera.
275 SB4C Type 10 Post 1

Stanley Bailey No. 4C, Type 10 photographed on my workbench immediately after a few test cuts.

***

Stanley Trademark Stamps

The following reference guide provides examples of Stanley’s trademark stamps from 1872 to the present. It is by no means comprehensive or complete, but this covers the main trademarks. There were often variations used on block planes and other tools. Some of the photos are pretty poor. I will try to photograph better examples as time goes by.

A.1 Trademark (1872-1874)

A.1 Trademark (1872-1874)

A.4 Trademark (1879-1885)

A.4 Trademark (1879-1885)

A.5 Trademark (1886-1890)

A.5 Trademark (1886-1890)

J Trademark (1874-1884) *Longer on Block Planes

J Trademark (1874-1884*) *~1909 on Block Planes

JJ Trademark (1890-1910) Used on Block Planes

JJ Trademark (1890-1910)
Used on Block Planes

P Trademark (1886-1890)

P Trademark (1886-1890)

Q Trademark (181-1904)

Q Trademark (1891-1904)

S Trademark (1907-1909)

S Trademark (1907-1909)

T Trademark (1909-1912)

T Trademark (1909-1912)

V ("Victory") Trademark (1912-1918)

V Trademark (1912-1918) Also called “Victory”

X Trademark (1919-1920) 1st "Sweetheart"

X Trademark (1919-1920)
1st “Sweetheart”

X Trademark (1919-1920) Block Plane Variation

X Trademark (1919-1920)
Block Plane Variation

X Trademark (1919-1920) Block Plane Variation

X Trademark (1919-1920)
Block Plane Variation

X Trademark (1919-1920) Block Plane Variation

X Trademark (1919-1920)
Block Plane Variation

Y Trademark (1920-1921) 2nd "Sweetheart"

Y Trademark (1920-1921)
2nd “Sweetheart”

Y Trademark (1920-1921) Block Plane Variation

Y Trademark (1920-1921)
Block Plane Variation

Y Trademark (1922) Canadian Variation

Y Trademark (1922)
Canadian Variation

AA Trademark (1922-1935) 3rd "Sweetheart"

AA Trademark (1922-1935)
3rd “Sweetheart”

AA Trademark (1923-35) Canadian Variation

AA Trademark (1923-35)
Canadian Variation

BB Trademark (1935-Present)

BB Trademark (1935-Present)


New Planes vs. Vintage Planes

Stanley-Bailey-5.5C-Type-14One of the first questions many people contemplating their first  plane purchase ask is “Should I buy a new plane or vintage plane?” Indeed, this was the first question I asked before my first purchase many years ago. There is no simple single right or wrong answer. It depends on a few different factors:

  • What is your budget?
  • What is the plane’s intended use?
  • Are you willing to invest a little time setting it up and tuning it for use?

Virtually any plane you buy, new or vintage, is going to need some degree tuning and sharpening. The modern hardware store planes will require virtually the same tuning process as a 100 year old Stanley or competitor. Even a brand new Lie Nielsen or Veritas (both of which I am a huge fan) will need a final honing, if nothing else. The quality of hand tools today is generally abysmal. The demand and quality for hand tools fell sharply after WWII as electrically powered tools took off and the era of self-sufficiency evolved into one where paid tradesmen were hired for jobs around the home.  It’s only in the last decade or two that niche companies like Lie Nielsen and Veritas have again produced hand planes that are of acceptable quality for fine woodworking. These, however, come at a cost.

Lie Nielsen Smoothing Plane

Lie Nielsen Smoothing Plane

If you’re a professional or serious woodworker, investing $200 to $400 in a precision plane is arguably justifiable. Both companies mentioned above manufacture extremely high quality tools. On the other hand, the planes found at local hardware stores, big box retailers, and even some specialty shops – those generally under $150 – are simply not in the same class.  Quality of materials, manufacture, fit and finish are often quite poor. And it’s important to note that these brand new sub-$150 planes will undoubtedly require at least a couple hours worth of tuning and sharpening to make them function correctly.

By contrast, the vintage planes made by companies like Stanley, Sargent, Union, and others, especially from about 1910 to 1940, were of excellent quality, and are generally superior to most of the planes made today, especially those under the $100 to $150 price point.  These planes can be found in antique shops, yard sales, tool swaps, and eBay, often for as little as $10 and rarely (depending on the model and rarity) over $100. The caveat with vintage tools is that they will almost always need some degree of restoration and tuning.  Like the cheaper new store bought planes, the sole may need lapping, the frog face flattened, rough surfaces smoothed, and the iron sharpened and honed. However, for the same investment in time and effort, you will likely end up with a far superior plane for less money than you would have spent at your local big box hardware store.

Stanley Bailey no. 2, Type 8

Stanley Bailey no. 2, Type 8

If you have a couple hundred dollars to spend and want the best CNC machined plane money can buy, a Lie Nielsen is a good investment. However, if you’re like most people just starting out, pick up one (or even two) vintage Stanley planes and give them a try. The knowledge gained by disassembling, tuning, and sharpening it will actually aid in your understanding of its mechanics and function. Here are a few resources from the Virginia Toolworks site that might help:

***

Plane Restoration for Use – Extreme Salvage Edition

Let’s face it, not all planes and tools are salvageable.  Sometimes, the neglect and decay is so extreme that the best you can do is pilfer them for parts. Other times, the tool can be saved, but nothing short of a full refinishing effort is in order. As anyone who reads this blog will know, my principled philosophical approach is one of preservation, to retain as much of the original finish and character of the tool as possible. I focus the majority of my time and effort on tools that are good candidates for that sort of conservative preservation methodology. However, there are tools that occasionally cross my path that require a heavier hand.

In this post, I will detail one of the many methods you might employ to restore a heavily rusted plane for use. I found this Stanley no. 4 on eBay for around $10 plus shipping. It’s a Type 19, dating from the 1950s, and as you can see from this eBay auction photo, was in horrible condition.

SB4-T19 ebay

Stanley No. 4 – eBay Auction Photo

And here’s a shot I tool myself before beginning the restoration. As you can see, it actually looked a little better that the eBay photo indicated. Just a little…

SB4-T19 Rest1

Photo taken just before restoration

As with any restoration, the first step is complete disassembly.

SB4-T19 Rest2

Plane completely disassembled

With heavy rust like this, I used a razor blade scraper to remove as much of the surface crud as possible. I started with the iron and cap iron, then continued with the plane body and frog face.  With a little care, this can be accomplished without scratching or gouging the surface of the metal, and it’s amazing how much of the rust you can remove. You can see in the photo below the effect of having scraped the right half of the cap iron, and the lower three quarters of the iron.

SB4-T19 Rest3

Note the contrast of scraped vs. unscraped metal

Here’s a close up. Note the difference. The nice thing about this is virtually all of the patina remains on the surface of the metal. You can leave it this way if you prefer, or continue on as I will show in the next step.

SB4-T19 Rest4

Close-up showing the scraped and unscraped iron and cap iron

Since this was a later model Stanley (less valuable) and destined for shop use, I decided to scrub it down to a clean surface, removing all traces of rust, corrosion, and subsequently age and patina. There are several ways to go about it at this point (chemical anti-rust agents and electrolysis for example), but I decided to stick with doing it the old fashioned way – elbow grease. Using 220 grit sandpaper lubricated with WD40, I scrubbed down all the exposed surfaces. The light oil really softens the effect of the sandpaper, greatly reducing any visible scratches.

SB4-T19 Rest9

Oil sanding using 220 grit wrapped around a wood block

The screws, nuts and hardware were brushed using a soft steel 6″ brush on my bench grinder. Finally, everything was scrubbed using a general purpose cleaner. Low and behold, the japanning on the bed was actually quite good under all that crud.  I finished up by using an citrus degreaser (not shown in the photos). As you can see, the difference from where I started is pretty striking.

SB4-T19 Rest10

Big difference, huh? This is starting to look like a plane again.

I don’t like my brass components highly polished. I used oil lubricated steel wool and a small steel brush to clean them up for this plane. The lighting in the “after” photo makes the brass look a bit brighter than it actually was.

SB4-T19 Rest12

Brass before cleaning

SB4-T19 Rest13

Brass after cleaning

The final consideration is the hardwood tote and knob. Much of the original finish was gone and what remained was in bad shape. I lightly sanded the entire surface, applied a gel stain, and when dry, topped it with a couple of coats of varnish.  Once completely dry and cured, I polished it up using paste wax.

SB4-T19 Rest14

Tote and knob in original condition

After refinishing

After refinishing

With all the parts refinished and restored, the iron was sharpened and the plane reassembled and tuned for use. Naturally it doesn’t have the charm of a Sweetheart era, or even the character of a fine condition 1950s vintage, but this plane was saved from the landfill and with proper care, can easily shave wood another 70+ years.

SB4-T19 Rest16

SB4-T19 Rest17

***