Video History of The Stanley Works
July 6, 2015 4 Comments
Restoration, Preservation, Care and Use of Vintage Hand Tools
February 16, 2015 12 Comments
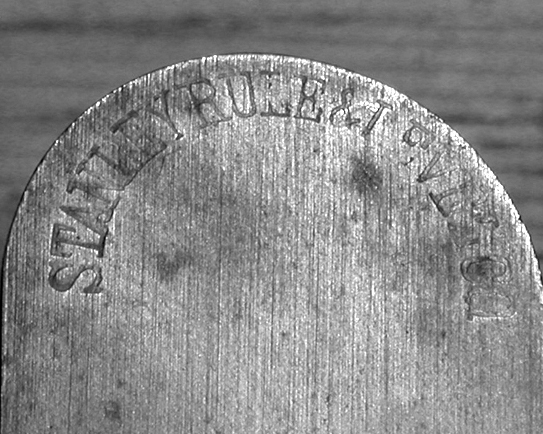
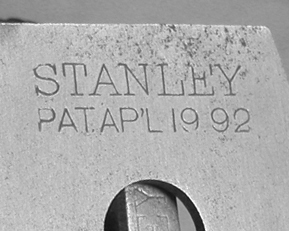
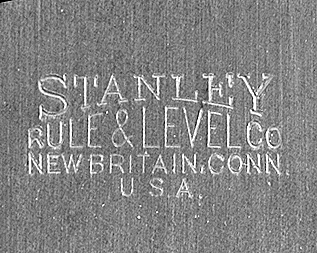
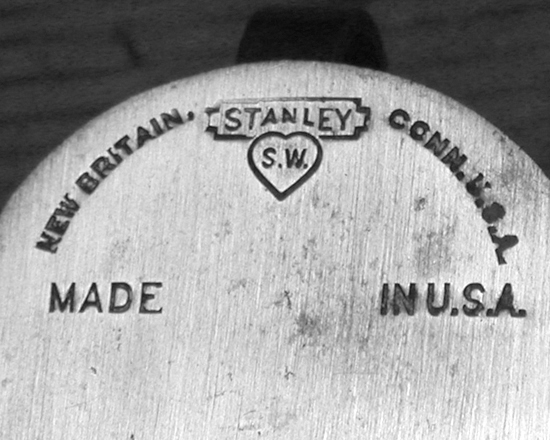
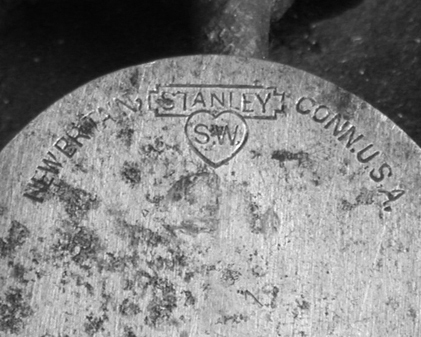
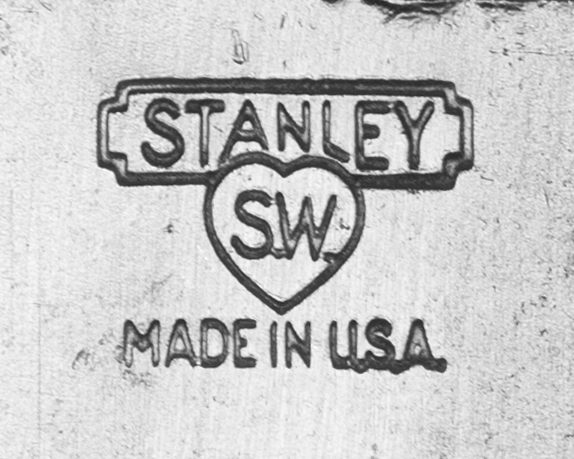
The following reference guide provides examples of Stanley’s trademark stamps from 1872 to the present. It is by no means comprehensive or complete, but this covers the main trademarks. There were often variations used on block planes and other tools. Some of the photos are pretty poor. I will try to photograph better examples as time goes by.
 A.1 Trademark (1872-1874) |
 A.4 Trademark (1879-1885) |
 A.5 Trademark (1886-1890) |
 J Trademark (1874-1884*) *~1909 on Block Planes |
 JJ Trademark (1890-1910) |
 P Trademark (1886-1890) |
 Q Trademark (1891-1904) |
 S Trademark (1907-1909) |
 T Trademark (1909-1912) |
 V Trademark (1912-1918) Also called “Victory” |
 X Trademark (1919-1920) |
 X Trademark (1919-1920) |
 X Trademark (1919-1920) |
 X Trademark (1919-1920) |
 Y Trademark (1920-1921) |
 Y Trademark (1920-1921) |
 Y Trademark (1922) |
 AA Trademark (1922-1935) |
 AA Trademark (1923-35) |
 BB Trademark (1935-Present) |
|
November 10, 2013 10 Comments
My dad died when I was still a teenager. Unlike his father, who was a carpenter, my dad wasn’t much of a woodworker. The few tools he left behind were mostly garden variety homeowner tools purchased from the local hardware store. So when my brother gifted me my dad’s old level this summer, I didn’t give it much thought. It was in horrible condition from decades of neglect. I brought it home and with barely a glance, set it aside on my workbench to deal with later.
With cooler fall temperatures here on the east coast, I recently pulled it out for a closer look. Upon closer inspection, I found that it is a Stanley no. 3 level, which was somewhat of a surprise in and of itself. More interesting, the trademark stamp dates it to the 1890s, approximately 30-35 years before my dad was born. It could have been my grandfather’s, but even he would have had to have purchased it as a teenager, if acquired new. Of course there is no way to know where it came from or who originally owned it, but it ended up in my father’s hands, then my brother’s, and thanks to him, it now belongs to me.
As you can see from the quick shot I took before I got started on it, virtually all the original finish is gone and the wood faded from exposure to the elements. It appears to have spent a good deal of time in a shed or barn. The primary glass vial was intact and serviceable, but the plumb vial was broken long ago. Otherwise, all the parts were in place and thankfully, the vial adjustment screws were not frozen.

My dad’s 1890s vintage Stanley no. 3 Level, partially disassembled
I disassembled and removed all the hardware to better evaluate what needed to be done in terms of cleanup, and to assess the broken plumb vial. After cleaning the rust off all the screws and the vial adjustment mechanisms, I cleaned the crud off the brass plates and end caps. I never polish old brass hardware, but I decided in this case to clean off most of the oxidation in order to better see the center scribe line.
With the hardware cleaned up, I moved on to the wood. Despite its condition, there were numerous paint specks and splatters from years of use that I wanted to protect. The wood itself is evidently cherry. I cleaned it lightly with Kramer’s Blemish Clarifier to remove any loose dirt and crud. I then applied 6 or 8 applications of Kramer’s Best Antique Improver, which I’ve written about before. It’s great stuff, all natural (no petrochemicals), and restores life to finished and unfinished wood.
In the meantime, I went to work sourcing a proper replacement vial. I preferred to keep it as close to original as possible, so new acrylic vials were out of the question. I found a few glass vials for sale on eBay, but the prices were absurdly high. So, I started trolling for a suitable “donor” level of approximately the same vintage. It took 2 or 3 weeks, but I finally found one for under $10 that had the plumb vial intact. When it arrived, I was surprised to find the condition actually better than the photos reflected. I actually felt a little guilty stripping it of one of its parts.
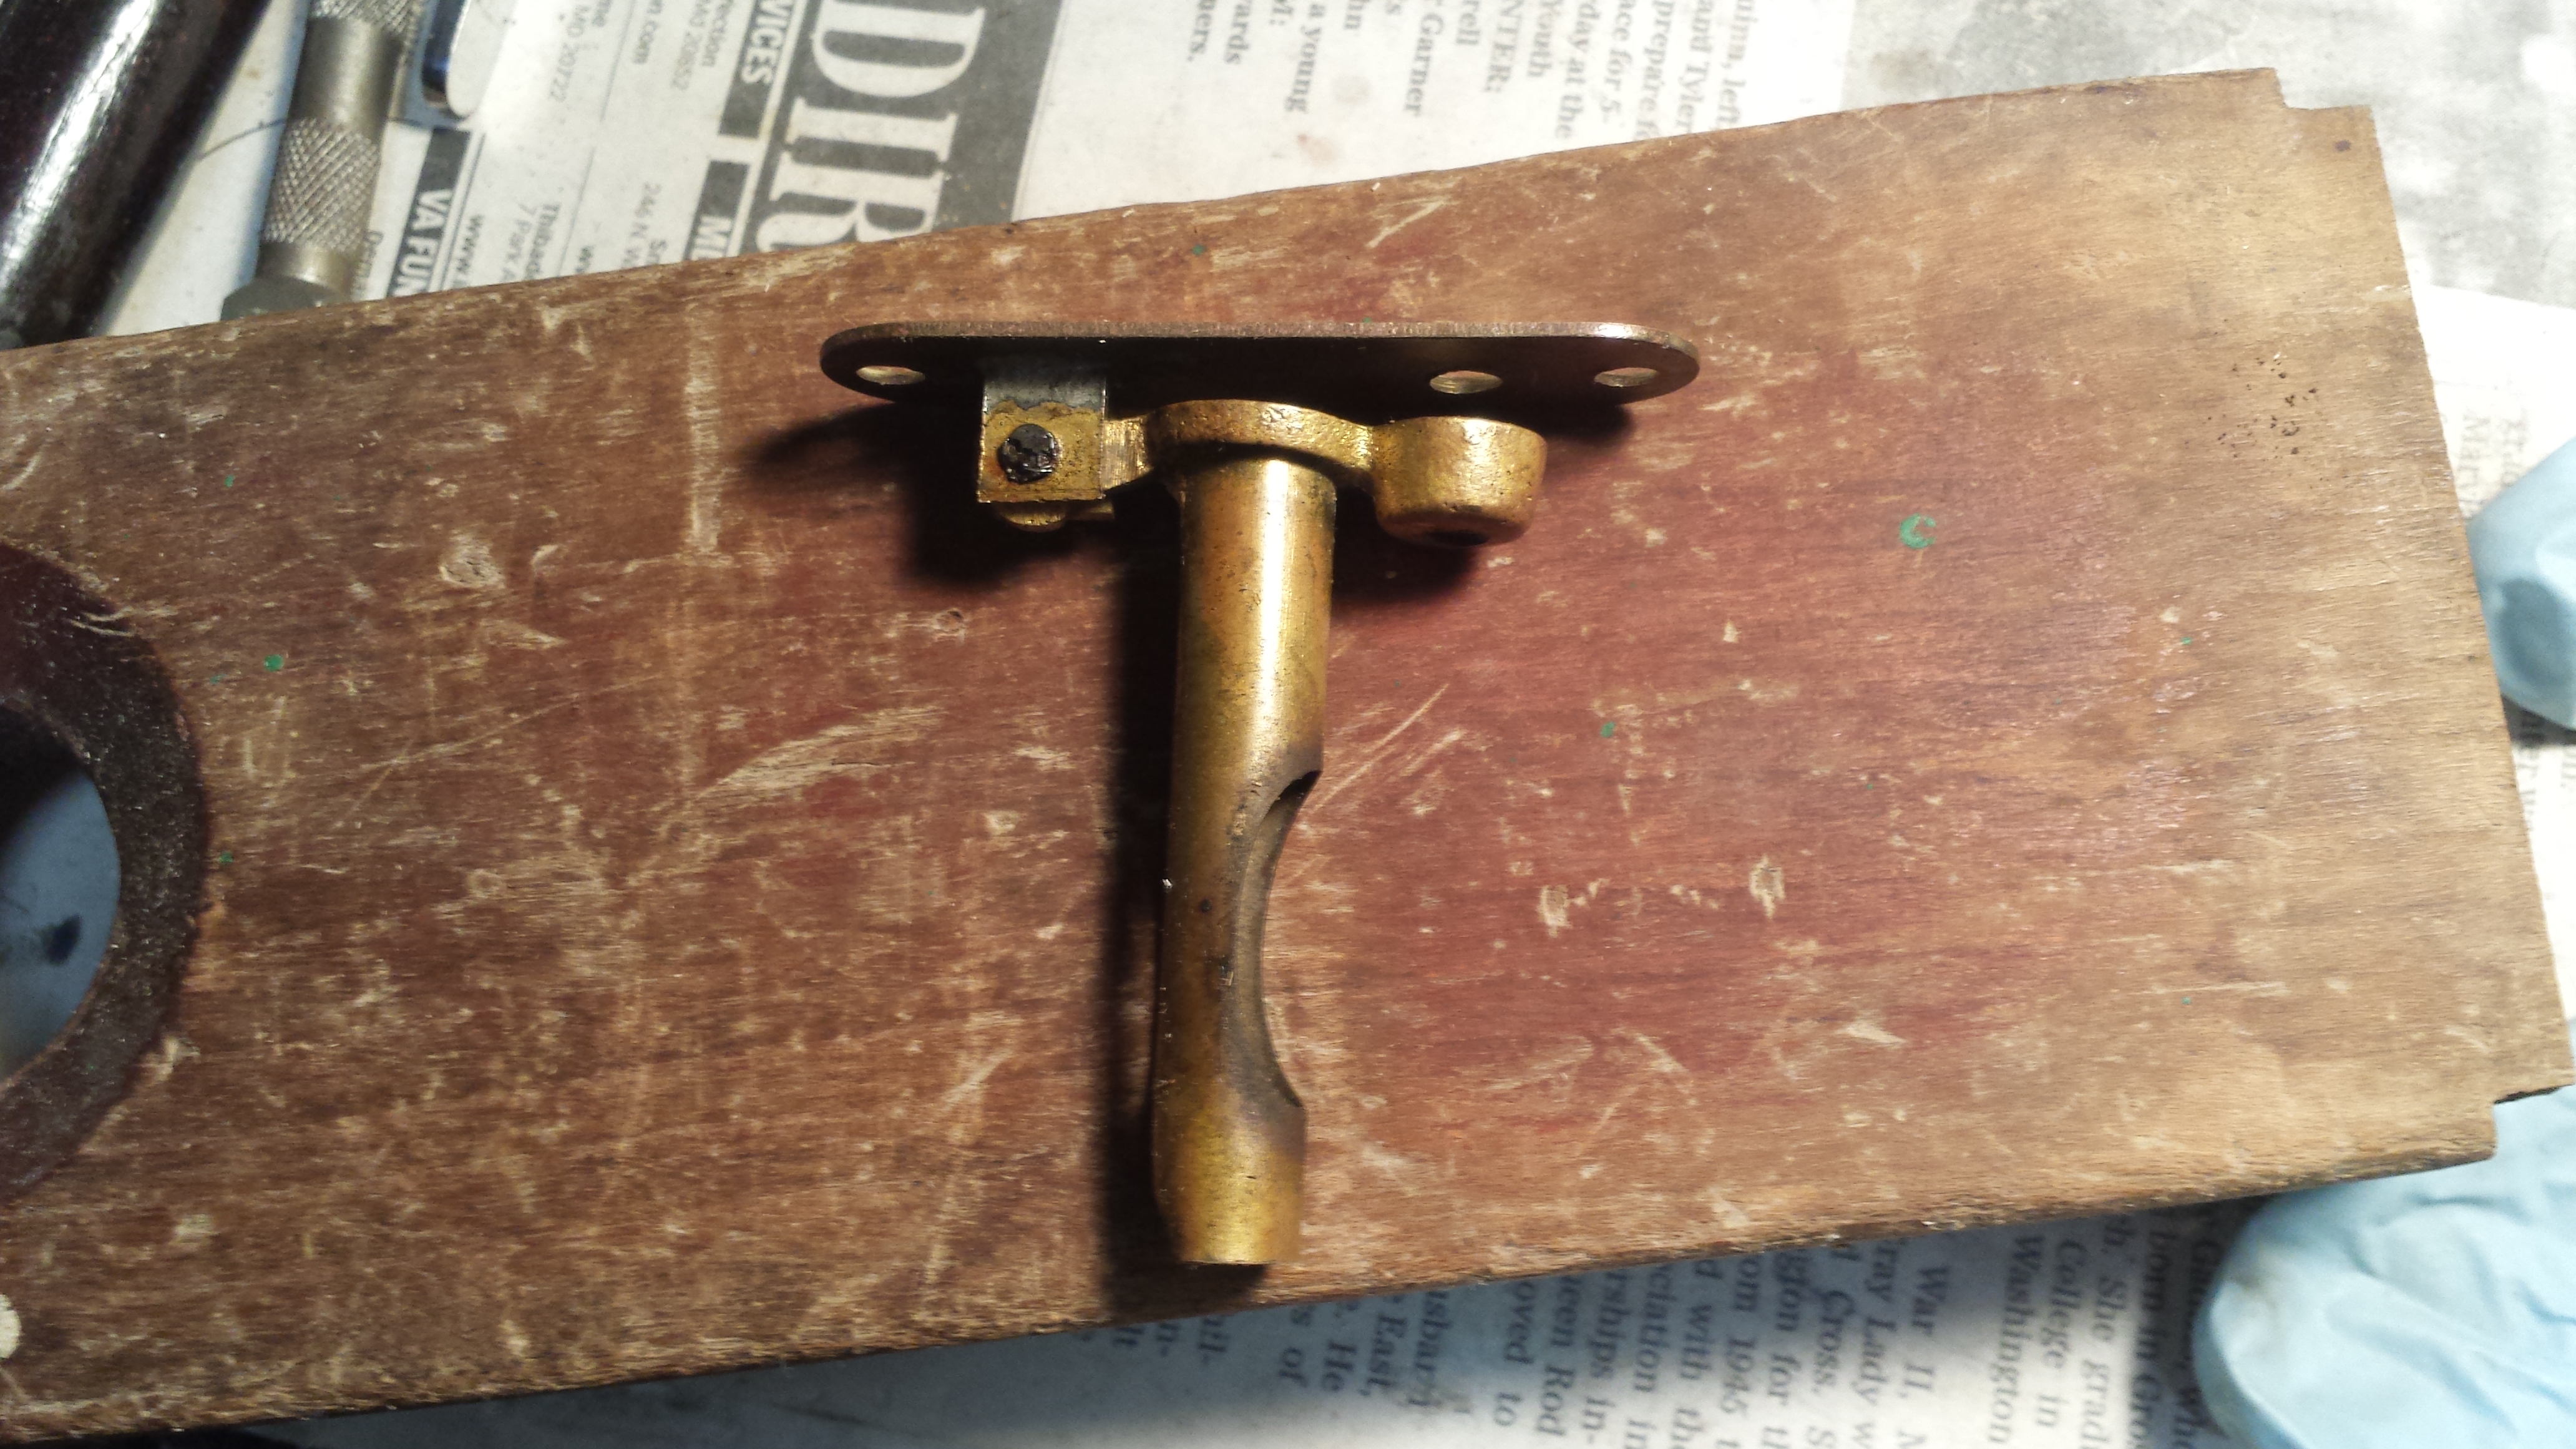
Plumb Assembly Before Vial Replacement
Now if you’ve never replaced a vial in an old Stanley level, you might be surprised to learn that they used Plaster of Paris (or something similar) to cement the glass vial in the tube shaped holder. This both held it in place and also protected the fragile ends. Getting the vial out of the old plane was much easier than I anticipated. Pulling the split holder tube open slightly, the vial and plaster slid right out in one piece. Once out, the old plaster easily released from the glass vial. The vial has a paper backing that wraps around the back side, but it isn’t attached. So carefully removing that paper and setting it aside, a quick cleaning of the glass had it looking very much like new in short order. Positioning the vial along with the paper backing into the assembly on my dad’s plane, I dabbed some plaster into place at each end and allowed it to dry.
I reattached all the hardware, and calibrated both vials using another level as a guide. Completed, my dad’s old level is once again accurate and ready for the workshop. You can just make out the replaced vial in the photo on the left. Now, as to the donor level I bought, it’s still sitting here in need of a plumb vial. There’s clearly something wrong with this scenario!


June 24, 2013 2 Comments
Ever wonder about the origin of the word “Excelsior” as it refers to the body style on Stanley block planes? Why Excelsior? What does it mean? Was it an official Stanley name or a term that has been applied in recent years?
Me too.
For anyone unfamiliar with the term, the “Excelsior” profile refers to the first body style used on Stanley block planes. Dating from 1873 to 1898, the Excelsior profile differs from the later profile in that the “hump” in the cheeks is positioned more toward the rear of the plane. After 1898 the hump was centered in the cheek profile and has the familiar milled Handi-grip indentions. And yes, there was a very brief period of a few months in 1898 when the excelsior bodies also included the Handi-grip indentions.

Early Excelsior Profile Stanley 9-3/4 Type 1
The word Excelsior comes from the latin word excelsus, meaning meaning “ever upward” or “even higher.” It is the origin for the word Excel, which obviously means to surpass in achievement. However, more interesting and relevant for us, “Excelsior” is commonly defined as fine curled wood shavings used for packing. Given that definition, it certainly makes sense that “Excelsior” was the name Stanley assigned to a line of block planes.
The earliest Stanley reference to Excelsior I could find is in the 1867 price list, which lists a “Patent Excelsior Tool Handle,” a wooden multi-tool handle that included 20 Bradawls and tools. However, the multi-tool handle design more commonly referred to today as Excelsior was patented on March 19, 1867. That patent design was awarded to Nathan S. Clement, and featured a different method of clamping the tool bits into the handle than the previous Stanley offerings. As was often the case, the patent was eventually acquired by Stanley Rule & Level and incorporated into their product line, and was reflected in both wooden and the ornate iron handled multi-tool handles.

Stanley also referred to their Bailey’s Patent Adjustable Block Planes as “Excelsior Block Planes” when they were introduced in 1873. This term only applied to the adjustable mouth planes, such as the no. 9-1/2, no. 9-3/4, no. 15, etc. The no. 110 and other non-adjustable planes had a different cheek profile, and were simply listed as Iron Block Planes in Stanley catalogs.
I did a little patent search sleuthing but could only find one reference that in any way tied in the term excelsior to hand or block planes. In 1875, Albion K. Hall of Jackson, MI patented a plane specifically for making excelsior shavings. However, I found nothing that tied him in any way to Stanley, so I assume there was no relationship between the two.
Stanley continued to use the Excelsior name for their multi-tools until 1902, and their planes until about 1898, when the profile was redesigned, moving the hump toward the center of the cheek. Today, the Excelsior planes are attractive primarily to collectors. While certainly usable, their castings tend to be thinner and more fragile than the later models, lending them better to display shelves than workbenches. Either way, they remain, in my opinion, one of the more attractive plane designs ever devised.
The Excelsior line included the following planes:
no. 9-1/2
no. 9-3/4
no. 15
no. 15-1/2
no. 16
no. 17
no. 18
no. 19
***
July 15, 2012 Leave a comment
I’ve just about finished uploading the Bailey and Bed Rock type studies, specification charts, and block plane dating information to the site. There’s a wealth of information here, both summarized and broken down in detail by the major individual components. The Bailey and Bed Rock type studies are relatively easy to find elsewhere online, but you won’t find the specification charts or information on dating your block plane anywhere but here!
Look for more information like this coming to the site over the next month or so, including specifications, conversion charts, and type studies for other models and manufacturers including Millers Falls, Sargent, and Record.
By the way, if you’re new to collecting, don’t miss the post on understanding type studies. It takes some of the mystery out of the madness.
Stanley Bailey Bench Plane Chart
Stanley Bed Rock Plane Chart
Stanley Block Plane Chart
Bailey Type Study
– Bailey Detailed Identification
Bed Rock Type Study
Block Plane Dating
***
July 12, 2012 Leave a comment
 Let’s be honest, Type Studies are confusing to a lot of people, especially those new to tool collecting. One reason for this is that by their very nature, Type Studies attempt to identify very specific points in time that correspond with transitions in the design and manufacturing process of tools made in the past. There are many problems with this. First and foremost, manufacturers never imagined that anyone in the future might care about tracking changes in the evolution of their designs. Subsequently, even veterans who know better sometimes lose sight of just how blurry those lines of delineation are along the historical manufacturing timeline.
The first thing to clearly understand is that Type Studies are a present day construct. They were not a production guide used by manufacturers to identify, notate, or track changes in design. Stanley and their competitors didn’t follow Type Studies. Why, you ask? Because Type Studies didn’t exist at the time the tools were made. Did you get that? Type Studies are a present day guide.
It was not until the 1970s and ’80s that people really started thinking about collecting vintage hand tools. And it’s only in the last 10 or 15 years, when woodworking with hand powered tools has enjoyed a resurgence, that vintage tool collecting has started to explode in popularity. The big name hand tool aficionados (Roger Smith, Alvin Sellens, Clarence Blanchard, and others) conducted extensive research, pouring over company records and old catalogs and detailing the physical variations of thousands of tools in order to begin piecing together timelines for various models.
These timelines, delineated by significant and important changes in the design and manufacture of a tool are referred to as Type Studies. Different ‘Types’ within a Type Study refer to a defined period of manufacture in which a particular set of features was unique. That said, the change from one Type to another doesn’t mean the entire tool was redesigned. In fact, virtually all feature changes overlapped others, and a given feature or set of features might extend over several Types. A good example can be illustrated with the lever caps used on Stanley’s Type 13-15 bench planes made between 1925 and 1932. While the same design cap was used on all three types, there were other feature changes that delineate the three different date ranges on the Type Study time-line.
Summing it all up, here are five important confusion-busting facts about Type Studies that should provide clarity:
***
June 25, 2012 1 Comment
Mention ‘block plane’ to the average person, and they usually think of the basic Stanley no. 110 or 220, or a competitor’s clone of the same design. These were, generally speaking, the handyman’s plane of the day, and worked just fine for occasional projects such as trimming the edge of a sticking door or window. However, those who worked with tools for a living typically used one of the more versatile models, such as the very popular no. 9-1/2 or the exceptional no. 18, both all-purpose, standard angle planes preferred for their adjustable throats and greater precision. [1]
Stanley missed no opportunity to make a dollar, and offering variations of their more popular planes was clearly an important factor in their strategy to dominate the industry. They offered more models and trim-lines than you could shake a unplaned stick at. Many, however, were only moderately popular and relatively shorter-lived, at least compared to the mainstay models that virtually every woodworker had in his tool box.
While the no. 9-1/2, and to a somewhat lesser extent the no. 18, enjoyed considerable popularity, Stanley also offered variations of both of these planes that, today, serve to confuse and confound new users and collectors of vintage tools. Unfortunately, Stanley’s incomprehensible numbering system did nothing to help matters, back then or now. To bring some clarity to the whole matter, here’s a brief breakdown of the variations of these two very popular models, the Stanley nos. 9-1/2 and 18.

no. 15 & no. 17, c. 1901-07
The no. 15 is identical to the no. 9-1/2 in every way except length – it’s approximately 7 inches long. It had one of the longest runs of all adjustable throat Stanley block planes, in production from 1876 to 1955. Given the plethora of size variations and years of production, Stanley clearly found a market for larger block planes, although the no. 15 was nowhere near as popular as its shorter brother. Subsequently, they are less common on the vintage tool market today and usually fetch higher prices.

no. 9-1/2 & no. 16, c.1904-09
This plane is the fraternal twin brother to the no. 9-1/2. Like the no. 9-1/2, the no. 16 was approximately 6 inches long with an iron (blade) width of 1-5/8 inches. The only difference was that its hooded lever cap, front knob, and rear wheel were tricked out in polished nickel, whereas the cap on the 9-1/2 was japanned and the knob and wheel polished brass. The no. 16 was manufactured from 1888 to 1941.
This plane is to the no. 15 what the no. 16 is to the no. 9-1/2. Got that? Simplified, it’s the nickeled out version of the no. 15. Since the nickel versions of Stanley planes originally cost more than their japanned counterparts, only those woodworkers with the discretionary wherewithal purchased them. I don’t see a lot of these planes out in the market, leading me to believe they were not all that popular. I guess selling bling during the 1930s depression was difficult. Just like the no. 16, the no. 17 was manufactured from 1888 to 1941.

no. 19 & no. 18, c. 1913-19
If there was a market for a 7 inch version of the no. 9-1/2, then logically there would be a market for a 7 inch version of the no. 18. The number 19 is just that. Sharing the same nickel plated knuckle jointed lever cap evolution as the no. 18, and the same 1-5/8 inch cutter used on all these planes, the no. 19 is identical to the no. 18 in every way except length. It was made from 1888 to 1949.
Summing it up…
The no. 15 is the 7 inch version of the no. 9-1/2
The no. 16 is the nickel version of the no. 9-1/2
The no. 17 is the nickel version of the no. 15 (and/or the 7 inch version of the no. 16)
The no. 19 is the 7 inch version of the no. 18
I suppose if you have extra big meat hooks, the larger planes might feel better in your hand. And if you like your planes tricked out, nickel-plated lever caps and hardware will help pimp your work bench. But other than length and bling, these planes are all pretty comparable to their better known counterparts, although they do tend to command higher prices since they are less common. Collectors will already know that, but for those of you looking to pick up your first or second user, hopefully this clears up the confusion.
[1] Standard angle refers to bed angle of 20 degrees. Sharpening the standard 25 degree bevel on the iron provides a cutting angle of 45 degrees, the same as bench planes. Low angle planes had 12 degree beds for a cutting angle of 37 degrees.
***
Tools shown in the photos were returned to functional condition by Virginia Toolworks using museum quality archival preservation techniques. Sharpened and tuned for use, every tool is fully tested and adjusted until perfect.
May 20, 2012 6 Comments
I have a weakness for block planes. They are the two seater sports cars of the hand plane world – quick, nimble, and fun to handle. Heck, from the classic lines of Stanley Excelsiors 130 years ago to the high performance Veritas planes of today, they even look fast. (Both shown below)


I have a sizeable collection of block planes that includes some of the rarest and most beautiful ever made. Those, of course, are now relegated to display, as their value precludes risking damage in use. But the vast majority in my collection are sharp and ready to use, and I do exercise each of them periodically when I’m working on a project. This helps keep them in working order, and it just makes me feel good.
Still, over time I’ve found myself unconsciously reaching for the same couple of planes whenever the need arises. If I were forced to reduce my toolbox to just two block planes, these are the two I would keep:
The Stanley No. 18 Standard Angle
The Stanley No. 60 Low Angle

Stanley no. 18, c. 1913-19
The Stanley No. 18 Standard Angle
This is my go-to block plane for everyday use, the one I always seem to grab first. Mine is a very pristine WWI era model that I’m pretty sure I’ve used more than anyone else in its history. Although it’s almost 100 years old, it looks like it could have been manufactured last year. Both the japanning and nickel plating are pushing 100%, and so I baby it.
The Stanley no. 18 is a standard angle plane, meaning the iron is seated on a 20 degree bed. With a bevel angle sharpened at the standard 25 degrees, you have a cutting angle of 45 degrees, same as a bench plane. It also has an adjustable throat plate, an essential feature in a block plane. The no. 18 is 6 inches long and fits my hand better than its longer, otherwise identical 7 inch brother, the no. 19. And unlike the more popular Stanley no. 9-1/2, it feels more like an extension of my hand.
The no. 9-1/2 plane predates the no. 18 by about 15 years, was in production longer, and was the best selling block plane Stanley ever made. It’s still made today, in fact, although the current design features a completely different mechanism from the original. Admittedly, the no. 9-1/2 was the more popular of the two. I truly don’t know why, though, since the design of the no. 18’s knuckle cap was far superior to the hooded lever cap on the no. 9-1/2, and it’s also more comfortable to hold in the hand. I also find that the hooded cap on the no. 9-1/2 is more prone to slip around a little in use. Not so with the no. 18.
Ironically they are both basically the same plane with two different styles of lever caps. Other than the lever cap and its mounting bolt, all the other parts are interchangeable. Stanley charged a little more for the no. 18 and marketed it as virtually indestructible. This of course was not true, for while the steel cap is arguably more durable, the bodies of both were cast iron and therefore susceptible to breaking if dropped.
I have several vintages of both models in my collection, but find the no. 18 with the knuckle cap superior in both function and comfort. I use this more often than any other block plane I own.

Stanley no. 60, c. 1910
The Stanley No. 60 Low Angle
The Stanley no. 60 (and the identical japanned version 60-1/2) is a low angle plane, meaning the iron is seated on a 12 degree bed. Sharpened at 25 degrees, you have a cutting angle of 37 degrees. The primary advantage of the lower angle of attack is that it excels at shaving end grain.
Like the no. 18, the 60 series of planes are approximately 6 inches long. However, the 60 series are narrower with an iron width of 1-3/8 inches, vs the 1-5/8 inch irons on the standard angle planes, and the 60 series featured a narrower version of the hooded lever cap used on the no. 9-1/2. The 60 series planes also have adjustable throat plates.
As with the standard angle planes, Stanley made another low angle plane that was more popular than the No. 60. The no. 65, which was wider and longer, is even today considered by many to be the ‘Cadillac’ of Stanley block planes. I have a couple of no. 65s, which I use occasionally, but I prefer the no. 60 for its smaller size. The size of the no. 65 makes it feel a little awkward to me for most projects, although it excels on wider boards and edges where the no. 60 is too small.
Most people are familiar with the knuckle jointed lever cap on the no. 65, the very same cap used on the nos. 18 and 19 standard angle planes. It’s interesting to note that the no. 65 was originally made with the hooded style cap until about 1917 when Stanley switched to the knuckle jointed steel cap. I’ve never quite understood why the no. 65 is so highly regarded. Being 7 inches long, I find it a little too big in the hand. The no. 60 series planes are smaller and much easier to handle, and ironically, I never found their hooded cap to be problematic as I do with the no. 9-1/2. So, maybe it’s just me.
Ultimately, that’s the point. I had to try all of the various models and sizes until I found what I liked best. On all of these block planes, the iron is seated bevel up, whereas on bench planes the bevel is usually down. There is a tremendous advantage with bevel up irons in that the angle of the bevel can be changed to affect a change in the angle of cut. While there is more to consider in edge geometry than just the angle of cut (ex. durability), you could reasonably sharpen the bevel on a low angle plane iron to 33 degrees and end up with an angle of cut of 45 degrees (12+33=45), the same as on a standard angle plane. However, to accomplish a low angle of cut using a standard angle plane, you’d have to sharpen the bevel at a very shallow 17 degrees (20+17=37). Durability of such a thin cutting edge would be problematic with most woods.
For this reason, along with a few others, many people consider the low angle plane to be the more versatile of the two. I tend to agree. While I use my standard angle plane more often, if I could only have one block plane, it would have to be a low angle. Fortunately, despite what my wife says, that’s not the case.
The no. 18 and no. 60 are my two primary go-to block planes when I’m working on a project. I have most of the other Stanley sizes in my collection, and like I said, I’ll pick them up to use sometimes just for nostalgia, but the nos. 18 and 60 are my favorites. These are the two that I think everyone should own, but ultimately, you won’t know which you prefer until you try a few for yourself.
***
Vintage tools shown in the photos were returned to functional condition by Virginia Toolworks using museum quality archival preservation techniques. Sharpened and tuned for use, every tool is fully tested and adjusted until perfect.
May 13, 2012 11 Comments

c. 1940s Stanley No. 5 Jack Plane
When I first started buying and collecting vintage hand planes, much of the available information I read online included ominous warnings about warped, twisted soles, unstable frogs, and mangled throats. Sounded more like a Stephen King movie than a discussion about tools! With recommendations for evaluation that involved engineering squares and feeler gauges. I was convinced that no vintage plane I purchased could ever possibly work correctly until I lapped the sole and re-machined every contact surface. It only took me suffering through flattening one or two planes to come to my senses and question just what the heck I was trying to accomplish.
Once I actually started sharpening, tuning, and using hand planes, I realized that most of these warnings were just a lot of unwarranted hooey. The vast majority of vintage planes I’ve owned and used over the years were actually just fine. Naturally, using a nice new Lie Nielsen or Veritas plane provides a noticeably different experience, but at a substantial cost premium. I’m just not there yet, and may never be. Here’s why…
The quality of the tool doesn’t contribute nearly as much to the end result as does the skill of the user. Craftsmen of 100 or so years ago made do just fine with the planes that were available. The average woodworker at the turn of the century didn’t own a micrometer or a machined straight edge. Many didn’t even use a measuring device, instead relying on dividers, marking gauges, and geometry. They used the tools and technology of the day, and produced some of the finest furniture in the world.
That’s not to say that tool quality isn’t important. Or more precisely, it’s not even so much the quality of the tool itself, but the quality of the tool’s tuning combined with proper technique that produces the desired result. As many others have pointed out before, a plane is really nothing more than a jig for holding a cutting implement at a consistent angle. With the appropriate ‘jig-o-metrics’ (tuning) applied, a properly sharpened cutting edge, and skillful application by the user, even the cheapest home center hand plane can competently get the job done. What quality of design, machining, and related workmanship gets you is ease of use and greater versatility. With tighter tolerances you get less slop and greater precision. While a high quality tool won’t improve the results of an unskilled user, it can certainly improve the results of one who has mastered its use.
All that said, there are some red flags to look for when shopping for hand planes, and with the abundance of vintage planes available on eBay, yard sales, and tool swaps across the country, there’s no reason to settle for a tool with serious problems. The challenge is knowing what is serious, and what isn’t. So let’s take it part by part. I’ll try to keep it simple.

Stanley No. 7, Lever Cap & Iron/Cap Iron
Body & Sole
Also sometimes referred to as the ‘base’ or ‘shoe,’ the body of the plane, as the name implies, is the main frame. The sole is the surface that comes in contact with the wood when using the plane. The main thing to look for on the body is cracks and/or repairs. Planes with this sort of damage are best avoided. Small chips along the top edges (cheeks) don’t affect usability, but are cosmetically undesirable. With so many planes available, why settle? The other thing to inspect on the body is the opening where the iron (blade) protrudes. It’s important that the opening, called the mouth or throat, isn’t chipped and hasn’t been repaired or enlarged through filing. The throat opening affects your ability to properly set the iron, and is one area of the plane where precision is extremely important.
Pitting is usually high on the list of problems to avoid. Again, with so many planes available, there’s no reason to settle for a tool with heavy pitting. Pitting is damage from rust that has eaten into the metal. In my experience, unless the pitting is very heavy, it doesn’t usually have much effect on a plane’s performance. Like all the normal scratches, scars, and dings from use that you’ll see, very light areas of pitting are not uncommon and are of little concern with regards to practical usability.
Some folks might disagree, but I don’t worry too much about the flatness of the sole. Having owned more than 250 vintage planes over the course of the time, I’ve only had a few that were unusable, and each of them had other issues more critical than the flatness of the bottom. Slap a ruler or straightedge against it if it makes you feel better or if you’re spending more than $75-$100 on a standard bench plane to use. However, if your need for critical tolerances is that great, I recommend you invest in a modern Lie-Nielsen or Veritas plane. They are machined to engineering grade tolerances, but you’ll pay a premium for them.
Knobs and Totes
The wooden knobs and totes (handle) on planes are frequently found with chips, cracks, and breaks. Aside from the obvious preference that they be perfect, minor damage is usually just cosmetic. Functionality is only compromised when the damage is so bad that they are unstable or inhibiting a proper grip on the plane. Breaks and cracks can often be repaired, even if the damage is severe, and replacements are abundant. If the tool is in otherwise good condition, a damaged or missing knob or tote isn’t a deal breaker for me. For more information check my post on repairing knobs and totes.

Stanley #7 Frog
Frog
The frog is the part of the plane that attaches to the top side of the base and provides an angled seat for the iron (blade), as well as a mechanism to adjust the depth and lateral positioning of the iron. I have no idea why it’s called a frog. Damage to look for is a missing lateral adjustment lever, which was a feature on the frogs of most Stanley (and other) bench planes manufactured after the mid 1880s. The lateral lever sticks up from the top of the frog and enables lateral (side to side) positioning of the iron. Every now and then this lever is missing. Ideally it should be straight and tight, although bends can be straightened and if it’s wobbly, it can be tightened by carefully tapping its rivet with a small ball peen hammer.
Broken and chipped frogs are the main concern and should be avoided. Look close at the bolt hole in the front center of the frog to make sure there are no chips around the edge. Once again, replacement frogs are fairly plentiful, but you will need to find one from the same period of manufacture to ensure proper fit since the design changed over the years.
Iron and Cap Iron
The iron, also referred to as the ‘cutter’ or ‘blade,’ is the tool’s cutting implement. The main things to look for are how much usable length remains and the condition of the surface metal. Pitted irons are not necessarily a lost cause (see my post on salvaging irons), but are problematic. Again, period irons are abundant, but if you’re buying the plane to use, you’ll want to invest in a modern replacement from somewhere like Hock, Lie-Nielsen, or Lee Valley Tools. They are far superior and will make a significant difference in the plane’s performance.
The cap iron, which is sometimes called the chipbreaker or double iron, attaches to the top of the iron and provides both stability and a raised surface to literally break the shaving as it’s cut from the wood. Other than very heavy pitting or a hack grinding job, I’ve rarely seen one of these that wasn’t usable.
Lever Cap
The lever cap sits on top of the iron/cap iron assembly and provides tension to hold them against the frog. Lever caps are sometimes found with chips along the bottom edge, either from having been dropped or used as a screwdriver to loosen the wide screw that attaches the iron and cap iron. While unsightly, a chip along the bottom edge doesn’t really affect its functionality. Again replacements are plentiful. Of greater concern is if it’s missing the tab lever at the top, which acts as a cam that locks the lever cap against the frog. It’s rare that this is missing, but the lever cap cannot function without it.

Frog Adjustment Hardware
Hardware
I’ve covered all the major functional parts, so all that remains is the miscellaneous hardware on the plane – screws, bolts, brass knob, etc. You will want to make sure all the parts are there in order for the plane to function, unless you’re willing to buy replacements on eBay. Since Stanley and others used a very unusual threading on their hardware, you won’t find replacements in your hardware store.
The knob and tote are attached to the plane with a bolt that is threaded on both ends, topped with a brass nut that is visible from the top. Models made during WWII may have single piece steel bolts.
The frog should have a bolt sticking out of the front of it that holds the iron/cap iron via the lever cap. The frog itself is attached to the base with two smaller bolts with washers. At the rear of the frog should be a large brass knob that is used to raise and lower the iron through the throat. It’s important that this knob turn freely across the full length of its bolt, although it’s not unusual to have to clean this area thoroughly before it will work as intended.
On Stanley bench planes made after 1907, there will be an adjustment bolt that engages a small plate attached to the bottom rear of the frog. This enables fine forward/backward adjustments to the frog, which has an effect similar to closing the throat of the plane for fine cuts. Since most bench planes did not have an adjustable throat as found on some of the better block planes, this frog adjustment allowed movement of the entire frog, which accomplished the same thing. Moving the frog back opens the throat for thicker cuts, while moving it forward closes the throat for very fine shavings. It’s actually pretty rare to find this feature permanently frozen due to rust and corrosion, but it’s something to look out for. While it may take a few days of soaking in penetrating oil, they almost always free up.
That’s pretty much it. Very few vintage hand planes are in perfect condition, so it’s important to have realistic expectations. Almost all show the effects of age and use. This is what gives them character. Perhaps most important for new buyers shopping for a first hand plane is to first understand how they function and how they are used. That will make evaluating condition much easier and the assessment more relevant. Additionally, all new hand plane purchasers need to understand that no tool they buy, whether 100 years old or manufactured yesterday, is going to function effectively without proper tuning. That discussion I will save for another post.
***
Tools shown in the photos were returned to functional condition by Virginia Toolworks using museum quality archival preservation techniques. Sharpened and tuned for use, every tool is fully tested and adjusted until perfect.
May 9, 2012 Leave a comment

When it comes to vintage tools, condition, like beauty, is in the eye of the beholder… or more specifically, the eye of the seller. So many online tool sellers throw around vague, undefined terms like ‘great condition’, ‘mint condition’ etc., it’s hard to get a good sense of exactly what you’re buying, especially on Ebay. I use such terms sparingly, and only as a complement to a much more specific description of condition and features. That’s why I write my listings using specific descriptives, not subjective adjectives.
Unless they were hermetically sealed soon after they were made, all vintage tools show some degree of age, whether through loss of finish, dents, dings, and scratches from use, transport, and storage, rust damage, or simply darkening from age and environment. It’s also healthy to keep in mind that relatively speaking, these were not precision made tools in the way we think of precision made tools today. Quality control was more subjective, and let’s face it, these were tools of tradesmen who carried them around in wooden boxes on horse drawn carriages. It’s a wonder any of them even survived! Customers of the day were not likely too concerned with cosmetics. They were not the disposable, ‘throw it away and buy a new one’ culture we are today. They used things until they were worn out, then they fixed them up as best they could, and used them some more.
For me, mint condition means brand new, unused, just as it was when it was sold. Anything less is near mint, very fine, fine, good, or user grade. For tools that are 50 to 150 years old to be in mint condition, they would have to not only have never been used, but kept in climate controlled storage so as not to sustain permanent rust or corrosion damage. I’ve seen very few tools that meet this criteria. Near mint to me means the tools was never used or used very lightly. It may well show some evidence of age, but overall looks like something akin to a floor sample. I think far less than 5% of vintage tools fall into this range. The vast majority of tools fall somewhere between Very Fine (maybe 5-10%), Fine (10%), Good and User (45%), and Poor (30%). All of these are, of course, very rough estimates based on my own observations and experience.
I guess the takeaway is, when you’re shopping for vintage tools, whether to use or display, ignore the subjective descriptors and adjectives such as ‘Good’ or ‘Mint’ or ‘Perfect.’ Don’t make assumptions about features, condition, or whether the tool is in working condition. Don’t be afraid to ask questions or request additional photos (if the tool is being sold online). And always be wary of tools that have been over-cleaned or ‘restored.’ To some, restored simply means sharpened. To others, it means completely refinished.
