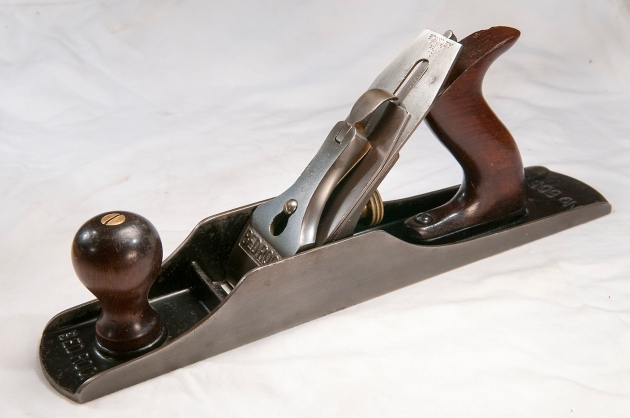
Rev-O-Noc Renewal

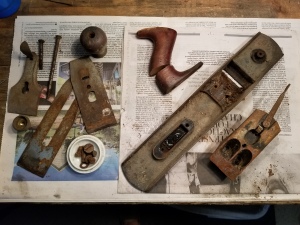
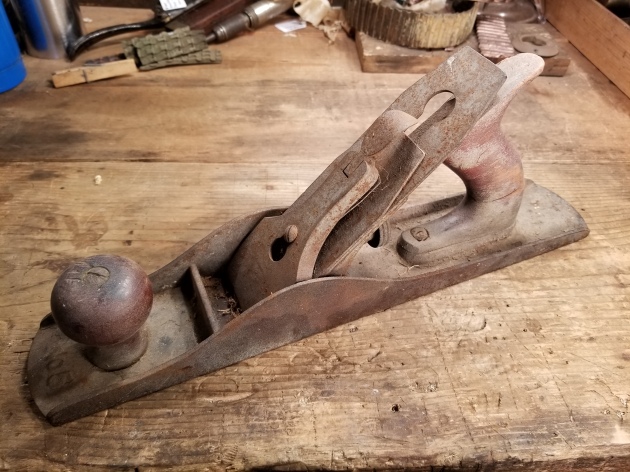
Rev-O-Noc 5C in pretty rough condition

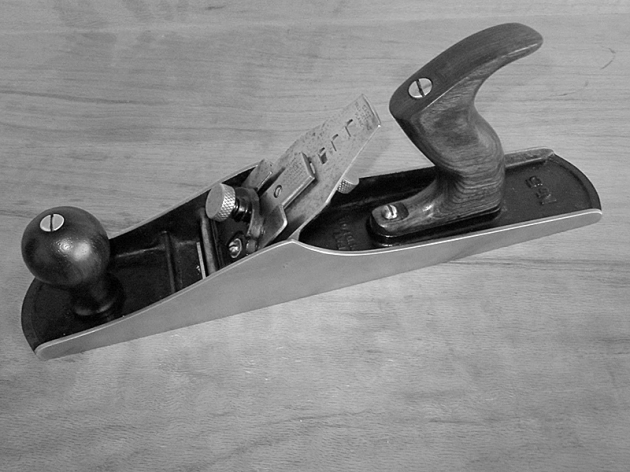
I can count on one hand the number of planes I’ve refinished (vs. restored) over the years, but this Rev-O-Noc 5C jack plane had some issues that made an anti-rust dip and repainting the best course of action.

Disassembled for assessment

The entire body was a rustbucket with very little japanning remaining. The lever cap fortunately looked worse than it actually was, and while the cap iron was salvageable, the Rev-O-Noc iron had some pretty deep pitting on the business end. While I was able to sharpen through that, there was something off with the temper of the blade that I didn’t like, so I added a Vaughan & Bushnell iron I had on hand that’s better suited for use. The break in the tote was clean, so I epoxied it back together and then spent the better part of a week refinishing it to match the knob. The repair turned out really nice and is completely invisible.

Repaired Tote came out incredibly nice

HSB Rev-O-Noc was a store brand from Hibbard, Spencer, Bartlett & Co., a Chicago hardware dealership that formed in 1882, but whose origin dates back to at least 1855 in the form of Tuttle, Hibbard & Co. In 1932, the company introduced a new line of hand tools under the brand name “True Value” and by 1948, Hibbard’s annual sales reached nearly $30 million. Business slowed and profits shrunk, however, as new hardware cooperatives began to bypass traditional wholesalers. In 1962, the company’s owners sold both the hardware operations and the “True Value” brand to John Cotter for $2.5 million. Yes, that’s the True Value brand we know today.

Also interesting, the name Revonoc is the reverse spelling of Conover. Conover was the name of an officer of the company, and apparently had a separate hardware company prior to joining Hibbard, Spencer, Bartlett & Co. They used this backwards spelling of his name for their brand of planes sold by HS&B from about 1920-1940. They were made at times by both Stanley and Sargent, but this one is clearly Stanley made based on the casting, frog, and hardware.

As far as I can tell, this plane likely falls somewhere closer to 1920 given the short knob and small adjustment nut. Of course, it’s also possible it’s an earlier plane and the Revonoc blade was a later replacement. I just don’t know.

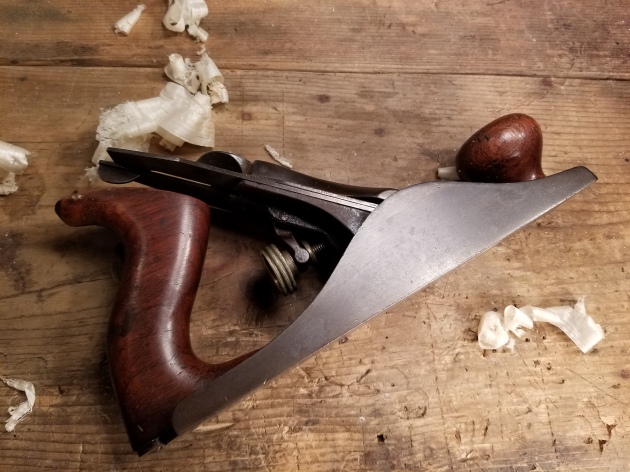
Despite a gnarly looking rust damaged sole, the mouth area was in decent shape and the plane functioned true to Stanley’s level of excellence. Once everything was cleaned up, oiled, reassembled, and tuned, this old plane shaved wood like a champ, producing some wispy thin shavings with no effort at all.

(Disclosure: This article contains paid links that help support the site)

Restoration completed, sharpened and tuned for use again

Don’t Strip or Dip! Scrape That Rust Away!

I read so many posts and articles online from guys doing absolutely heinous things to old tools. From chemical strippers to electrolysis, sanding to anti-rust dips, everyone has their own ideas about how best to remove rust. While any or all of these methods work, they’re all destructive on some level. I suppose that’s fine if your objective is to refinish the tool for use, but in my opinion it strips away all the character and beauty of the tool. Certainly some tools are so far gone there’s no other viable choice, but in many cases, there is a better way.

When I started collecting and restoring tools, I spent almost a year researching everything I could find on archival restoration and preservation, the techniques museums use. I didn’t want to simply refinish tools to make them appear new, I wanted to restore them to functional use while maintaining the aesthetic character that only decades of use and age can impart. My goal was (and remains) to bring them back to a point where they look and function as if they had been properly cared for over the years.

Like anyone else, my learning process came through trial and error. I quickly discovered that the anti-rust dips, while working well, left the metal with a dull and lifeless grey phosphate coating that I found unnatural and unappealing. Likewise, vinegar, citric acid, electrolysis, wire brushing, and sanding all do the job, but at the cost of all the color, character, and charm that makes old tools so appealing. What I really wanted to accomplish was to remove the rust while leaving (at least most of) the patina intact – that lovely brownish gray darkening of the metal that only comes from age and use.

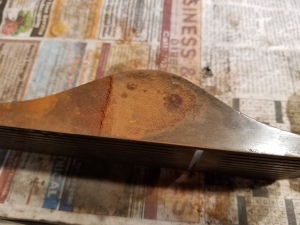
Stanley no. 4C base, as found with considerable surface rust

I found that on many tools, specifically those that haven’t been exposed to overtly wet conditions, the rust is really only on the surface and in many cases hasn’t yet eaten into the metal, causing the cancerous pitting that we all despise. It has been my experience that often times a really gnarly looking rusty crust will come right off, leaving relatively undamaged metal that still retains that desirable patina below.

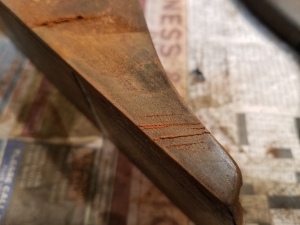
By using a 3 or 4 inch glass scraper with a very sharp blade, held at a fairly high angle, I slowly and carefully begin scraping the rust off the surface of the plane body. This does require a sharp undamaged blade. Once it gets knicks in the edge, it will start leaving light scratches in the underlying patina, which you don’t want.

It’s a slow and methodical process, but the payoff is worth the effort. As you can hopefully see in the photos above, there’s a distinct line where the rust is removed. You can also begin to see the underlying patina on the metal surface, and thankfully in this case, no pitting.

Scraping using the glass scraper

Once all the rust is removed, the metal surface will be dusty and dirty, and you may well see some micro-scratches from the scraper. I’ll take care of those in the next step.

Using a cleaner/degreaser, gently buff the surface with very fine steel wool (000 or 0000). You want to clean the metal, smoothing out and blending in any scratches in the patina without removing it. Careful here, as that patina is fragile. Go slow. Follow up with the cleaner/degreaser on a paper towel or rag until it’s completely clean.

Once clean and dry, I usually wipe it down with something to help protect and preserve it with Kramer’s Best Antique Improver. Howard’s Feed-n-Wax, Camellia oil, or Renaissance Wax, etc. will also work. Camellia oil, by the way, is really good stuff for protecting tools and knives, and is food safe. What you should be left with now is a clean surface free of rust, but retaining that beautiful patina.

The stanley plane body after cleaning, degreasing, and a wipe down with Kramer’s Best

With all the rust removed from the surface, you can see the underlying patina is still very much intact. Once the rest of the parts are cleaned and the plane reassembled, its beauty really shines through. I find this method of restoration produces superior results to any other I’ve found thus far. Mind you, it’s a workout! But that’s okay, too.

(Disclosure: This article contains paid links that help support the site)

Working Wood by Hand

I like working with hand tools much more than power tools whenever I can. Aside from the fact that they’re infinitely safer – no spinning blades, etc. to slice through flesh – they’re also quiet. And rather than making sawdust, which is unpleasant to breathe, non-powered tools make shavings, so a mask isn’t necessary. But more than that, hand tools bring me into physical contact with the wood, in exactly the same way that intaglio printmaking requires physical contact with the plates and paper.

I enjoy the way a tool feels in my hand, the way it responds to my direction, and the way it interacts with the surface of the wood. Using hand tools is similar to playing a musical instrument. When well tuned and skillfully employed, they literally sing as they cut, shave, and shape the surface of the wood, achieving the desired effect.

Video History of The Stanley Works


Everything You Ever Wanted to Know About Stanley Bed Rock Planes

317 SBR605C Type 6 Post 1

Stanley Bed Rock no. 605C, Type 6, c. 1912-1921

History

The motivation behind Stanley’s decision to develop the Bed Rock line of planes is debatable. However, given their genius at marketing and creating demand, I suspect it was driven by a couple of different factors. In 1895, Justice Traut patented what would become the basic Bed Rock design. That same year, E. A. Schade patented the frog adjustment feature that would initially be used on the Bed Rock planes, and eventually (1907) would become a mainstay feature of the Bailey line of planes.

US536746-Traut Bed Rock0

J. A. Traut Patent 536,746, Apr 2, 1895

US545732-Shade Bed Rock

E. A. Schade Patent 545,732, Sept. 3, 1895

The introduction date of Bed Rock planes is a little uncertain. They first appeared in Stanley catalogs in 1900, but there is some evidence they may have begun manufacture as early as 1898. Apparently there was a dispute over the Schade patent, because those sold for the first year or two have the Sept. 3, 1895 patent date on the bed milled out.  This was done by the factory, and after the body had been japanned, indicating there was some sort of legal dispute over the Schade patent that required a last minute intervention prior to the planes being sold to the public.  By 1900, the milled out date was gone and just the single APR 2, 95 date from the Traut patent remained stamped into plane bodies until about 1911, when Stanley introduced a major design change.

Differences between Baileys and Bed Rocks

The Bed Rock line was marketed as Stanley’s premium line of bench planes. There were two primary differences between the Bailey line and the Bed Rocks, and both were in the frog design.

1. The mating surfaces of both plane body and frog was substantially larger than on the Bailey planes, and the frog on the Bed Rock fit into a groove on the body, eliminating any slop or shifting of the frog once in place. As Stanley described it in their marketing material:

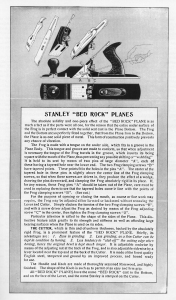
The absolute solidity and one-piece effect of the “BED ROCK” PLANE is as much a fact as if the parts were all one, for the reason that the entire under surface of the Frog is in perfect contact with the solid seat cast in the Plane Bottom. The frog and the Bottom are so perfectly fitted together, that from the Plane Iron to the Bottom, the Plane is as one solid piece of metal. This form of construction positively prevents any chance of vibration.

2. Additionally, the Bed Rocks originally featured the frog adjustment mechanism that was patented by Schade on Sep. 3, 1895.  This same feature was eventually added to the Bailey line in 1907. Again, as described in a Stanley catalog:

The width of the mouth may be regulated and made wider or narrower as coarse or fine work may require. First remove the lever and cutter and loosen the two frog screws that fast en the frog t o it s seat. With a screw driver turn the center adjusting screw to the right to close the mouth, and to the left to open it. When the frog is in the position desired, tighten the frog screws and replace the cutter and lever .

Of course, there were other less significant differences as well. Interestingly, Stanley used the same numbering system for the Bed Rocks as the Baileys for the first 2 years of manufacture. It wasn’t until 1900 that the ‘600’ series of numbers (602 through 608) were cast into the plane bodies.  Stanley also had a Bed Rock branded lever cap that was used to help distinguish the two lines. The first design of this cap was marked ‘STANLEY’ on one line, then ‘R.&L.Co.’ on a middle line, with ‘BED ROCK’ on the bottom line. In 1908 the middle line was removed and caps were marked ‘STANLEY’ over ‘BED ROCK.’

Stanley Bed Rock no. 607 Type 3 c. 1900-1908

Stanley Bed Rock no. 607 Type 3 c. 1900-1908

Major Design Changes of 1911/1912

After the frog adjustment feature was added to the Bailey line in 1907, there was little to clearly differentiate the Bed Rock planes from the Bailey planes. For example, while the frog base design was arguably superior, it was a feature that was not readily apparent unless one were to disassemble the plane. Further, up until this point, the profile of the plane base was the same on both Bailey and Bed Rock lines; with both using the same classic ‘hump’ on each cheek. For Stanley to differentiate the two and justify the premium cost of the Bed Rock, it’s pretty easy to see the reasoning behind the changes they were about to make.

1. On March 14, 1911, Schade was granted another patent for the use of pins and set screws to both attach and adjust the position of the frog. This new design was superior to the previous (and the one provided on the Bailey planes), and set the Bed Rock line apart from all of Stanley’s competitors.
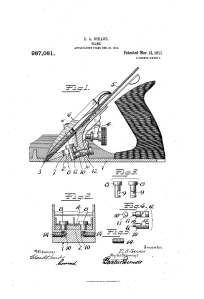
E. A Shrade Patent 987,081, Mar 14, 1911

E. A. Schade Patent 987,081, Mar 14, 1911

The Two Frog Attachment and Adjustment Designs

The Two Frog Attachment and Adjustment Designs

2. In addition to the new frog attachment and adjustment design, Stanley, in a move of marketing brilliance, also changed the profile of the body casting, flattening the tops of the cheeks to give the Bed Rock planes a unique look all their own. With such a clear visual distinction, it’s not hard to imagine that this decision was intended to induce those with the financial means to spend a little more and buy the premium Bed Rock planes.

3. The third major change was the addition of a raised receiver for the front knob, and the transition from the low knob to the high knob. It’s interesting that high knobs weren’t introduced to the Bailey line for another 8 years, and the raised receiver wasn’t added to the Bailey design until 1929, some 19 years later!

Miscellaneous

The Bed Rock line included pretty much the same assortment as the Bailey line, with the omission of a number 601, which was never produced. The line included everything else from the 602 to the 608, including half sizes and corrugated versions. The only other exception is that they never made a corrugated version of the 605 1/4.

Bed Rocks were slightly heavier planes with slightly greater mass. The 1934 Stanley catalog offers a comparison, with the no. 603 weighing 1/4 lb more than the Bailey no. 3, and the no. 608 weighing 1/2 lb more than the no. 8.

Prior to the 1911/1912 changes, Stanley manufactured Bed Rock style planes for both Winchester and Keen Kutter. These planes were very similar in design, varying mainly in the lateral adjustment levers, lever caps, and numbering system.

Bed Rock Flyer Bed Rock Flyer-1923

Bed Rock Type Study

The chart below is a summary Type Study of Stanley Bed Rock Planes based on Bob Kaune’s thorough 1996 study and additional research I have conducted over the past several years.   Please note that all type studies are approximate as production variations throughout the manufacturing years were quite common.   Also keep in mind that Type Studies are present day references, time-lines that map changes in the design and features of tools manufactured in the past.  Understand that neither Stanley nor any other manufacturer followed type studies.  They didn’t exist at the time.  In fact, it is only in the last 30 years or so that type studies have been assembled through historical research and the physical inspection of hundreds or thousands of tools made over the years.

Bed Rock Distinguishing Features By Type

Dates

Low Knob – Rounded Sides

Type 1 Beds marked with Bailey model numbers (Nos.2 to 8.)
Space below “PAT’D APR. 2. 95″ was milled out at the factory
S casting mark on bed (a single raised dot on some specimens)
Frogs & Lever Caps have “B” casting marks
Lateral lever has two patent dates “10-21-84 & 7-24-88”
STANLEY R & L CO…BED ROCK on lever caps, Q trademark stamp on most irons

1898

Type 2 7-24-88 is the only patent date on the lateral adjustment lever

1898-1899

Type 2a Model No.603 and 604 beds (only these two) were marked “No.60x”

1899

Type 3 All beds now marked with “600” numbers, i.e.; No.602 – 608
No milled space below “PAT’D. APR. 2. 95.” on bed, B casting marks
Frogs of some planes are nickel-plated on the machined surfaces

1900-1908

Type 4 B casting marks eliminated. No patent dates on the lateral adjustment lever
Lever caps now marked “STANLEY….BED ROCK”
Some irons have “S” trademark stamp, later planes have “T” trademark stamp

1908-1910

High Knob – Flat Sides

Type 5 Beds now marked “BED ROCK” in addition to “600” model numbers
2 patent dates behind frog, “PAT’D. APR. 2. 95″ & APR. 19. 10″
Flat-top sides introduced for first time
Raised knob receiver (flat version), Tall knobs introduced, “T” tm on irons
Frogs are now attached to beds with adjustment pins and set screws

1911

Type 6 Lever caps now marked “BED ROCK”
Irons stamped with “V” trademark or “X” trademark stamps

1912-1921

Type 6a 1-1/4″ diameter frog adjustment wheel
Iron stamped with “Y” Trademark (1922-1923)

1922

Type 7 One patent date behind the frog – “U.S. PAT. APR. 19. 10.”
Lever caps marked “STANLEY” only in the notched rectangular logo
Irons stamped with “AA” Trademark (1923-1935)

1923-1926

Type 8 Bed now stamped “MADE IN USA” in addition to the one patent date
Knob receiver boss now cupped for fitting knob

1927-1930

Type 9 Beds no longer have a patent date; stamped “MADE IN U.S.A.” only
Some lever caps nickel-plated with orange paint behind STANLEY logo

1931-1932

Type 10 Beds of No.603, 604 & 605-1/4 planes have raised handle receivers
Some frogs have orange paint on sides like Bailey planes
Lever caps now have kidney-shaped bolt holes
Irons stamped with BB tm starting in 1936

1933-1941

Type 11 Castings are heavier and thicker during war production years
Finishes left rough; lever caps not plated or polished

1942

Type 12 Frog adjustment nut either hard rubber or small diameter steel
Knob and handle are hardwood (maple) with dark varnish stain
All brass parts eliminated during war-time production
END OF PRODUCTION FOR BED ROCK PLANES

1943

The chart below lists specifications for Stanley’s line of Bed Rock planes.

Plane No. Dates Made Iron Width Length Weight
No. 602 1898-1942 1 5/8 7 2 lb 4 oz
No. 602C 1898-1923 1 5/8 7 2 lb 4 oz
No. 603 1898-1943 1 3/4 8 3 lb 4 oz
No. 603C 1898-1935 1 3/4 8 3 lb 4 oz
No. 604 1898-1943 2 9 3 lb 12 oz
No. 604C 1898-1935 2 9 3 lb 12 oz
No. 604 1/2 1898-1935 2 3/8 10 4 lb 12 oz
No. 604 1/2C 1898-1935 2 3/8 10 4 lb 12 oz
No. 605 1898-1942 2 14 4 lb 8 oz
No. 605C 1898-1935 2 14 4 lb 8 oz
No. 605 1/4 1925-1943 1 3/4 11 1/2 4 lb
No. 605 1/2 1898-1935 2 1/4 15 6 lb 8 oz
No. 605 1/2C 1898-1937 2 1/4 15 6 lb 8 oz
No. 606 1898-1941 2 3/8 18 7 lb 6 oz
No. 606C 1898-1934 2 3/8 18 7 lb 6 oz
No. 607 1898-1943 2 3/8 22 8 lb 12 oz
No. 607C 1898-1935 2 3/8 22 8 lb 12 oz
No. 608 1898-1940 2 5/8 24 9 lb 12 oz
No. 608C 1898-1935 2 5/8 24 9 lb 12 oz

_________________________________

References

Kaune, Bob, Bed Rock Type Study, 1996

Sellens, Alvin, The Stanley Plane, 1975

Smith, Roger, Patented Transitional & Metallic Planes In America, Vols. I & II, 1992

Walter, John, Stanley Tools – A Guide to Identity & Value, 1996

Various Stanley catalogs, flyers, pamphlets
Tool Profile – The Stanley Bailey no. 2C Plane

033 SB2C Type 8 - 1

Stanley Bailey no. 2C Smoothing Plane, Type 8 (c. 1899-1902)

The diminutive Stanley no. 2 plane has long been a collector’s favorite, second only to the tiny no. 1 in its appeal among bench planes. Produced from 1869 to 1961 and measuring just 7 inches long with a 1-5/8″ iron, this smoothing plane is useful for working smaller pieces or in confined spaces.

The corrugated version of the no. 2, designated the no. 2C, was never a popular model. Although offered from 1898 to 1943, comparably few were actually produced, making this one of the rarest of Stanley planes. The corrugations were provided to help reduce friction. Whether or not they actually help, or were a marketing gimmick, is debatable, but the feature was more popular on the larger bench planes than on the no. 2.

033 SB2C Type 8 - 5

The corrugated sole of the rare Stanley no. 2C

The no. 2C shown here is part of my personal collection and is currently offered for sale for a limited time.

Stanley Trademark Stamps

The following reference guide provides examples of Stanley’s trademark stamps from 1872 to the present. It is by no means comprehensive or complete, but this covers the main trademarks. There were often variations used on block planes and other tools. Some of the photos are pretty poor. I will try to photograph better examples as time goes by.

A.1 Trademark (1872-1874)

A.1 Trademark (1872-1874)

A.4 Trademark (1879-1885)

A.4 Trademark (1879-1885)

A.5 Trademark (1886-1890)

A.5 Trademark (1886-1890)

J Trademark (1874-1884) *Longer on Block Planes

J Trademark (1874-1884*) *~1909 on Block Planes

JJ Trademark (1890-1910) Used on Block Planes

JJ Trademark (1890-1910)
Used on Block Planes

P Trademark (1886-1890)

P Trademark (1886-1890)

Q Trademark (181-1904)

Q Trademark (1891-1904)

S Trademark (1907-1909)

S Trademark (1907-1909)

T Trademark (1909-1912)

T Trademark (1909-1912)

V ("Victory") Trademark (1912-1918)

V Trademark (1912-1918) Also called “Victory”

X Trademark (1919-1920) 1st "Sweetheart"

X Trademark (1919-1920)
1st “Sweetheart”

X Trademark (1919-1920) Block Plane Variation

X Trademark (1919-1920)
Block Plane Variation

X Trademark (1919-1920) Block Plane Variation

X Trademark (1919-1920)
Block Plane Variation

X Trademark (1919-1920) Block Plane Variation

X Trademark (1919-1920)
Block Plane Variation

Y Trademark (1920-1921) 2nd "Sweetheart"

Y Trademark (1920-1921)
2nd “Sweetheart”

Y Trademark (1920-1921) Block Plane Variation

Y Trademark (1920-1921)
Block Plane Variation

Y Trademark (1922) Canadian Variation

Y Trademark (1922)
Canadian Variation

AA Trademark (1922-1935) 3rd "Sweetheart"

AA Trademark (1922-1935)
3rd “Sweetheart”

AA Trademark (1923-35) Canadian Variation

AA Trademark (1923-35)
Canadian Variation

BB Trademark (1935-Present)

BB Trademark (1935-Present)


Tool Profile – Stanley nos. 61 & 63 Low Angle Block Planes

Stanley nos. 61 & 63 ~ from the Virginia Toolworks collection

Stanley nos. 61 & 63 ~ from the Virginia Toolworks collection

The Stanley no. 61 and no. 63 planes are low angle block planes featuring depth adjustment mechanisms but lacking an adjustable throat plate.  Introduced in 1914 and 1911 respectively, neither the 6 inch no. 61 nor the 7 inch no. 63, were ever particularly popular with tradesmen, woodworkers, or carpenters.  Offered as less expensive, fixed throat alternatives to the no. 60 and no. 65, very few folks were tempted to purchase a low angle plane without an adjustable throat, especially when that feature could be had for just a few pennies more. Subsequently, their limited popularity constricted demand and production, and so they are fairly hard to find today.

Ironically, these planes are virtually identical to the very first type no. 60 and no. 65, both of which were introduced in 1898 with a similar wooden knob and lacking an adjustable throat.  Why then, less than 10 years later, Stanley thought reintroducing this handicapped design under the model nos. 61 and 63 was a good idea is anyone’s guess. Regardless, both the no. 61 and no. 63 are easily distinguished from the Type 1 no. 60 and 65 since their model numbers were cast in relief at the rear of the bed just below the depth adjustment knob.  Manufactured for less than 25 years, both planes were discontinued in 1935.

While the no. 61 and no. 63 are very collectible due to their scarcity, users looking for a functional low angle block are far better off sourcing a no. 60 or 65 in good condition.

***

Stanley Gage Planes – History and Type Study

John Porcius Gage formed the Gage Tool Co. in 1883, and operated it until 1917, making wood bottom transitional planes. J.P. Gage registered plane patents on 4 August 1885, 13 April 1886 and 8 November 1892. The 30 January 1883 patent of David A. Ridges was also used.

US339872-Gage-Patent

J. P. Gage Patent Drawing

The Gage “self-setting” design eliminated the need for a lateral adjustment feature, which eliminated slop in the blade movement. The adjustment slide was designed to accurately fit into a groove in the frog, and depth adjustment was controlled by a screw at the rear of the frog, similar to a low angle block plane. The two-piece lever cap design also functioned as a chipbreaker. The outer part of the cap serves as the lever cap, with the inner piece functioning as a chipbreaker. The mechanism is adjustable via a two-screw slide to bring it closer to the edge of the blade. The self setting feature allowed the cutter and cap to be removed and reinstalled without adjustment of the cut.

In 1919 Stanley Rule & Level Co. bought the Vineland NJ company, mainly to get the patent for their excellent frog design and to compete with Sargent’s Auto-Set line of planes that are very similar in both appearance and design. Stanley retained the use of the Gage name, producing a line of transitional planes from 1919 to 1935, and metal Gage planes from 1919 to about 1941, when the line was phased out.

The original Stanley Gage line of metal bench planes was numbered 3 through 7, sizes that compared to their Bailey counterparts. The G prefix was added in 1930 to distinguish them from the Bailey line (G3 through G7C). There were 10 different numbers included in the offering, which included corrugated versions that, like Bailey planes, were differentiated with a C suffix appended to the model number (ex. G3C or G7C).

Gage Plane

Stanley Gage no. 5, Type 2 (1924-1930)

Gage Type Study

There are four “Types” of Stanley Gage planes, which are thankfully far less complicated than most of the other Stanley Type studies.

Type 1 (1919-1923) – Plane beds marked “Pat. Appl’d For” in the casting. No “G” prefix to the model number

Type 2 (1924-1930) – “Pat. Appl’d For” removed from the casting. Plane beds are now marked with Schade’s 2-17-20 patent date.

Type 3 (1930-1941) – The “G” prefix added to the model number.

Type 4 – Same as Type 3 but has “Made in USA” added to the casting. (exact date of this is uncertain)


Sellens, Alvin, The Stanley Plane,: A History & Descriptive Inventory, Augusta, KS: Allvin Sellens, 1978.

Walter, John, Stanley Tools: Guide to Identity & Value, Marietta, OH: John Walter, 1996.

***

Renewed Life for My Dad’s Stanley Level

My dad died when I was still a teenager.  Unlike his father, who was a carpenter, my dad wasn’t much of a woodworker.  The few tools he left behind were mostly garden variety homeowner tools purchased from the local hardware store.  So when my brother gifted me my dad’s old level this summer, I didn’t give it much thought.  It was in horrible condition from decades of neglect.  I brought it home and with barely a glance, set it aside on my workbench to deal with later.

With cooler fall temperatures here on the east coast, I recently pulled it out for a closer look.  Upon closer inspection, I found that it is a Stanley no. 3 level, which was somewhat of a surprise in and of itself.   More interesting, the trademark stamp dates it to the 1890s, approximately 30-35 years before my dad was born.  It could have been my grandfather’s, but even he would have had to have purchased it as a teenager, if acquired new.  Of course there is no way to know where it came from or who originally owned it, but it ended up in my father’s hands, then my brother’s, and thanks to him, it now belongs to me.

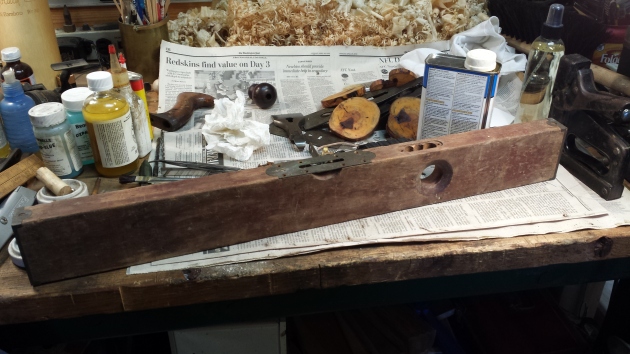
As you can see from the quick shot I took before I got started on it, virtually all the original finish is gone and the wood faded from exposure to the elements.  It appears to have spent a good deal of time in a shed or barn.  The primary glass vial was intact and serviceable, but the plumb vial was broken long ago.  Otherwise, all the parts were in place and thankfully, the vial adjustment screws were not frozen.

Level Pre-Restoration

My dad’s 1890s vintage Stanley no. 3 Level, partially disassembled

I disassembled and removed all the hardware to better evaluate what needed to be done in terms of cleanup, and to assess the broken plumb vial.  After cleaning the rust off all the screws and the vial adjustment mechanisms, I cleaned the crud off the brass plates and end caps.  I never polish old brass hardware, but I decided in this case to clean off most of the oxidation in order to better see the center scribe line.

With the hardware cleaned up, I moved on to the wood.  Despite its condition, there were numerous paint specks and splatters from years of use that I wanted to protect.  The wood itself is evidently cherry.  I cleaned it lightly with Kramer’s Blemish Clarifier to remove any loose dirt and crud.  I then applied 6 or 8 applications of Kramer’s Best Antique Improver, which I’ve written about before.  It’s great stuff, all natural (no petrochemicals), and restores life to finished and unfinished wood.

In the meantime, I went to work sourcing a proper replacement vial.  I preferred to keep it as close to original as possible, so new acrylic vials were out of the question.  I found a few glass vials for sale on eBay, but the prices were absurdly high.  So, I started trolling for a suitable “donor” level of approximately the same vintage.  It took 2 or 3 weeks, but I finally found one for under $10 that had the plumb vial intact.  When it arrived, I was surprised to find the condition actually better than the photos reflected.  I actually felt a little guilty stripping it of one of its parts.

Plumb Vial Before Repair

Plumb Assembly Before Vial Replacement

Now if you’ve never replaced a vial in an old Stanley level, you might be surprised to learn that they used Plaster of Paris (or something similar) to cement the glass vial in the tube shaped holder.  This both held it in place and also protected the fragile ends.  Getting the vial out of the old plane was much easier than I anticipated.  Pulling the split holder tube open slightly, the vial and plaster slid right out in one piece.  Once out, the old plaster easily released from the glass vial.  The vial has a paper backing that wraps around the back side, but it isn’t attached.  So carefully removing that paper and setting it aside, a quick cleaning of the glass had it looking very much like new in short order.  Positioning the vial along with the paper backing into the assembly on my dad’s plane, I dabbed some plaster into place at each end and allowed it to dry.

I reattached all the hardware, and calibrated both vials using another level as a guide.  Completed, my dad’s old level is once again accurate and ready for the workshop.  You can just make out the replaced vial in the photo on the left.  Now, as to the donor level I bought, it’s still sitting here in need of a plumb vial.  There’s clearly something wrong with this scenario!

Complete Full ViewComplete Full View 2