The Myth of Sole Flatness

I’ve never understood the obsession some people have over sole flatness. Somewhere along the way, a lot of folks got the impression that enough of the millions of vintage planes out in the wild are warped or distorted enough to warrant suspicion when buying. Worse, some even insist that for a vintage plane to be viable for use, it’s sole must be flattened.

Lie Nielsen states that their modern manufacture plane soles are ‘ground flat and square to .0015″ or better, regardless of length.’ Veritas planes have similar tolerances. Don’t get me wrong, I have nothing against either of these two companies. Heck, I own products from both of them. Certainly, if you’re spending $325 for a LN No. 5 Jack Plane made in 2020, you expect it to be dead flat. But is this a reasonable expectation in a plane that was made in 1920, and more important, is it even necessary?

In my opinion, sole flatness is a myth driven by modern day influences and perspective. We’ve been conditioned to believe that a couple hundredths or thousandths of an inch will somehow make or break the functional viability of the tool. But it’s silly to apply expectations of tolerances we get from computer driven milling equipment to mass produced hand tools made +/- 100 years ago. This is misguided at best, and completely unnecessary.

I suspect those who obsess over sole flatness fundamentally misunderstand how hand tools were originally used and likely have some pretty big misconceptions about 18th and 19th century furniture construction and finish. Hand planes were never intended to be precision instruments, at least not in the same way we think about precision instruments today. In today’s world, we tend to rely almost solely on the tolerance of our tools to produce precise results. 100 years ago, that was simply not the case.

Craftsmen and journeymen of the 18th, 19th, and early 20th century mastered the tools they had available and learned to compensate for any imperfections and limitations. Sure, some of them produced very precise pieces of furniture and cabinetry, but it was due to their skill and mastery, not the precision of their tools. And to be honest, most of the handmade furniture made during that period was anything but precise. Look closely inside and behind and underneath period pieces. The beauty and craftsmanship doesn’t lie in precision as we think of precision today. On the contrary, it lies in the subtle imperfections that reflect the hands of the maker and mark of his tools. That, in my opinion, is what makes it beautiful.

I’ve owned and restored many hundreds of vintage hand planes over the years dating from the 1870s to the 1980s. Some were in near mint condition, while others were closer to landfill fodder. Most fell somewhere in between, but the point is I’ve never seen one that was warped or cupped significantly enough that its usability was affected. All of them needed some degree of tuning and refining, but none required flattening. In fact, the only two planes I’ve ever “flattened” were two of my own block planes, and that wasn’t so much because they weren’t already flat, but because I wanted completely clean metal.

I’m frequently asked what kind of camera and lighting I use for my photos. I always respond that the secret to good photos doesn’t lie in better equipment or tools, but in mastering the equipment you have, learning to leverage its capabilities and overcome its limitations. Creativity isn’t stifled by constraint. On the contrary, constraints fuel creativity, innovation, and invention.

I think the same holds true for most other pursuits, as well. It’s certainly true for woodworking. Could I take even better photographs with a newer camera and broader selection of lenses? Sure. But that’s not the point. That’s not what makes me a better photographer, just as flatter plane soles won’t make me a better woodworker.

Working Wood by Hand

I like working with hand tools much more than power tools whenever I can. Aside from the fact that they’re infinitely safer – no spinning blades, etc. to slice through flesh – they’re also quiet. And rather than making sawdust, which is unpleasant to breathe, non-powered tools make shavings, so a mask isn’t necessary. But more than that, hand tools bring me into physical contact with the wood, in exactly the same way that intaglio printmaking requires physical contact with the plates and paper.

I enjoy the way a tool feels in my hand, the way it responds to my direction, and the way it interacts with the surface of the wood. Using hand tools is similar to playing a musical instrument. When well tuned and skillfully employed, they literally sing as they cut, shave, and shape the surface of the wood, achieving the desired effect.

Sometimes You Just Have To Work Out of the Bed of Your Truck

I love this little Stanley no. 18. It’s my first go-to for anything a block plane might be able to handle. It dates from the 1910s (V Logo), and is as close to mint condition as a 100 year old plane can be. The nickel plating on the cap is p e r f e c t, and the japanning 100%. Aside from a little patina on the cheeks, it looks like it just came out of the box.

20170129_142259

20170129_141928

Tool Profile – Sargent no. 514 Low Angle Block Plane

Sargent-514-DSC_1937

Sargent no. 514 Low Angle Block Plane (Virginia Toolworks Collection, c. 1913-1918)

The Sargent no. 514 Low Angle Block Plane was Sargent’s answer to the Stanley no. 62. Manufactured from 1913 to 1935, the 514 is almost identical in outward appearance. Like the Stanley no. 62, this plane features an adjustable mouth and a similar horizontal depth screw adjustment. It differs, however, through its unique lateral pivot adjustment that enables the cutter to be adjusted laterally despite it’s extreme low angle. This adjustment design was patented by Albert A. Page on March 17, 1914.

Sargent-514-DSC_1938

The lateral and depth adjustments

The depth adjustment knob screws into a cylinder that free floats vertically in a two sided raised boss in the main body casting. The depth adjustment bolt threads through this cylinder and pivots in a range limited by the two sides of the boss, enabling the lateral adjustment. A U shaped attachment on the back side of the iron fits into a notched area of the depth adjustment lever between the threads and the knob, providing for depth adjustment. The design is very clever and offers good stability, and is superior to the Stanley no. 62, in my opinion.

Sargent-514-DSC_1939

The mahogany knobs sits on the cast disk with oval lugs

Like the no. 62, the mouth of the no. 514 is also adjustable, using Henry Sargent’s same April 26, 1906 patented design featured on Sargent’s other block planes. The front mahogany knob threads into the sliding toe section of the sole through an adjustment disk with two raised oval thumb lugs integrated into the casting opposite each other. By loosening the mahogany knob, the disk is grasped and the plate positioned forward or backward using the oval thumb lugs, thereby adjusting the size of the mouth opening. I find this a more precise method than the eccentric lever found on the Stanley planes.

Produced in relatively limited quantities, most of these planes are found today with chipped mouth openings or missing parts. This very early example from the Virginia Toolworks collection dates from 1913 to 1918, and is in very fine condition, only missing an area of japanning on the inside cheek. Values on these typically run from about $500 to $1000 depending on the condition.(1)

For more information on Sargent Planes including the #514, I strongly recommend Don Wilwol’s fantastic reference book, The Sargent Hand Plane Reference Guide for Collectors and Woodworkers!

Sargent-514-DSC_1942

The Stanley no. 62 (rear) and Sargent no. 514 (front) ~ from the Virginia Toolworks Collection

___________________________________
1. Heckel, David, Sargent Planes Identification and Value Guide, 1997

***

Dad’s Sargent Hercules Block Plane

The plane in its original condition in 2008

The Sargent Hercules plane in its original condition in 2008

This old Sargent Hercules block plane, a clone of the Stanley 110, belonged to my dad and is one of just a couple of his tools that I have. The Hercules was Sargent’s lower priced line of ‘handyman’ or value tools. This particular plane lived its life in our outdoor shed and was in pretty rough condition when I got it 8 years ago. I first restored it in 2008, but was never happy with it. At the time, I resisted repainting it, as I do with almost all tools, but so much of the original finish was gone that even after oxidizing, it was lifeless and dull.  In this case, the only way to get it back to anything resembling its original look was a full on refinishing.

DSCN1739

After the original 2008 restoration

The plane has practically no monetary or utility value, and I figured even if I painted it and later changed my mind, stripping it would leave it no worse off than it was to begin with. So last week, I repainted the body with black enamel, including the cheeks, which were apparently japanned or painted to begin with. After a couple of hours of baking in the oven, the paint came out very hard and should be reasonably durable, not that I will be using this plane for much of anything.

Now that it’s all said and done, this old Sargent once again looks pretty good. I think dad would approve.

For more information on Sargent Planes including the #514, I strongly recommend Don Wilwol’s fantastic reference book, The Sargent Hand Plane Reference Guide for Collectors and Woodworkers!

Dad's Sargent Hercules DSC_1934

The Sargent Hercules after a full refinishing, April 2015

Setting Up and Tuning a Block Plane

165 SB9.5 Type 12 Post1

Stanley Bailey no. 9-1/2, c. 1952-55 ~ one of the most popular block planes of all time

As a follow up to an earlier post about setting up and tuning bench planes, this one will focus solely on block planes. Some of the information is taken directly from that post, so if you’ve read it, it may sound familiar.

On to Setting Up Those Block Planes…

It’s no surprise that so many ‘modern’ woodworkers, especially those used to plug-and-play electric tools, eschew anything that requires sharpening, let alone tuning and fettling to make it work properly.  But the fact is, whether 100 years old or brand spanking new, virtually all planes benefit from some degree of tuning to bring them to their full potential.  Fortunately, this is not a difficult proposition, and actually aids in better understanding how the tool functions and how to get the most out of it.

Below are the basic steps for setting up and tuning a block plane for use.  Block planes tend to be less complicated than bench planes, but there are still many variations, both new and used. I’m purposefully keeping it fairly generic, so some interpretation may be necessary when applying the concepts to the tool in front of you.  But don’t worry, there are no tool police surveilling workshops and garages.  Feel free to skip a step if you don’t think it’s relevant or needed.

Step 1 – Soles Need Saving

I’m not a stickler when it comes to flattening the sole of a plane.  After owning hundreds and using dozens of planes over the years, it’s fairly rare to come across one with a sole so warped, cupped, or bowed that it’s unusable.  If you happen upon one that is truly unusable, my advice is to return it, sell it, or throw it away.  The only possible exceptions are block planes, which are pretty easy to flatten due to their smaller size.  Bench planes are far more difficult, especially the larger ones.  You can take them to a machine shop and have them milled or lapped flat, but forget trying to flatten them yourself with sandpaper unless the problem is very minor.

165 SB9.5 Type 12 Post5

The sole of this plane was lapped by hand using a granite surface plate

If you do decide to lap your plane’s sole flat, you’ll need a dead flat substrate.  The cast iron bed of a table saw or jointer works well, or if you don’t have one of those available and want to keep it on the cheap, a piece of 12” x 12” or larger granite surface plate will work for block planes.  Just make sure you retract the blade and tension the lever cap as you would in actual use.  This puts the correct stress on the plane body.  I start with 60 grit and progress up to about 320.  Removing high spots (convexity) is more critical than low spots (concavity).  Keep in mind that you don’t even need the entire sole dead flat.  As long as you have smooth contact at the toe, around the mouth, and at the heel, the plane will work just fine.

Vintage planes often have raised dings from bouncing around in tool boxes, especially along the edges, toe or heel.  A flat mill file makes very quick work of these minor problems.  Finally, some woodworkers file a very small 45 degree chamfer along each edge of the sole.  This is completely optional, but helps prevent inadvertent gouges when using the plane should you tip it slightly.  I’ve seen some Stanley planes from the mid 20th century that appear to have been made that way at the factory.

Step 2 – Flatten ‘dem Frogs

The hole in the iron straddles the lateral adjustment pivot disc and seats against the tiny frog where it engages the tiny pins on the height adjustment lever mechanism

The hole in the iron straddles the lateral adjustment pivot disc and seats against the tiny frog where it engages the tiny pins on the height adjustment lever mechanism

Block planes do not typically have removable frogs like bench planes, but there are some exceptions, mainly on some of the specialty and low angle planes where part of the frog moves with the iron when adjusting depth of cut. Either way, the function of the frog is the same on all planes. It provides a secure platform on which the iron is supported.  In order for the plane to shave wood correctly, there must not be any movement (wobble, play, rocking, etc.) to the iron.  It must be firmly seated against the frog, so the face of the frog must be as flat and secure as possible. This platform on most block planes is frequently very small, especially when compared to bench planes. Click on the photo to the right and you can see the frog is less than 1/2 square inch.

Since the frog on your block plane is typically not removable, you only need to touch up the seat with a firm sanding block to ensure it is flat.  Also, because the flat sloped area behind the mouth on the plane’s base provides much of the forward support for the iron, it needs to be flat too.  Unfortunately, it’s hard to get to, and since you don’t want to enlarge the mouth at all, just a touch using a small piece of angled wood with fine sandpaper wrapped around it is about as far as you want to take it. Thankfully, this is all that is usually needed to remove old crud. A Dremel or quality flexible shaft tool with a wire wheel brush will also work if the problem is limited to dirt and light corrosion.  Finally, as on the bench plane, clean the threads on all the hardware and add a little light oil to help retard moisture and rust.

Step 3 – Lever Caps (This is not a drinking game…)

18 cap 4

Just the leading edge to the underside of the lever cap at the bottom of the photo needs to be flattened. This photo, taken before flattening, shows the edge to be a little rough, which will compromise flush contact with the iron.

Block planes don’t have cap irons, so the lever cap plays a more important role.  Use your coarse sharpening stone or take a fine file to the back side and remove any rough spots, giving close attention to the leading contact edge.  This is most important on block planes with cast iron hooded style lever caps, such as the old Stanley 9-1/2.  The back sides of these caps are notoriously rough and unfortunately japanned. You don’t need to remove all the japanning, but you do want to get a smooth line of contact down front where it touches the iron along the front edge.  File it smooth and give it a couple of swipes across your 1000 grit stone. If your plane uses one of the nickel plated knuckle style lever caps, just flatten the bottom of the front edge in a similar fashion.

Step 4 – I Pity the Fool Who Don’t Sharpen His Tool!

The iron has been sharpened with a small 2 to 3 degree secondary bevel added (the dark line at the very edge)

The iron has been sharpened with a small 2 to 3 degree secondary bevel added (the dark line at the very edge)

The simple fact is, even with brand new planes, the irons require final honing before use.  This is not due to some lack of attention on the part of manufacturers.  Irons are provided this way on purpose, since the manufacturer has no way of knowing what you will be using the plane for, and subsequently how the iron would need to be honed. You may want a perfectly straight edge if working on joinery, or you may want it cambered (with a slight radius) for smoothing out small surface areas. It’s up to you, but if you do nothing else in the way of tuning or preparing your plane for use, at least take the time to properly sharpen it.  Do not skip this step!  Sharpen the iron.  Again, sharpen the iron!  Sharpen it I say!

Since sharpening is such an expansive topic in and of itself, I will leave the specific details for other posts.  What you need to know in the context of tuning, however, is that any plane, new or old, requires initial sharpening and honing.  At a minimum, new plane irons need to have their un-beveled side honed flat and polished to at least 4000 grit and preferably 8000 grit.  You don’t need to fuss with the entire surface; just the first 1/8” to 1/4” along the cutting edge will do.  You also need to put a final honing on the bevel edge itself.  It may look sharp, but it needs to be honed, again, to at least 8000 grit.  The goal is to get your cutting edge to as close as possible to a zero degree radius.

Sharpening is too often the deal breaker that dissuades woodworkers from trying hand tools.  This in unfortunate, for it requires little monetary investment to get started, is not particularly difficult to learn, and can be accomplished rather quickly with surprisingly good results.  For detailed information on sharpening, I recommend investing in one of the outstanding books on the subject by Ron Hock or Leonard Lee.   Chris Schwarz has also written a number of fantastic articles on sharpening plane irons.

Step 5 – Final Adjustments

Now that you’ve finished tuning and sharpening your plane, it’s time to put it all back together and adjust it for use.  Hopefully, you have a better understanding of what each part does and how they all function together.  This will make adjusting it for use, and while in use, more intuitive and fluid.

A few points of consideration…

The adjustable mouth plate on the Stanley no. 9-1/2. The mouth opening is adjusted by loosening the knob and rotating the eccentric throat lever left or right (to open or close the mouth).

The adjustable mouth plate on the Stanley no. 9-1/2. The mouth opening is adjusted by loosening the knob and rotating the eccentric throat lever left or right (to open or close the mouth).

While the frog’s position on bench planes is adjustable, meaning you can shift if forward to decrease the size of the mouth opening or backward to increase the size of the opening, many (but not all) block planes have adjustable mouths.  Use a larger mouth opening for thicker cuts, and a smaller mouth opening for fine shavings.  For details on this please see my post on adjustable mouth planes.

Holding the plane upside down, and looking down the sole at a low angle, lower the iron until it just begins to appear through the mouth – just a whisper.  Note that it’s not unusual for there to be quite a bit of slop in the wheel that lowers and raises the iron, as much as a full turn or two.  Just turn it until you begin to feel resistance. Make any lateral adjustments necessary using the lateral adjustment lever if your plane has one (some do and some don’t). If yours doesn’t, just tap the side of the iron with a small hammer to properly align it. I use a brass hammer so as not to mushroom the iron’s edge, but what you use is up to you. Turn it upright and make a test pass on a piece of scrap wood.  If the plane digs in, back off the depth just a bit.  If it misses entirely, lower the iron a little.  You will quickly get a feel for when it’s ‘right,’ as evidenced by the rewarding ‘thwack’ sound a plane makes when it cuts a perfect curl.

Tuning a hand plane is not a difficult endeavor.  Once practiced, the whole process can be accomplished in about a half hour, even less depending on the tool. Rather than view it as an unpleasant chore, I actually enjoy it, especially later in the evening when the dust has settled and the world is quiet.  Pour yourself a measure (or two) of your favorite Kentucky brown, put on some music of choice, and saddle up to your work bench.

276 SB18 Type 15 Post 9

Stanley Bailey no. 18, c. 1936-42

 ***

Tools shown in the photos were returned to functional condition by Virginia Toolworks using museum quality archival preservation techniques.  Sharpened and tuned for use, every tool is fully tested and adjusted until perfect.

Tool Profile – Sargent no. 507 Rabbet Plane

Sargent 507

Sargent no 507, c. early 1940s

The Sargent no. 507 Rabbet Plane with its open arches on each side is one of the more unusual and interesting block planes ever made. From both a functional and design standpoint, it is reminiscent of a Stanley no. 10, but in a 7 inch block plane. Stanley, however, never made a comparable model to this plane. The closest they came was with the no. 140 Skew Angle Block with a removable side, enabling it to function as a rabbet plane. Like the Stanley no. 140, the Sargent no. 507 can function as both a rabbet plane and a normal block plane.

316 Sargent 507 Post 10

You can see the critical stress area is at the top of the cheeks

Manufactured from 1919 to 1947, the no. 507 is a very functional, albeit somewhat fragile design. The cheeks are easily cracked or broken if the plane is dropped or mishandled. However, used with care, this is one of the most functional of all specialty block plane designs. Using a mechanism similar to low angle blocks, the blade depth is adjustable via the rear knob. The throat is not adjustable, but for a rabbet plane this isn’t much of a handicap. The front knob is mahogany, which looks very much like rosewood and is screwed into place via a steel screw that attaches to a raised boss at the toe of the plane.

For more information on Sargent Planes including the #514, I strongly recommend Don Wilwol’s fantastic reference book, The Sargent Hand Plane Reference Guide for Collectors and Woodworkers!


Tool Profile – Stanley nos. 61 & 63 Low Angle Block Planes

Stanley nos. 61 & 63 ~ from the Virginia Toolworks collection

Stanley nos. 61 & 63 ~ from the Virginia Toolworks collection

The Stanley no. 61 and no. 63 planes are low angle block planes featuring depth adjustment mechanisms but lacking an adjustable throat plate.  Introduced in 1914 and 1911 respectively, neither the 6 inch no. 61 nor the 7 inch no. 63, were ever particularly popular with tradesmen, woodworkers, or carpenters.  Offered as less expensive, fixed throat alternatives to the no. 60 and no. 65, very few folks were tempted to purchase a low angle plane without an adjustable throat, especially when that feature could be had for just a few pennies more. Subsequently, their limited popularity constricted demand and production, and so they are fairly hard to find today.

Ironically, these planes are virtually identical to the very first type no. 60 and no. 65, both of which were introduced in 1898 with a similar wooden knob and lacking an adjustable throat.  Why then, less than 10 years later, Stanley thought reintroducing this handicapped design under the model nos. 61 and 63 was a good idea is anyone’s guess. Regardless, both the no. 61 and no. 63 are easily distinguished from the Type 1 no. 60 and 65 since their model numbers were cast in relief at the rear of the bed just below the depth adjustment knob.  Manufactured for less than 25 years, both planes were discontinued in 1935.

While the no. 61 and no. 63 are very collectible due to their scarcity, users looking for a functional low angle block are far better off sourcing a no. 60 or 65 in good condition.

***

The 5 Hand Planes Everyone Should Own

Unless you live in a city apartment, or happen to be wealthy, disinterested, or lazy enough to pay someone to do all of your home maintenance projects, chances are now and then you have need of a hand plane.  Even the most ardent power tool minded woodworker can’t escape the reality that some jobs are just easier solved by a couple of passes with a hand plane than with anything you plug into an electrical outlet.   Whether you’re an active hand tool user, a neophyte learning to work wood by hand, a weekend woodworker or a casual homeowner, a basic set of good hand planes is essential.

There’s a great deal of generalization that goes into compiling a list like this.  Because hand planes tend to be used for specific applications, some woodworkers my find greater utility in some planes than others.  Someone who makes musical instruments would obviously need different tools than a furniture maker.  But speaking in the broadest sense, these are the 5 essential hand planes that virtually everyone should own.  Certainly for anyone interested in acquiring a first set of planes to use around the shop, farm, or house in the suburbs, these tools offer the greatest utility and versatility.

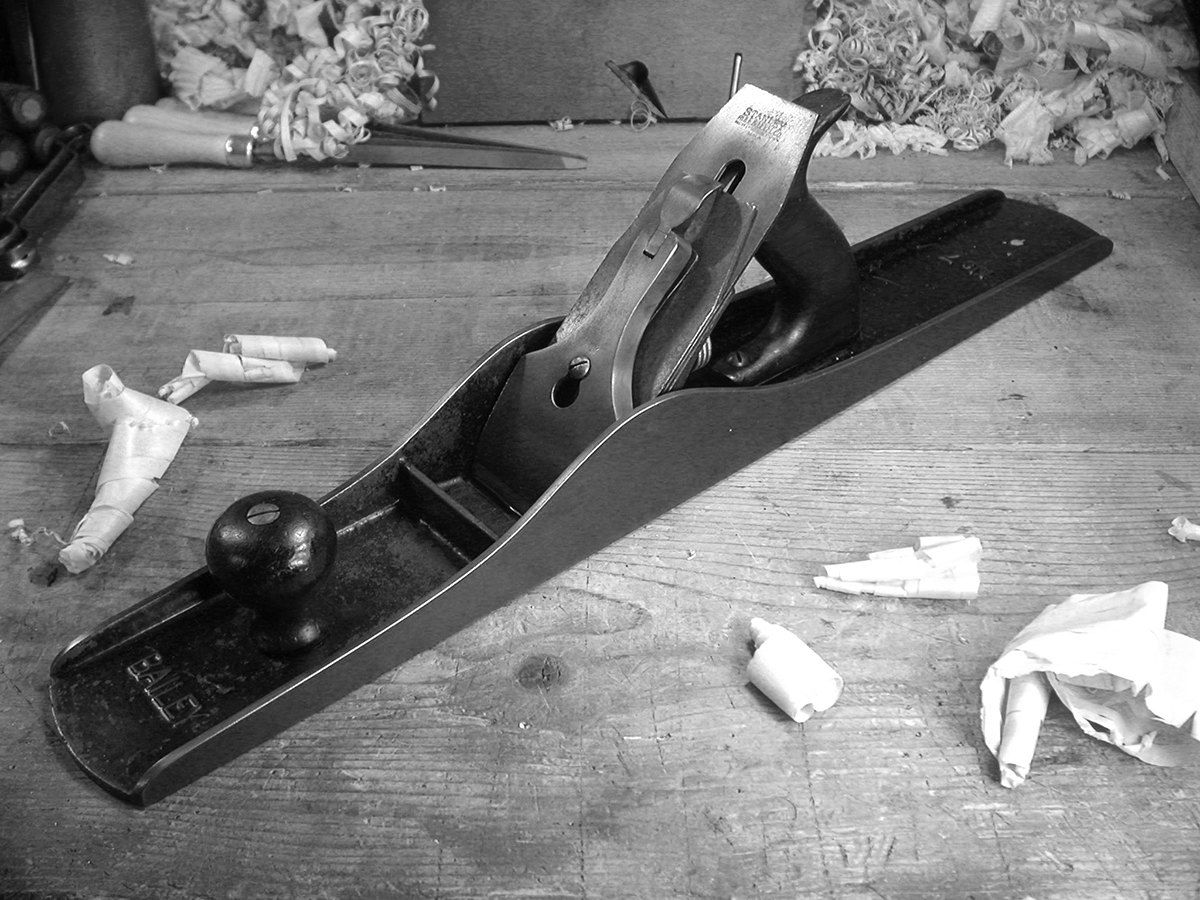
1. Fore Plane – The Stanley No. 5

Stanley Bailey No. 5, Type 11 (c. 1910-18)

Stanley Bailey No. 5, Type 11 (c. 1910-18)

Fore planes are those ranging from approximately 14 inches to 18 inches in length. In the Stanley bench plane assortment, these include the nos. 5, 5-1/4, 5-1/2, and 6. The term ‘Fore’ dates back several hundred years and is generally assumed to be a contraction of ‘Before’ and interpreted as the plane used first in flattening a surface. “It is called the Fore Plane because it is used before you come to work either with the Smooth Plane, or with the Joynter.” [1]

As the first plane one would use in preparing a surface, the Fore plane takes the most aggressive cut, removing rough saw marks and leveling out low and high spots, etc. The iron is sharpened with a significant camber, or curvature to the cutting edge, with as much as 1/16″ to 1/8″ difference between the center and the edges. This removes the most waste, but subsequently leaves the surface of the wood with a scalloped finish.

While either the Stanley no. 5 or no. 6 will do, the no. 5 is the better choice in our 5 plane roundup. Rough planing is a very physical activity, and the lighter weight of the no. 5 makes it less fatiguing to use. It’s smaller size also makes it more appropriate for the wide variety of other day to day planing jobs that most people likely face. The no. 5 is, in my opinion, the most versatile of all the bench planes and the plane I use most often.

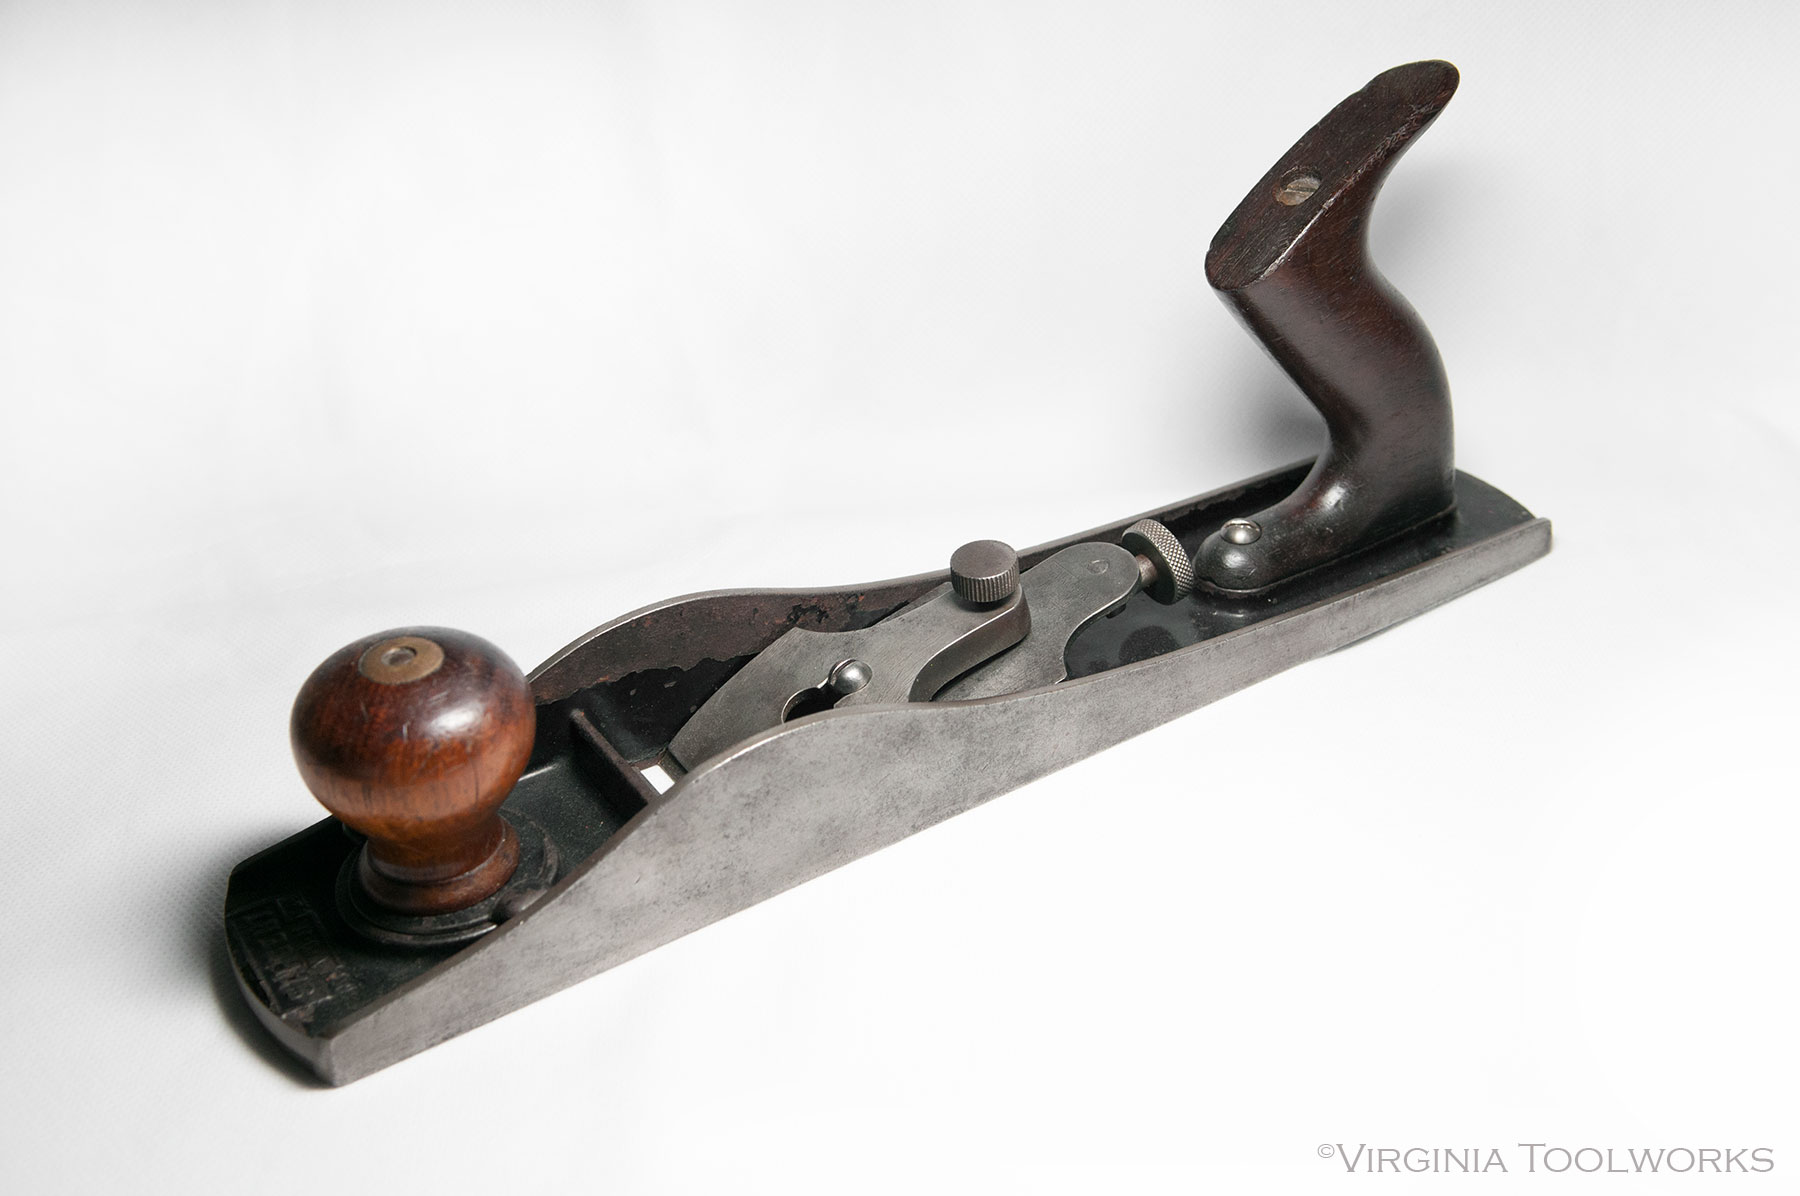
2. Try (or Jointer) Plane – The Stanley No. 7

Stanley Bailey No. 7, Type 10 (c. 1907-09)

Stanley Bailey No. 7, Type 10 (c. 1907-09)

Try planes, more commonly known as Jointer planes, are those over 18 inches, and are most commonly 22 to 28 inches. Stanley’s offering of Jointer planes are the no. 7 and no. 8, measuring 22 inches and 24 inches respectively.As the name implies, a Jointer plane excels at truing the edges of long boards that will be glued together to make table tops, shelves, and carcasses. But its value and place on the workbench isn’t limited to edge work. The Try, or Jointer, plane is used to flatten and refine the surface left by the Fore plane. Its extra length allows it to true large flat surfaces without riding up over the peaks or dipping down into the valleys created (or left uncorrected) during the initial surface preparation.

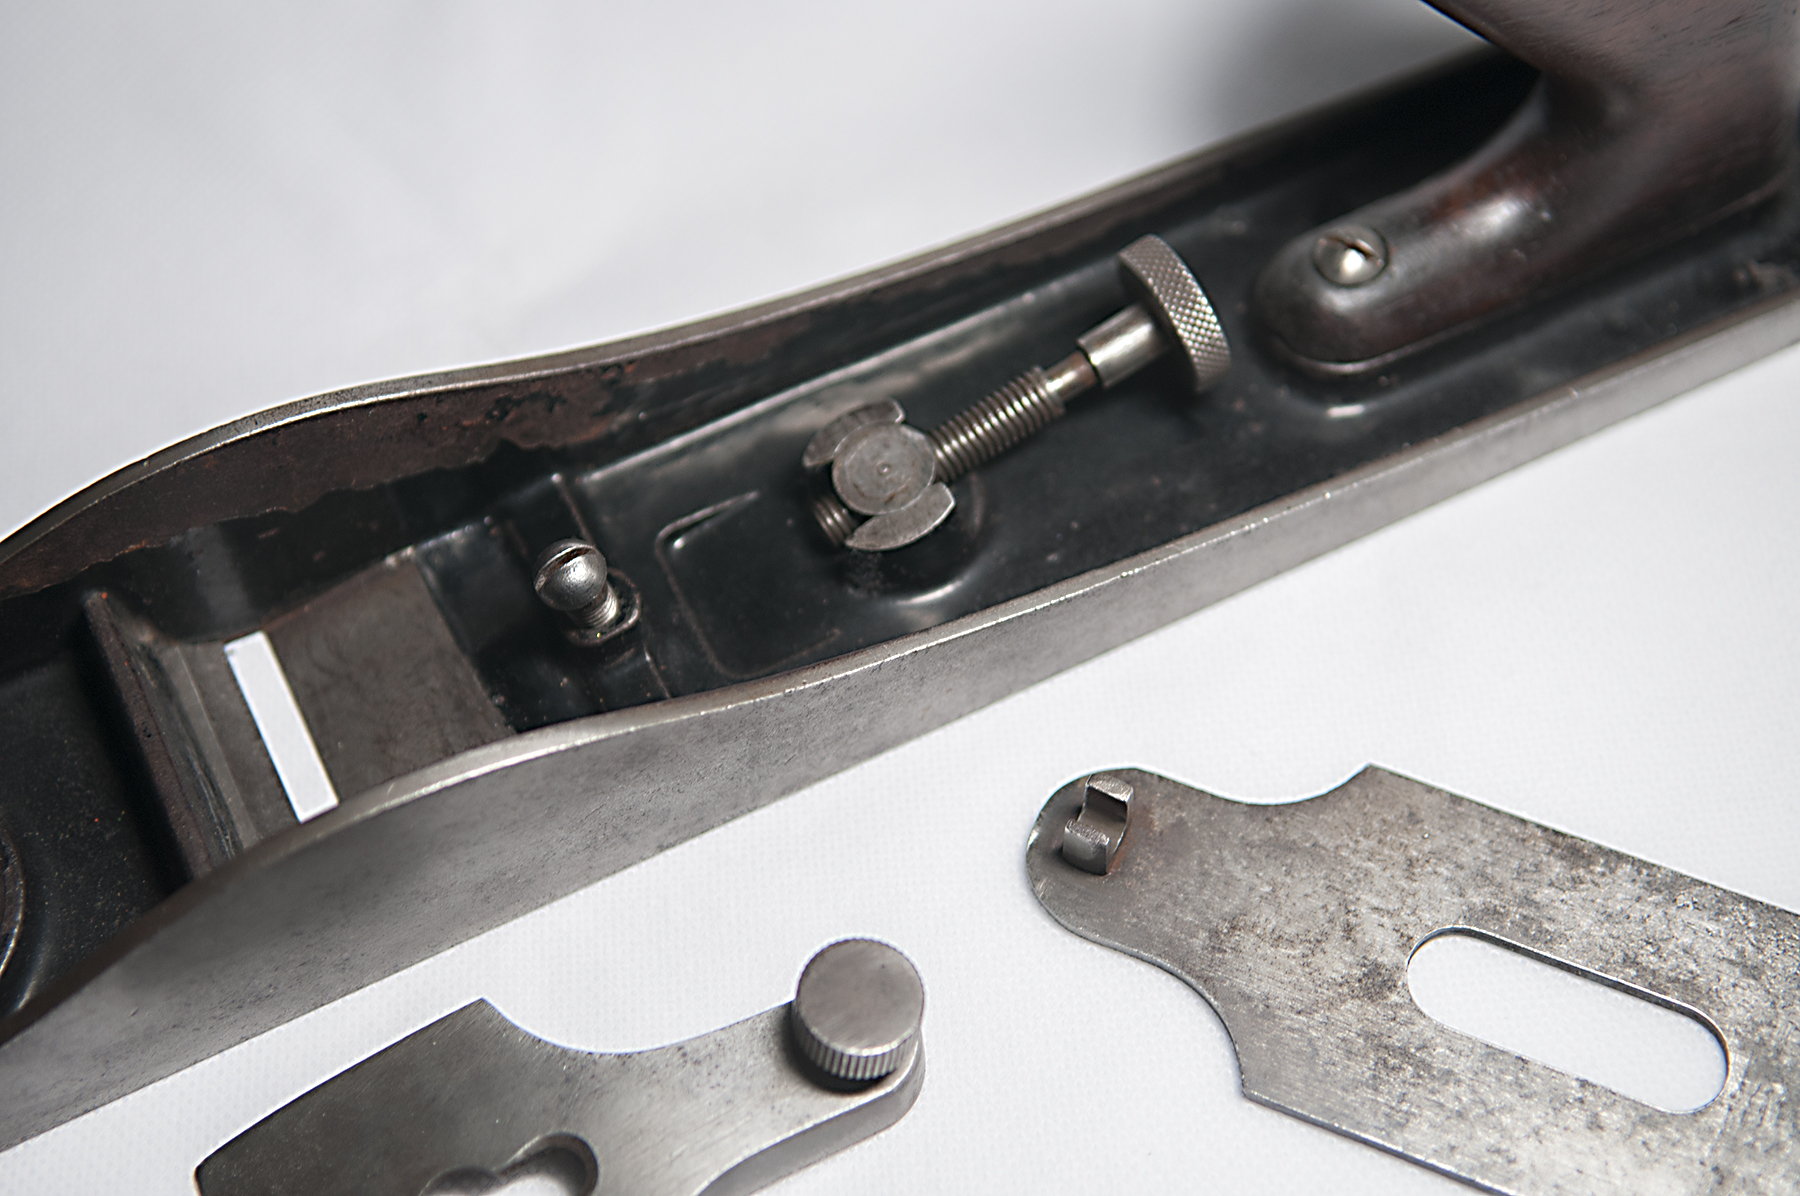
Despite its heft, the Jointer should be considered a precision tool. The iron should be sharpened with a slight camber (or perhaps none at all if used exclusively for edge work), and the frog typically adjusted with a fine set for thinner shavings than the Fore plane. Working both across the grain and in all directions, the Try plane leaves a perfectly flat surface that requires only final touch up with the Smoothing plane.

Your choices between the two standards, nos. 7 and 8, are really a matter of personal preference. In this case, Newton’s laws of motion lend a helping hand.  The greater heft is actually a benefit, in that once you get it moving the additional mass helps keep it going with less effort. That said, the no. 8 is quite a beast, and my personal preference is for the lighter and shorter no. 7, which I find easier to manage.

3. Smoothing Plane – The Stanley No. 4

Stanley Bailey No. 4C, Type 10 (c. 1907-09)

Stanley Bailey No. 4C, Type 10 (c. 1907-09)

Smoothing planes include the shorter planes in the lineup, those 10 inches or less. Stanley made a number of planes in this range, from the tiny no. 1 to the most popular no. 4 and its wider sibling, the 4-1/2.The Smoothing plane is the final plane used prior to applying the finish. Executed properly, there should be no need for sandpaper. Used primarily with the grain, the Smoothing plane is normally sharpened with just the slightest camber or left straight with its corners eased to prevent them from digging in or leaving tell tale ‘lines’ along the edge of the cut. The frog is adjusted with a closed mouth for the finest of cuts, and the shavings produced are tissue thin, ideally produced from long strokes covering the full length of the wood. Aside from perhaps a little hand scraping here and there, the surface left by the Smoothing plane should require no further treatment. In fact done correctly, sanding would actually diminish the quality of the surface left by the Smoother.

More so than with the Fore and Try planes, the choice of which size Smoother is really a matter of and comfort and the scale of your work. All of them will do a comparable job, although the nos. 1 and 2 are really only suited for very small surfaces (and very small hands). The no. 4 is considered the most versatile size, and the one I use most often. However, I do have a smaller no. 3 and a wider no. 4-1/2 that I reach for, depending on the size of the project. But since the point of this article is to identify the three core bench planes you’ll need for woodworking, the no. 4 is probably the best overall size choice for a single Smoothing plane for most people.

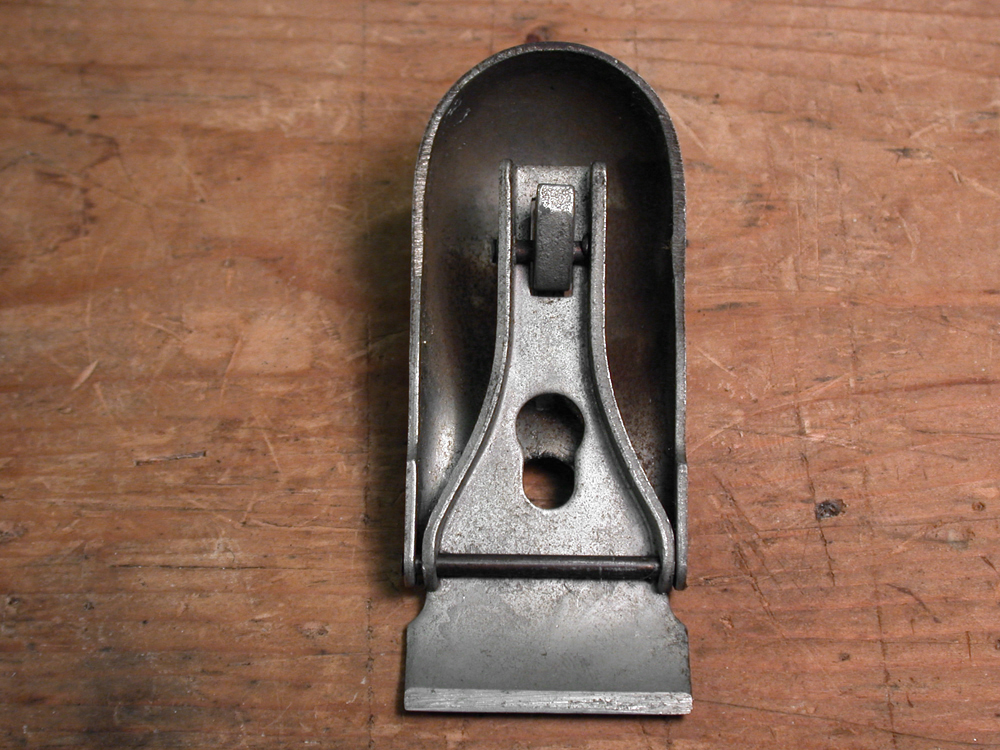
4. Standard Angle Block Plane – The Stanley No. 18 

Stanley Bailey No. 18, Type 17 (c. 1947-50)

Stanley Bailey No. 18, Type 17 (c. 1947-50)

This is my go-to block plane for everyday use, the one I always seem to grab first.  Mine is a very pristine WWI era model that I’m pretty sure I’ve used more than anyone else in its history.  Although it’s almost 100 years old, it looks like it could have been manufactured last year.  Both the japanning and nickel plating are pushing 100%, and so I baby it.

The Stanley no. 18 is a standard angle plane, meaning the iron is seated on a 20 degree bed.  With a bevel angle sharpened at the standard 25 degrees, you have a cutting angle of 45 degrees, same as a bench plane.  It also has an adjustable throat plate, an essential feature in a block plane.  The no. 18 is 6 inches long and fits my hand better than its longer, otherwise identical 7 inch brother, the no. 19.  And unlike the more popular Stanley no. 9-1/2, it feels more like an extension of my hand.

The no. 9-1/2 plane predates the no. 18 by about 15 years, was in production longer, and was the best selling block plane Stanley ever made.  It’s still made today, in fact, although the current design features a completely different mechanism from the original.  Admittedly, the no. 9-1/2 was the more popular of the two.  I truly don’t know why, though, since the design of the no. 18′s knuckle cap was far superior to the hooded lever cap on the no. 9-1/2, and it’s also more comfortable to hold in the hand.  I also find that the hooded cap on the no. 9-1/2 is more prone to slip around a little in use.  Not so with the no. 18.

Ironically they are both basically the same plane with two different styles of lever caps.  Other than the lever cap and its mounting bolt, all the other parts are interchangeable. Stanley charged a little more for the no. 18 and marketed it as virtually indestructible.  This of course was not true, for while the steel cap is arguably more durable, the bodies of both were cast iron and therefore susceptible to breaking if dropped.

I have several vintages of both models in my collection, but find the no. 18 with the knuckle cap superior in both function and comfort.  I use this more often than any other block plane I own.

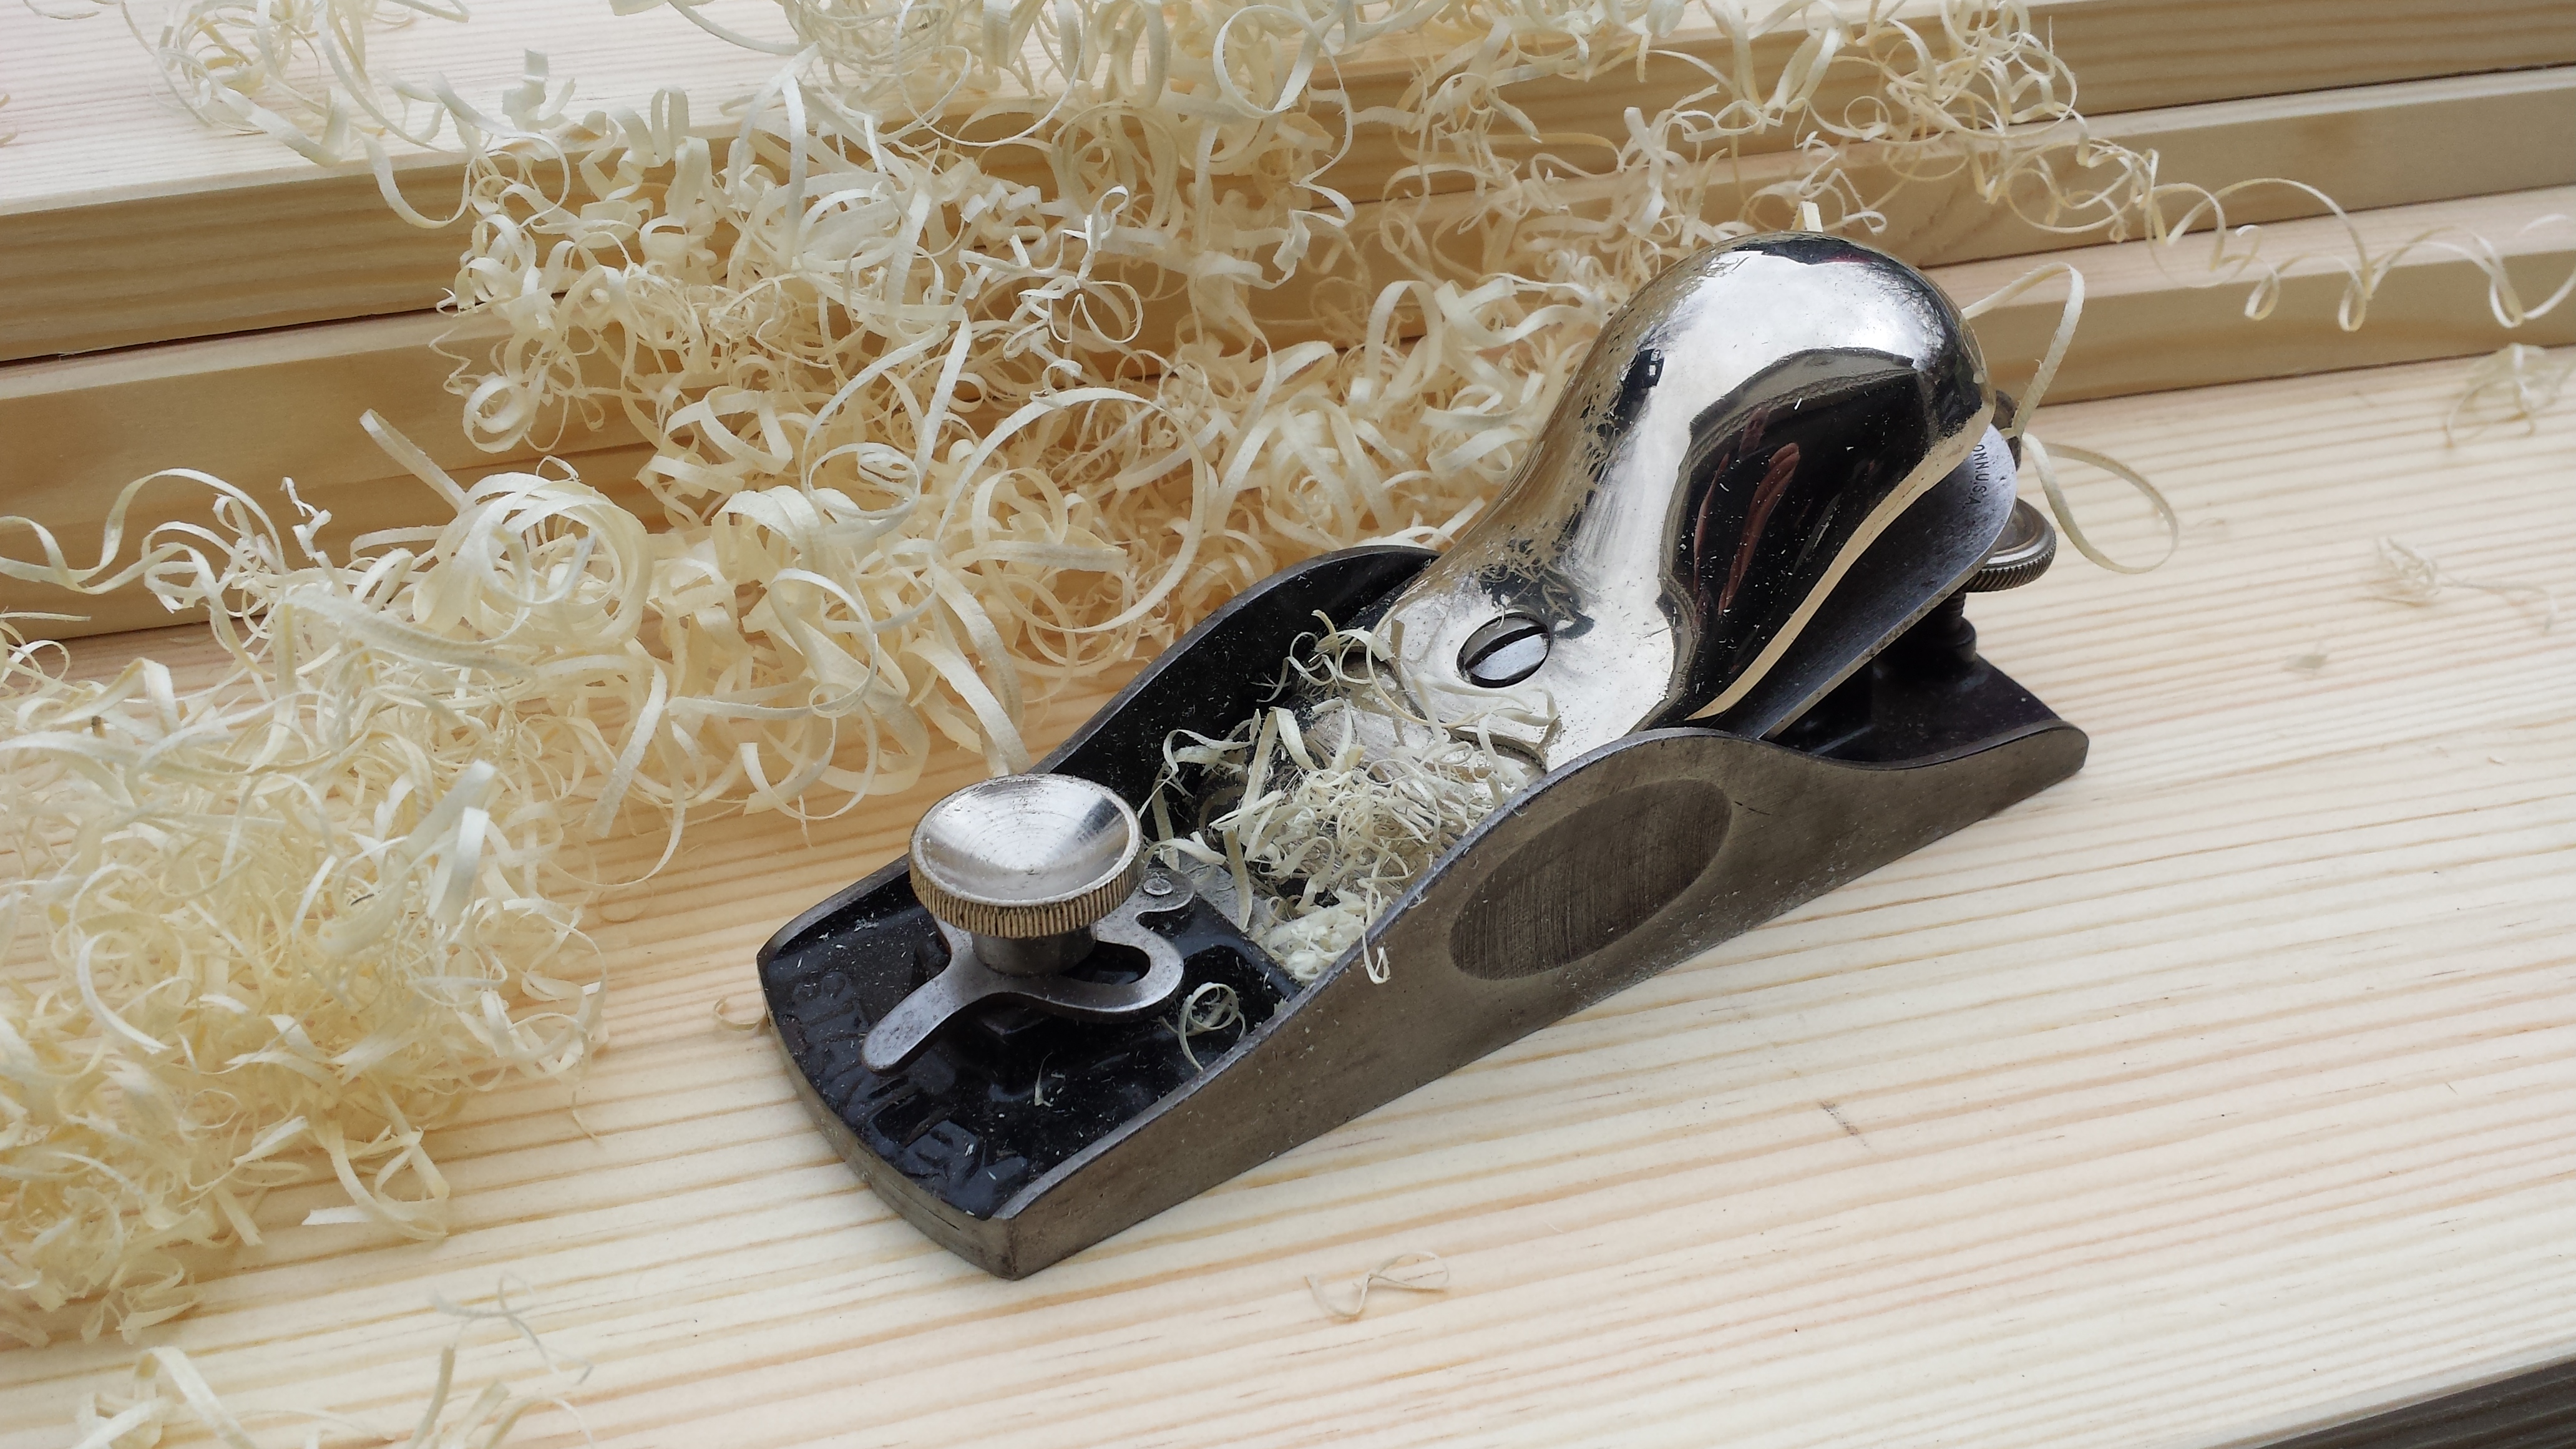
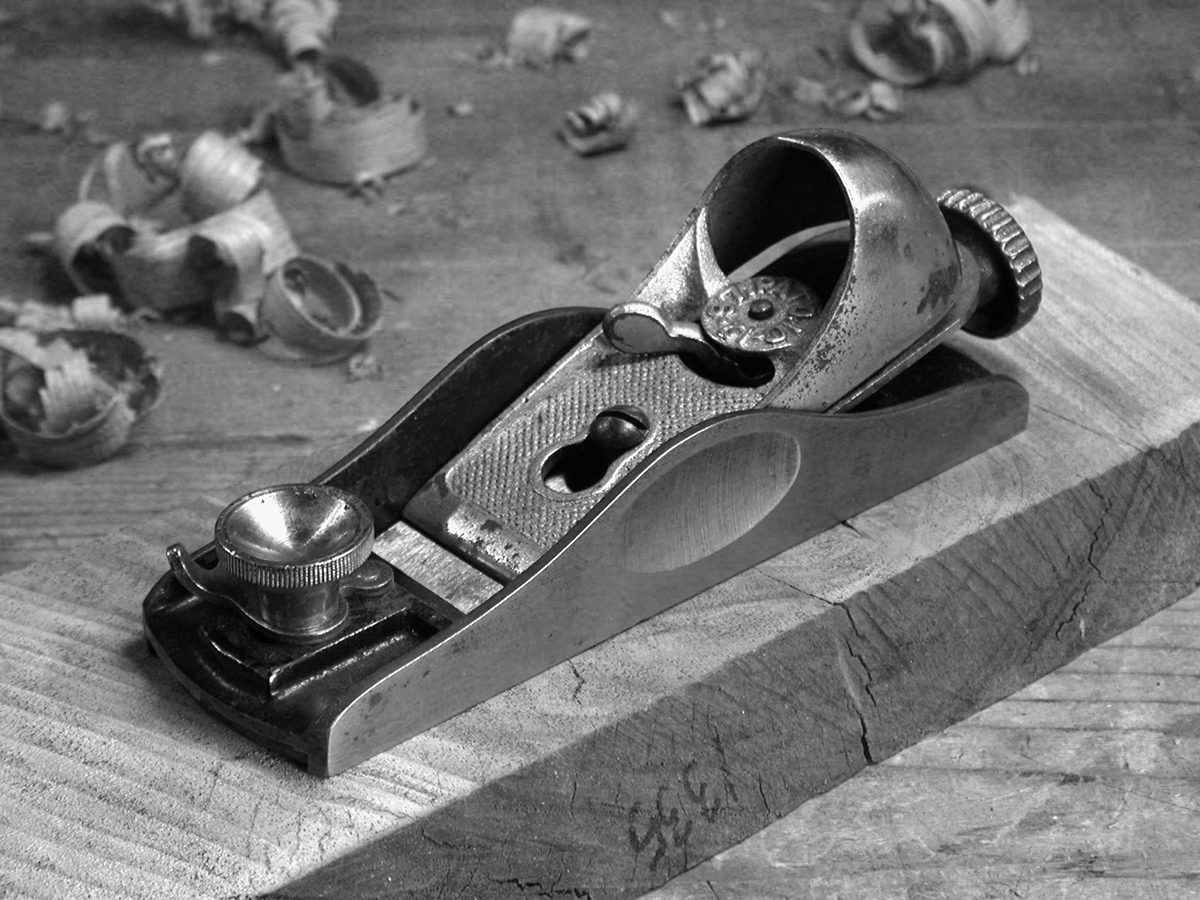
5. Low Angle Block Plane –  The Stanley No. 60 

Stanley Bailey no. 60 Type 2 (c. 1901-04)

Stanley Bailey no. 60 Type 2 (c. 1901-04)

The Stanley no. 60 (and the identical japanned version 60-1/2) is a low angle plane, meaning the iron is seated on a 12 degree bed.  Sharpened at 25 degrees, you have a cutting angle of 37 degrees.  The primary advantage of the lower angle of attack is that it excels at shaving end grain.

Like the no. 18, the 60 series of planes are approximately 6 inches long.  However, the 60 series are narrower with an iron width of 1-3/8 inches, vs the 1-5/8 inch irons on the standard angle planes, and the 60 series feature a narrower version of the hooded lever cap used on the no. 9-1/2.  The 60 series planes also have adjustable throat plates.

Low angle planes are typically used for cutting end grain, i.e., across the end of a cut, verses cutting along the grain, down the side of the wood.  The lower angle is perfect for the shearing action needed to cut those end fibers.  On cuts that will be visible and finished, this produces a very clean and smooth surface, whereas if left as cut from the saw, the grain tends to be very rough and porous.

On both standard and low angle block planes, the iron is seated bevel up, whereas on bench planes the bevel is usually down. There is a tremendous advantage with bevel up irons in that the angle of the bevel can be changed to affect a change in the angle of cut.  While there is more to consider in edge geometry than just the angle of cut (durability), you could reasonably sharpen the bevel on a low angle plane iron to 33 degrees and end up with an angle of cut of 45 degrees (12+33=45), the same as on a standard angle plane.  However, to accomplish a low angle of cut using a standard angle plane, you’d have to sharpen the bevel at a very shallow 17 degrees (20+17=37).  Durability of such a thin cutting edge would be problematic with most woods.

For this reason, along with a few others, many people consider the low angle plane to be the more versatile of the two. I tend to agree.  While I use my standard angle plane more often, if I could only have one block plane, it would have to be a low angle.

***

For more detailed information on the three step process using hand planes, I highly recommend you check out Christopher Schwarz’s outstanding Course, Medium, and Fine, available on DVD.

Tools shown in the photos were returned to functional condition by Virginia Toolworks using museum quality archival preservation techniques.  Sharpened and tuned for use, every tool is fully tested and adjusted until perfect.

____________________________________

1. Moxon, Joseph. Mechanick Exercises. London, 1703.

Stanley Block Planes Demystified

Block Plane Collection 3-11 B&WStanley was surely not lacking in its appetite for block planes, offering models and variations of models in every size and flavor imaginable.  Trying to figure out all the models and differences is maddening.  Since search phrases most frequently entered by those visiting Virginia Toolworks include which block plane to buy, I thought it might be helpful to provide a list  of Stanley’s block plane models organized by functional group and mechanical similarity (rather than numerical model order).  For detailed specifications on each model, please check my Block Plane Chart and the Block Plane Dating page.

Note that the functional groups are not necessarily mutually exclusive.  The same plane will be found in more than one functional group as I’ve categorized  them. Therefore, you will see a lot of duplication.  I listed them this way on purpose.  It’s also worth noting that competitors like Millers Falls, Sargent, and others offered comparable models to many of these.

Block Planes Sorted by Functional Group & Mechanical Similarity

Basic Handyman Planes

Early Stanley no. 120

Early Stanley no. 120 c. 1870s-80s

  • No. 9-1/4 – 6 inches long and standard angle, this plane was identical to the no. 9-1/2 in every way except it doesn’t have an adjustable mouth.  It was a cheaper alternative and never as desirable as the 9-1/2.  Features a thumb rest instead of a front knob.
  • No. 100 – 3-1/2 inches long and standard angle, this tiny plane is a simple palm sized plane with a raised “squirrel tail” handle and thumb screw tightened lever cap. Features a thumb rest instead of a front knob.
  • No. 101 – 3-1/2 inches long and standard angle, this plane is identical to the no. 100, except it does not have the squirrel tail.  Originally sold in toy tool chests before becoming available within Stanley’s line. Features a thumb rest instead of a front knob.
  • No. 102 – 5-1/2 inches long and standard angle, this plane was another very basic small size block plane.  This one featured a tension adjustment wheel for the lever cap and a thumb rest instead of a front knob.
  • No. 103 – 5-1/2 inches long and standard angle, this plane is similar to the no. 102 but adds a poorly designed lever adjustment feature and a wooden front knob.
  • No. 110 – 7 inches long and standard angle, featuring a wooden front knob, this plane is otherwise the same as the no. 102, however it was far more popular.
  • No. 120 – 7 inches long and standard angle, this plane is similar to the smaller no. 103 with the same inadequate adjustment mechanism and wooden front knob.
  • No. 203 – 5-1/2 inches long and standard angle, this plane featured the same hooded lever cap found on the 9-1/2 series, a screw type depth adjustment similar to the low angle blocks, and a wooden front knob.
  • No. 220 – 7 inches long and standard angle, this plane is otherwise identical to the no. 203 but was far more popular.

Fixed Mouth Planes

Stanley no. 110 Type 1

Stanley No. 110 Type 1 c. 1874

  • No. 9-1/4 – 6 inches long and standard angle, this plane was identical to the no. 9-1/2 in every way except it doesn’t have an adjustable mouth.  It was a cheaper alternative and never as desirable as the 9-1/2.  Features a thumb rest instead of a front knob.
  • No. 18-1/4 – 6 inches long and standard angle, this plane was identical to the no. 18 except it didn’t have an adjustable throat.  It was only made from 1952-58 and is somewhat rare.
  • No. 61 – 6 inches long and low angle, this plane was identical to the no. 60 but had no adjustable throat and featured a wooden front knob.  These are relatively rare.
  • No. 63 – 7 inches long and low angle, this plane was identical to the no. 65-1/2 (hooded lever cap) but had no adjustable throat and featured a wooden front knob.  These are also relatively rare.
  • No. 100 – 3-1/2 inches long and standard angle, this tiny plane is a simple palm sized plane with a raised “squirrel tail” handle and thumb screw tightened lever cap. Features a thumb rest instead of a front knob.
  • No. 100-1/2 – 3-1/2 inches and standard angle, this plane is identical to the 100, but has a convex sole and iron for shaving concave surfaces such as chair seats.  This one is pretty handy for those tasks and there are modern versions being sold today.
  • No. 101 – 3-1/2 inches long and standard angle, this plane is identical to the no. 100, except it does not have the squirrel tail.  Originally sold in toy tool chests before becoming available within Stanley’s line. Features a thumb rest instead of a front knob.
  • No. 101-1/2 – 3-1/2 inches and standard angle, this is a bull-nose version of the no. 101.  It is extremely rare with fine examples selling in the $500 range.
  • No. 102 – 5-1/2 inches long and standard angle, this plane was another very basic small size block plane.  This one featured a tension adjustment wheel for the lever cap and a thumb rest instead of a front knob.
  • No. 103 – 5-1/2 inches long and standard angle, this plane is similar to the no. 102 but adds a poorly designed lever adjustment feature and a wooden front knob.110 – 7 inches long and featuring a wooden front knob, this plane is otherwise the same as the no. 102, however it was far more popular.
  • No. 110 – 7 inches long and standard angle, featuring a wooden front knob, this plane is otherwise the same as the no. 102, however it was far more popular.
  • No. 120 – 7 inches long and standard angle, this plane is similar to the smaller no. 103 with the same inadequate adjustment mechanism and wooden front knob.
  • No. 130 – 8 inches long and standard angle, this double ended plane featured a tension wheel lever cap.  Bull-nose on one end and standard nose on the other, the iron could be reversed for dual purpose use.
  • No. 131 – 8 inches and standard angle, this plane was similar to the no. 130 but featured a hooded lever cap and a screw type depth adjustment.  It is considered superior to the no. 130, but the mechanism is fragile.
  • No. 140 – 7 inches long and standard angle, this rabbet plane’s iron was set at a skew angle, and its side was removable for precise rabbeting.  This plane is very useful with modern variations still being made.
  • No. 203 – 5-1/2 inches long and standard angle, this plane featured the same hooded lever cap found on the 9-1/2 series, a screw type depth adjustment similar to the low angle blocks, and a wooden front knob.
  • No. 220 – 7 inches long and standard angle, this plane is otherwise identical to the no. 203 but was far more popular.

Adjustable Mouth Planes

Stanley 9.5 and 16

Stanley no. 9-1/2 and no. 16 c. 1904-08

  • No. 9-1/2 – 6 inches long and standard angle, this was Stanley’s most successful block plane.  Featuring a hooded lever cap, lateral adjustment lever, iron depth adjustment, and an adjustable throat, this plane set the standard for the industry.
  • No. 9-3/4 – 6 inches long and standard angle, this plane was identical to the no. 9-1/2 with the addition of an arm with a wooden knob attached to the rear.  There were far fewer of these planes made and they can easily sell for several hundred dollars today.
  • No. 15 – 7 inches long, this plane was otherwise identical to the no. 9-1/2.
  • No. 15-1/2 – 7 inches long, this plane is otherwise identical to the no. 9-3/4 with the same wooden knob at the rear.
  • No. 16 – 6 inches long and standard angle, this plane was identical to the no. 9-1/2 except it had a nickel plated lever cap whereas the no. 9-1/2’s cap was japanned.
  • No. 17 – 7 inches long and standard angle, this plane is otherwise identical to the no. 15 except it had a nickel plated lever cap whereas the no. 15’s cap was japanned.
  • No. 18 – 6 inches long and standard angle, this plane was identical to the no. 9-1/2 except the lever cap (after 1913) was the knuckle style cap (also found on the no. 65).  Although not quite as popular as the no. 9-1/2, this is my preferred standard angle block plane for its comfort in use.
  • No. 19 – 7 inches long and standard angle, this plane is otherwise identical to the no. 18.
  • No. 60 – 6 inches long and narrower than most of the other planes this length (1-3/8″), this low angle block featured a hooded style lever cap, screw depth adjustment, and adjustable throat.  It’s lever cap and hardware were nickel plated.
  • No. 60-1/2 – 6 inches long and low angle, this plane is identical to the no. 60 in every way except its lever cap was japanned.  The no. 60 and no. 60-1/2 are frequently confused as there has been conflicting information published online.  Just remember, the 60-1/2 has a japanned cap.
  • No. 65 – 7 inches and low angle, this plane is often referred to as the “Cadillac” of block planes.  It features the same nickel plated knuckle cap as the 18/19 planes, and the same screw type depth adjustment of the 60 series low angle blocks.  And of course the throat is adjustable.
  • No. 65-1/2 – 7 inches long and low angle, this 65-1/2 is identical to the no. 65 except it had a japanned hooded style lever cap throughout it’s entire life.  This confuses a lot of people since the no., 65 switched from a hooded cap to a knuckle cap in about 1913.

Standard Angle Planes

Stanley 19 and 18

Stanley no. 19 & no. 18 c. 1913-18

  • No. 9-1/4 – 6 inches long and standard angle, this plane was identical to the no. 9-1/2 in every way except it doesn’t have an adjustable mouth.  It was a cheaper alternative and never as desirable as the 9-1/2.  Features a thumb rest instead of a front knob.
  • No. 9-1/2 – 6 inches long and standard angle, this was Stanley’s most successful block plane.  Featuring a hooded lever cap, lateral adjustment lever, iron depth adjustment, and an adjustable throat, this plane set the standard for the industry.
  • No. 9-3/4 – 6 inches long and standard angle, this plane was identical to the no. 9-1/2 with the addition of an arm with a wooden knob attached to the rear.  There were far fewer of these planes made and they can easily sell for several hundred dollars today.
  • No. 15 – 7 inches long, this plane was otherwise identical to the no. 9-1/2.
  • No. 15-1/2 – 7 inches long, this plane is otherwise identical to the no. 9-3/4 with the same wooden knob at the rear.
  • No. 16 – 6 inches long and standard angle, this plane was identical to the no. 9-1/2 except it had a nickel plated lever cap whereas the no. 9-1/2’s cap was japanned.
  • No. 17 – 7 inches long and standard angle, this plane is otherwise identical to the no. 15 except it had a nickel plated lever cap whereas the no. 15’s cap was japanned.
  • No. 18 – 6 inches long and standard angle, this plane was identical to the no. 9-1/2 except the lever cap (after 1913) was the knuckle style cap (also found on the no. 65).  Although not quite as popular as the no. 9-1/2, this is my preferred standard angle block plane for its comfort in use.
  • No. 19 – 7 inches long and standard angle, this plane is otherwise identical to the no. 18.
  • No. 100 – 3-1/2 inches long and standard angle, this tiny plane is a simple palm sized plane with a raised “squirrel tail” handle and thumb screw tightened lever cap. Features a thumb rest instead of a front knob.
  • No. 100-1/2 – 3-1/2 inches and standard angle, this plane is identical to the 100, but has a convex sole and iron for shaving concave surfaces such as chair seats.  This one is pretty handy for those tasks and there are modern versions being sold today.
  • No. 101 – 3-1/2 inches long and standard angle, this plane is identical to the no. 100, except it does not have the squirrel tail.  Originally sold in toy tool chests before becoming available within Stanley’s line. Features a thumb rest instead of a front knob.
  • No. 101-1/2 – 3-1/2 inches and standard angle, this is a bull-nose version of the no. 101.  It is extremely rare with fine examples selling in the $500 range.
  • No. 102 – 5-1/2 inches long and standard angle, this plane was another very basic small size block plane.  This one featured a tension adjustment wheel for the lever cap and a thumb rest instead of a front knob.
  • No. 103 – 5-1/2 inches long and standard angle, this plane is similar to the no. 102 but adds a poorly designed lever adjustment feature and a wooden front knob.
  • No. 110 – 7 inches long and standard angle, featuring a wooden front knob, this plane is otherwise the same as the no. 102, however it was far more popular.
  • No. 120 – 7 inches long and standard angle, this plane is similar to the smaller no. 103 with the same inadequate adjustment mechanism and wooden front knob.
  • No. 130 – 8 inches long and standard angle, this double ended plane featured a tension wheel lever cap.  Bull-nose on one end and standard nose on the other, the iron could be reversed for dual purpose use.
  • No. 131 – 8 inches and standard angle, this plane was similar to the no. 130 but featured a hooded lever cap and a screw type depth adjustment.  It is considered superior to the no. 130, but the mechanism is fragile.
  • No. 140 – 7 inches lo
    ng and standard angle, this rabbet plane’s iron was set at a skew angle, and its side was removable for precise rabbeting.  This plane is very useful with modern variations still being made.
  • No. 203 – 5-1/2 inches long and standard angle, this plane featured the same hooded lever cap found on the 9-1/2 series, a screw type depth adjustment similar to the low angle blocks, and a wooden front knob.
  • No. 220 – 7 inches long and standard angle, this plane is otherwise identical to the no. 203 but was far more popular.

Low Angle Planes

Stanley no. 65 c. 1913, no. 65 c. 1904, & no. 65-1/2 c. 1904

Stanley no. 65 c. 1913, no. 65 c. 1904, & no. 65-1/2 c. 1904

  • No. 61 – 6 inches long and low angle, this plane was identical to the no. 60 but had no adjustable throat and featured a wooden front knob.  These are relatively rare.
  • No. 63 – 7 inches long and low angle, this plane was identical to the no. 65-1/2 (hooded lever cap) but had no adjustable throat and featured a wooden front knob.  These are also relatively rare.
  • No. 60 – 6 inches long and narrower than most of the other planes this length (1-3/8″), this low angle block featured a hooded style lever cap, screw depth adjustment, and adjustable throat.  It’s lever cap and hardware were nickel plated.
  • No. 60-1/2 – 6 inches long and low angle, this plane is identical to the no. 60 in every way except its lever cap was japanned.  The no. 60 and no. 60-1/2 are frequently confused as there has been conflicting information published online.  Just remember, the 60-1/2 has a japanned cap.
  • No. 65 – 7 inches and low angle, this plane is often referred to as the “Cadillac” of block planes.  It features the same nickel plated knuckle cap as the 18/19 planes, and the same screw type depth adjustment of the 60 series low angle blocks.  And of course the throat is adjustable.
  • No. 65-1/2 – 7 inches long and low angle, this 65-1/2 is identical to the no. 65 except it had a japanned hooded style lever cap throughout it’s entire life.  This confuses a lot of people since the no., 65 switched from a hooded cap to a knuckle cap in about 1913.

Bull-nose Planes

Stanley 131 Plane

Stanley no. 131 Plane c. 1920s

  • No. 101-1/2 -3-1/2 inches and standard angle, this plane is identical to the 100, but has a convex sole and iron for shaving concave surfaces such as chair seats.  This one is pretty handy for those tasks and there are modern versions being sold today.
  • No. 130 – 8 inches long and standard angle, this double ended plane featured a tension wheel lever cap.  Bull-nose on one end and standard nose on the other, the iron could be reversed for dual purpose use.
  • No. 131 – 8 inches and standard angle, this plane was similar to the no. 130 but featured a hooded lever cap and a screw type depth adjustment.  It is considered superior to the no. 130, but the mechanism is fragile.

Instrument Makers Planes

Stanley 101.5 Plane

Stanley no. 101-1/2 Plane c. 1890s

  • No. 100 – 3-1/2 inches long and standard angle, this tiny plane is a simple palm sized plane with a raised “squirrel tail” handle and thumb screw tightened lever cap. Features a thumb rest instead of a front knob.
  • No. 100-1/2 – 3-1/2 inches and standard angle, this plane is identical to the 100, but has a convex sole and iron for shaving concave surfaces such as chair seats.  This one is pretty handy for those tasks and there are modern versions being sold today.
  • No. 101 – 3-1/2 inches long and standard angle, this plane is identical to the no. 100, except it does not have the squirrel tail.  Originally sold in toy tool chests before becoming available within Stanley’s line. Features a thumb rest instead of a front knob.
  • No. 101-1/2 – 3-1/2 inches and standard angle, this is a bull-nose version of the no. 101.  It is extremely rare with fine examples selling in the $500 range.

Rabbet (Rebate) Planes

  • No. 140 – 7 inches long and standard angle, this rabbet plane’s iron was set at a skew angle, and its side was removable for precise rabbeting.  This plane is very useful with modern variations still being made.
SB140 Type 1

Stanley no. 140 Rabbet Plane c. 1896

***