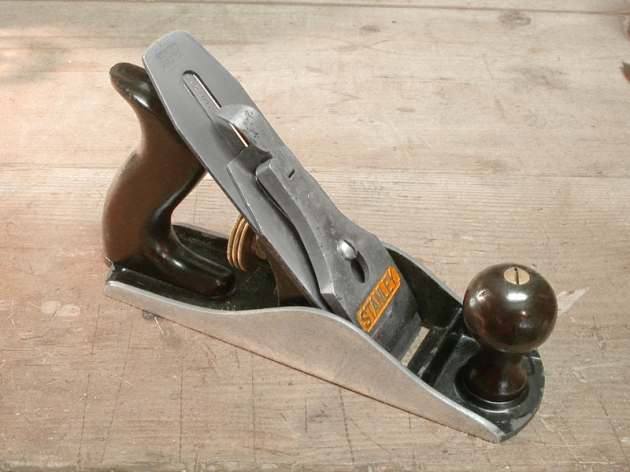
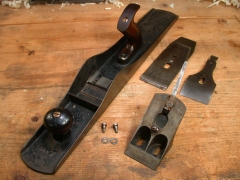
Rev-O-Noc Renewal

Rev-O-Noc 5C in pretty rough condition

I can count on one hand the number of planes I’ve refinished (vs. restored) over the years, but this Rev-O-Noc 5C jack plane had some issues that made an anti-rust dip and repainting the best course of action.

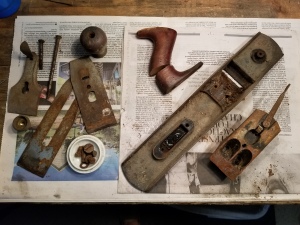
Disassembled for assessment

The entire body was a rustbucket with very little japanning remaining. The lever cap fortunately looked worse than it actually was, and while the cap iron was salvageable, the Rev-O-Noc iron had some pretty deep pitting on the business end. While I was able to sharpen through that, there was something off with the temper of the blade that I didn’t like, so I added a Vaughan & Bushnell iron I had on hand that’s better suited for use. The break in the tote was clean, so I epoxied it back together and then spent the better part of a week refinishing it to match the knob. The repair turned out really nice and is completely invisible.

Repaired Tote came out incredibly nice

HSB Rev-O-Noc was a store brand from Hibbard, Spencer, Bartlett & Co., a Chicago hardware dealership that formed in 1882, but whose origin dates back to at least 1855 in the form of Tuttle, Hibbard & Co. In 1932, the company introduced a new line of hand tools under the brand name “True Value” and by 1948, Hibbard’s annual sales reached nearly $30 million. Business slowed and profits shrunk, however, as new hardware cooperatives began to bypass traditional wholesalers. In 1962, the company’s owners sold both the hardware operations and the “True Value” brand to John Cotter for $2.5 million. Yes, that’s the True Value brand we know today.

Also interesting, the name Revonoc is the reverse spelling of Conover. Conover was the name of an officer of the company, and apparently had a separate hardware company prior to joining Hibbard, Spencer, Bartlett & Co. They used this backwards spelling of his name for their brand of planes sold by HS&B from about 1920-1940. They were made at times by both Stanley and Sargent, but this one is clearly Stanley made based on the casting, frog, and hardware.

As far as I can tell, this plane likely falls somewhere closer to 1920 given the short knob and small adjustment nut. Of course, it’s also possible it’s an earlier plane and the Revonoc blade was a later replacement. I just don’t know.

Despite a gnarly looking rust damaged sole, the mouth area was in decent shape and the plane functioned true to Stanley’s level of excellence. Once everything was cleaned up, oiled, reassembled, and tuned, this old plane shaved wood like a champ, producing some wispy thin shavings with no effort at all.

(Disclosure: This article contains paid links that help support the site)

Restoration completed, sharpened and tuned for use again

Plane Restoration for Use – Extreme Salvage Edition

Let’s face it, not all planes and tools are salvageable.  Sometimes, the neglect and decay is so extreme that the best you can do is pilfer them for parts. Other times, the tool can be saved, but nothing short of a full refinishing effort is in order. As anyone who reads this blog will know, my principled philosophical approach is one of preservation, to retain as much of the original finish and character of the tool as possible. I focus the majority of my time and effort on tools that are good candidates for that sort of conservative preservation methodology. However, there are tools that occasionally cross my path that require a heavier hand.

In this post, I will detail one of the many methods you might employ to restore a heavily rusted plane for use. I found this Stanley no. 4 on eBay for around $10 plus shipping. It’s a Type 19, dating from the 1950s, and as you can see from this eBay auction photo, was in horrible condition.

SB4-T19 ebay

Stanley No. 4 – eBay Auction Photo

And here’s a shot I tool myself before beginning the restoration. As you can see, it actually looked a little better that the eBay photo indicated. Just a little…

SB4-T19 Rest1

Photo taken just before restoration

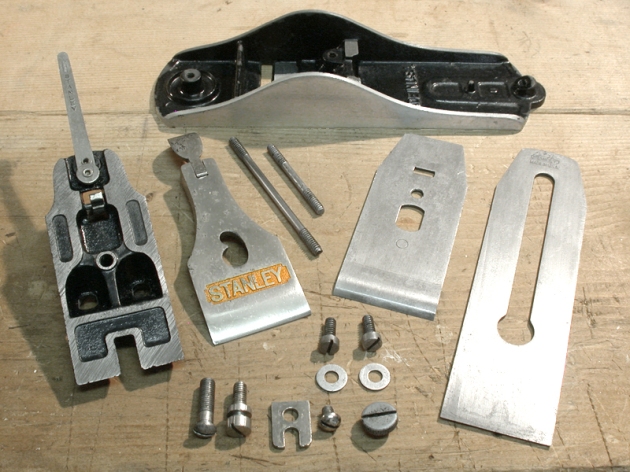
As with any restoration, the first step is complete disassembly.

SB4-T19 Rest2

Plane completely disassembled

With heavy rust like this, I used a razor blade scraper to remove as much of the surface crud as possible. I started with the iron and cap iron, then continued with the plane body and frog face.  With a little care, this can be accomplished without scratching or gouging the surface of the metal, and it’s amazing how much of the rust you can remove. You can see in the photo below the effect of having scraped the right half of the cap iron, and the lower three quarters of the iron.

SB4-T19 Rest3

Note the contrast of scraped vs. unscraped metal

Here’s a close up. Note the difference. The nice thing about this is virtually all of the patina remains on the surface of the metal. You can leave it this way if you prefer, or continue on as I will show in the next step.

SB4-T19 Rest4

Close-up showing the scraped and unscraped iron and cap iron

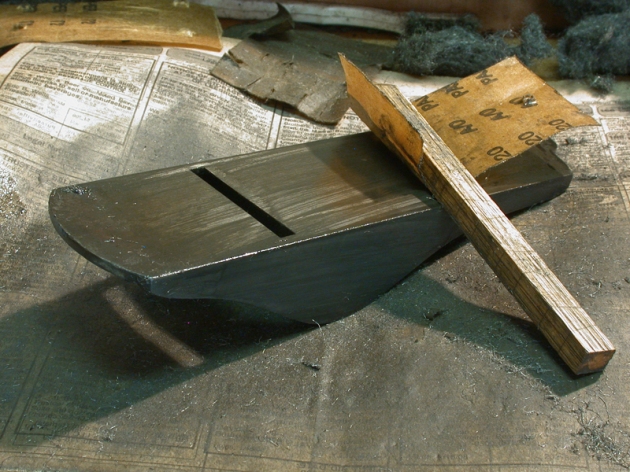
Since this was a later model Stanley (less valuable) and destined for shop use, I decided to scrub it down to a clean surface, removing all traces of rust, corrosion, and subsequently age and patina. There are several ways to go about it at this point (chemical anti-rust agents and electrolysis for example), but I decided to stick with doing it the old fashioned way – elbow grease. Using 220 grit sandpaper lubricated with WD40, I scrubbed down all the exposed surfaces. The light oil really softens the effect of the sandpaper, greatly reducing any visible scratches.

SB4-T19 Rest9

Oil sanding using 220 grit wrapped around a wood block

The screws, nuts and hardware were brushed using a soft steel 6″ brush on my bench grinder. Finally, everything was scrubbed using a general purpose cleaner. Low and behold, the japanning on the bed was actually quite good under all that crud.  I finished up by using an citrus degreaser (not shown in the photos). As you can see, the difference from where I started is pretty striking.

SB4-T19 Rest10

Big difference, huh? This is starting to look like a plane again.

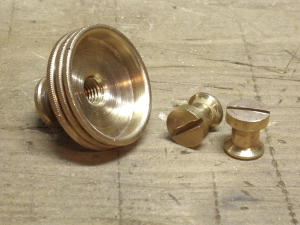
I don’t like my brass components highly polished. I used oil lubricated steel wool and a small steel brush to clean them up for this plane. The lighting in the “after” photo makes the brass look a bit brighter than it actually was.

SB4-T19 Rest12

Brass before cleaning

SB4-T19 Rest13

Brass after cleaning

The final consideration is the hardwood tote and knob. Much of the original finish was gone and what remained was in bad shape. I lightly sanded the entire surface, applied a gel stain, and when dry, topped it with a couple of coats of varnish.  Once completely dry and cured, I polished it up using paste wax.

SB4-T19 Rest14

Tote and knob in original condition

After refinishing

After refinishing

With all the parts refinished and restored, the iron was sharpened and the plane reassembled and tuned for use. Naturally it doesn’t have the charm of a Sweetheart era, or even the character of a fine condition 1950s vintage, but this plane was saved from the landfill and with proper care, can easily shave wood another 70+ years.

SB4-T19 Rest16

SB4-T19 Rest17

***

Thoughts on the Art of Restoration

10-Gauge-stock-&-receiver-right-Comp-1

There are definitely artistic elements to restoration, and while mostly technical, I would argue that compositional elements also come into play in an unconventional sense. It’s very much like creating something with found objects. I approach restoration projects with the objective of finding the fine, although often fuzzy, line between age and damage, removing the latter while keeping the former. Instead of graphite, ink, or paint, the media used here were a variety of abrasives, lubricants, and chemicals that effect specific desired changes in metal and wood.

***

Stanley No. 7 Reflects Secret History

Some months back I purchased a particularly beautiful old Stanley no. 7 jointer plane dating from the late 1880s with the intention of reselling it. It was sharp, clean from decades of proper care, and looked like it was still being used a week ago – absolutely amazing condition for its age. The original owner’s initials were neatly stamped on one side and it came from his family’s estate, which was sadly being liquidated. The plane was remarkably perfect by all accounts – except one…

At some point, almost certainly early in its life, the plane was dropped, breaking off the top quarter of the frog. In a classic reflection of those parsimonious times and testament to the care the owner gave to his tools, he went to unusual lengths to repair that frog, fabricating a perfectly fitting replacement section out of brass, secured with handmade copper rivets. Normally I shy away from tools with such repairs, but the complexity and care given to this one fascinated me. It was extremely well executed, having no doubt taken the better part of a day (perhaps even two) to complete, with an aesthetic effect that was detectable only upon close inspection. More important, it also returned the plane to perfect working order.

I was so conflicted I let the plane sit in my shop for weeks as I tried to decide what to do with it. Obviously treasured by its original owner, whether through necessity or nostalgia, it was used and handed down within his family for numerous generations. I hated to think of it being sold for scrap or parts after 130 years, especially given its impeccable working condition. Eventually reason and practicality prevailed, and I reluctantly decided to just list it at a fixed price on eBay, hoping I would find a buyer who could appreciate it as it was. And find a buyer I did… one with a surprising affinity for this particular plane.

Turns out the guy who bought it already had at least one other plane from the same estate with the same owner’s initials stamped on the side. He wrote and told me he was so intrigued at the care the owner had given his tools, he felt compelled to own this no. 7 just for the repair it featured. For him, the repair reflected the respect and value afforded the tool, and that little bit of history made it all the more desirable. He was excited to get it and I was thrilled to have found it a home with a new owner who ‘gets it’ – who appreciates that tool for the secret history it carries in an exceptionally well executed repair. You have to love that!

Restoration & Preservation of Hand Plane Totes & Knobs

Knob Before & AfterVintage hand planes are commonly found in the wild with filthy, crud encrusted, cracked, or broken totes and knobs.  While I periodically come across a plane with a knob or tote that has an old repair (usually poorly done), most have been left neglected and broken.  Correct vintage replacements, especially for Stanley planes, are readily available on Ebay, but they are expensive, often costing as much or more than an entire tool.  In my experience, however, most damaged wood components can be restored for use, if not display, with just a little effort and patience.

In keeping with my overarching philosophy that less is more when it comes to vintage tool preservation, I strive to retain as much of the original finish and character of the wooden components as possible.  To that end, I don’t advocate refinishing per se, unless of course the original finish has been destroyed through exposure to the elements, heavy use, or in the course of completing the repair.  The very nature of extensive damage (multiple breaks, chips, missing pieces, etc.) will frequently necessitate at least some degree of restoration to the finish itself.  However, when the only other alternative is to discard and replace the damaged part, more radical restoration techniques are easily justified.

In the following sections I will take you through the steps and materials required to complete many of the most common repairs to totes and knobs.  While there are numerous solutions to any one problem, these are the techniques I have found to produce the most favorable results.

General Cleaning and Preservation
The totes and knobs on many vintage hand planes are perfectly fine just as they are.  Unless the tool was never used, virtually all will have some degree of dents, dings and abrasions from time spent in a toolbox.  There may also be a few minor chips along edges, specks of paint, and perhaps the initials of the original owner stamped into the surface.  The varnish might be crazed and there may be some checks in the grain from age and dryness.  And, of course, there may well be layers of dirt, dried oil and grime hiding an otherwise beautiful piece of rosewood.  All of this is to be expected.

I don’t need (or necessarily want) my totes and knobs to look pristine, and most of the time the only treatment I give them is a little wax, or if the wood appears dry, a thorough rub down with a hydrating concoction of linseed oil, turpentine, and vinegar (LTV).  You can make your own or purchase Kramer’s Best Antique Improver, which I’m pretty sure Mr. Kramer makes at home in his kitchen.  Applied with a cotton rag, this all natural solution cleans and nourishes the wood, bringing back is lustrous beauty without petrochemicals, and most importantly, does not alter the finish or surface features at all.

Dirt, Crud, and Paint
For totes and knobs that are structurally sound, but have layers of crud stuck to them (where basic cleaning isn’t enough), I use a very fine synthetic pad or steel wool soaked in the same LTV solution as a lubricant to the abrasive pad.  Using very light pressure, I scrub away whatever crud I can.  This requires a cautious touch, however, as too much scrubbing can easily damage or remove the original finish.  Go slow and repeat if necessary.  Don’t try to remove every speck and spot or the piece will start to look refinished.  Wipe off the slurry of muck this creates and finish up with a generous application of LTV, polished with a clean cotton cloth.

I like to leave paint specks intact since they are a colorful part of the tool’s history and character, but if you’re determined to remove them, use the same technique described above, but with a little more vigor.  This will usually remove most of the tiniest specks.  For larger spots, lubricate the wood with turpentine, and very carefully scrape the paint spot off using a card scraper or any tool with a fairly sharp angle.  I use a three sided hollow scraper that can be found in most art supply stores.  The turpentine provides light lubrication for the scraper, which helps protect the surrounding and underlying finish.  This will leave visible scratched spots, so go over the entire piece again with the fine synthetic pad or steel wool lubricated with turpentine or LTV to blend in any marks you made.  Finish up with an application of LTV, polished with a clean cloth.

Keep in mind that by doing this you are altering the original finish of the piece, not to mention erasing part of its history.  This is a destructive technique, however mild.  Once done, it cannot be reversed, so go slow.

Cracks and Breaks
Like everything else, damage is part of the tool’s history.  Wooden parts are comparatively fragile, and when tools are used improperly or carelessly, they suffer chips, cracks, and breaks.  Age and environment also takes a toll.  Once damage occurs (or is found), there are three options available to the owner – leave it as is, repair the damage, or replace the part.  If you decide to repair the damage, there are two further considerations – functional stability and visual aesthetic.

Cracks and clean breaks are easy to repair, especially if done right away.  Older breaks tend to be literally rougher around the edges, but are still no lost cause.  Even the nastiest shattered breaks with multiple shards, splinters, and open gaps can be repaired with surprisingly appealing cosmetic results.

When performing a repair, function trumps form.  Making it pretty isn’t of much value if the repair breaks the first time you use the tool.  Repairing cracks and breaks necessitates the adherence of two separated pieces of wood, and the obvious solution to that is some sort of adhesive.  Anyone making anything out of wood will likely have one of the commercial polyvinyl acetate (yellow wood) glues close by.  This is probably the most common type of glue used in woodworking.  If you’re a purist you might favor hide glue.  The newer polyurethane glues (ex. Gorilla brand) are popular and very strong, but messy.  These are just a few of the options available.

I’ve tried just about every type of glue, and have found that 2 part epoxy provides the best results for this particular application.  It is quite strong, does not require pressure while curing, cures under a wide range of temperatures, has good gap filling properties, can be filed and sanded, is easily tinted, and accepts a finish.

2 Part epoxy consists of a resin and a hardener.  Simply squeeze out an equal measure of both, mix thoroughly, and apply.  I tint the epoxy with just a pinch of dry pigment (available at art supply stores) before mixing.  I typically use black or raw umber if working on rosewood.  It doesn’t take much to tint the epoxy, just a tiny amount.  I should note that you can also use very fine rosewood sawdust to tint the epoxy, which works exceptionally well and is naturally a perfect color match.

Mix the epoxy thoroughly and apply liberally to both mating surfaces.  Use a razor blade or thin knife to work it into cracks.  Clamp tight as best you can remembering it’s actually more important that the pieces stay properly aligned than under a lot of pressure.  With this method, you actually want a little squeeze out consistently along the seam to fill any gaps that might remain, so don’t wipe it off.  Epoxy starts to set in about 5 minutes, but takes a good 24 hours to cure.  Let it fully harden before proceeding.

Once cured, use the scraper or a file to remove the excess epoxy.  I use old steel files for this purpose.  File sharpness for this sort of woodwork is not as much of concern as it is for metalwork, and old files are plentiful and cheap.  You’re going to damage the surrounding finish doing this, but don’t worry, you’ll touch it up later.  Nasty breaks or poor alignment during curing may leave some rough spots.  Go ahead and reshape these areas using the files or a rasp.  Remember to use progressively finer teeth.  Once shaped, finish up with 200 to 320 grit sandpaper to remove file marks and help refine shape and edges.  At this point there should be no open gaps or holes.

Now you’ll need to repair the finish.  Stanley and most competitors used a varnish on their totes and knobs, and fortunately for us, they weren’t too concerned with leaving a furniture grade finish.  The finish they imparted was utilitarian and that works in our favor.  There are lots of finish options to choose from, but I prefer a penetrating oil and varnish blend, such as Watco Danish Oil Finish.  It comes in both tinted and natural versions, which you can tint yourself if desired.  Tinting helps hide the epoxy seams and blends well with the existing finish. Follow the directions on the can closely.  I apply it to the repaired portions only, slightly overlapping the original finish on adjacent areas.  The finish builds up slowly and will require multiple applications.  This takes patience and time, but the results are worth it.  Once you feel you’re getting close, dry buff the new finish using the fine synthetic pad, blending it with the areas of old finish.  Repeat steps with more Watco if necessary.   Once the new finish matches the old in overall luster and is completely cured, top it off with a good rub of LTV or wax.  Buff to a shine with a cotton cloth.  If the new finished area looks dull compared to the original finish, you need to go back and add more coats.

When well executed, breaks and cracks repaired in this manner are not only extremely strong and stable, they are nearly invisible.

Chips and Missing Chunks
Knobs with minor chips around the base and totes with missing or chipped tips are common.  Many chips are simply not practical to replace – those along the top edge of the tote’s tip, for example.  Others, such as an entire missing horn or a chunk missing from a knob base provide an interesting challenge.  The solution is no mystery, however.  It’s a matter of filing or sanding a perfectly flat mating surface, attaching a section of replacement wood, reshaping the new piece, and applying a finish.

Often the most frustrating part of the process is finding pieces of matching rosewood to use for the repair.  For this I save all the broken totes and knobs I can find to use as scrap.  It’s just a matter of cutting a new piece to the approximate size needed for the repair.  The most difficult part of the process is creating perfectly flat mating surfaces.  As discussed above, the epoxy is somewhat forgiving in its ability to fill gaps, but better mating makes for a stronger joint.  The easiest way to accomplish this is by using a motorized disk sander with an adjustable table.  If you don’t have one, you can do it by hand using sandpaper adhered to a flat substrate.  ¼” or thicker plate glass is best, although I’ve achieved great results using a four dollar 12” x 12” granite surface plate.  It just takes a very steady hand.

The glue up process is the same as previously described.  Once attached, shape the new section using rasps and files, followed by sandpaper.  Apply the finish and you’re done.

Fixing Old Repairs
Fixing poorly executed old repairs frequently present the biggest restoration challenge.  It’s easier to do it right the first time than to undo and fix a mistake that was already made.  The variety of old repairs you might come across are infinite, so I will speak in general terms.

Begin by removing any nails, screws, or bolts present.  Old glue joints can often be softened by gently heating the piece.  Just be careful not to get too hot or you’ll ruin the finish, if not set the whole thing on fire!  If the old repair joint is bad enough, you might have to cut through it with a band saw to give yourself nice new mating halves, although you do lose a little of the dimension.  Some joints are brittle enough to break apart by hand.  Others are poorly aligned but extremely strong; you may not be able to get these apart at all.  The important thing is to assess and decide up front just how you plan to proceed, then go at it.

If nothing else, a poorly aligned or ugly break repair (that is otherwise stable) can be cosmetically improved by filling the gaps and holes with tinted epoxy.  This includes nail and screw holes.  Once cured, file and sand it smooth and touch it up with the Watco finish.  Where alignment is poor, this may require some fairly aggressive reshaping of surrounding wood, but the results are usually much improved.

Damaged Finishes
On some planes the wood finish is damaged or worn so extensively that the wood appears bare.  On others, the finish might be intact but is very faded.  Others still, especially those from the 1940s and 50s might have a finish that is heavily crazed and flaking off.  It’s very important to determine just what the problem is before attempting a repair.  I’ve seen planes on which the wood at first glance looked like a completely lost cause, only to find that a simple cleaning and conditioning brought them back to life.  Proceed conservatively until you know what you’re dealing with.

Wood that has lost it finish for whatever reason can be restored following the steps above.  If the damage is weather or water related, you may need to sand down the surface before proceeding.  If the wood has a lot of open pores, you may get better results by wet sanding with the Watco, especially through the first two or three coats.  This creates a slurry that helps fill the pores and seal the wood.

For finishes that are flaking off, the best you can do is remove all the loose finish using the scraper or fine steel wool and turpentine.  I’m usually pretty aggressive with this because the flaking reflects something wrong with the original finish itself.  A healthy, properly applied finish will not flake off, even after decades.  Better to remove all of it and start over.

I don’t mind scars, scratches, and initials, etc.  I like the character they provide.  If rough, a single application of Watco will help seal the wood, preserving and protecting these features.

Painted and Varnished Hardwood
Stanley used painted hardwood totes and knobs in its planes for a brief period during the 1940s.  These are almost always found in terrible cosmetic condition, with chips and areas of loss to the painted finish.  After briefly returning to rosewood in the late 1940s and early 1950s, the company switched to heavily varnished hardwood, and then finally to a lighter varnished hardwood in the 1960s.

In my experience, these finishes are virtually impossible to restore in any conservative manner.  Short of simply cleaning them, leaving them otherwise as is, the only other thing you can do is to completely refinish them.  Unfortunately, refinished wood looks… refinished.  If you like your tools to look like new, have at it.  I just clean them up as best I can and call it a day.

Loose Totes
Pick up 5 planes and at least one of them will have a loose tote.  Have you ever tightened that tote bolt as far as you dare only to find the tote still slips when you go to use it?  It seems to be more common in the shorter smoothing planes that don’t have a toe screw in their totes.  Perhaps it’s due to wood shrinkage… who knows?  Regardless, it’s easy to resolve.  Remove the bolt and grind off a millimeter or so to shorten it.  Replace the bolt and tighten it down.  The tote should now be secure. You might have to do this a couple of times depending on how loose it is.

Suggested Resources
• Turpentine
• Kramer’s Best Antique Improver
• Fine Synthetic Wool Pads
• Fine Steel Wool
• 2 Part Epoxy (5 Min)
• Artists Pigments (Black, Raw Umber, Burnt Sienna)
• 3 Sided Hollow Scraper
• Old Metal Files (Mill, Half Round, Round, etc.)
• Wet/Dry Sandpaper (60 to 320 grits)
• Cotton Rags
• Rosewood scraps
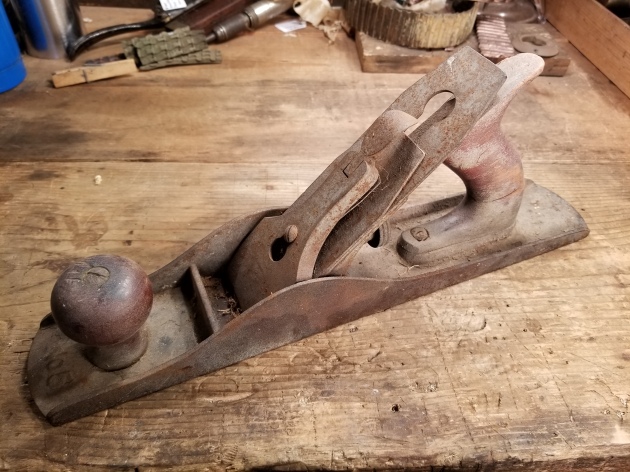
The Restoration of Old Hand Planes

Bed Rock 605C Type 7 ComparisonOpinions on the restoration of old hand planes, or virtually any antique item for that matter, vary widely and are frequently debated within their respective communities of interest. Many believe fervently that old tools should not even be cleaned, maintaining every grimy detail of its use and history. Others prefer refinishing them to like new condition. My thoughts on the subject are largely dependent upon the specific attributes of the tool – age, rarity, condition, etc., as well as the intent of the owner. There are rare and quite valuable tools whose value would be destroyed if restored. There are many others in such exceedingly poor condition that their value can only be improved by restoration. Still others have no significant value as an antique, but could be restored to functional condition for renewed use.

I personally believe that less is more when it comes to restoration. I like the idea of retaining a tool’s character – its scars and marks from use, its patina, etc. However, with rare exception, I find no nostalgia in rust and dirt. I believe a tool should be cleaned and maintained in the same manner as the original craftsman who owned it would have done. A hundred years ago, these tools represented the livelihood of the owner. They were relatively expensive and the woodworkers who owned them relied on them to make a living. They would not have allowed rust to accumulate and would have cleaned and oiled them regularly. Many vintage tools were in fact well maintained for generations, yet were eventually replaced by “improved” models (or power tools) and were left unused and abandoned in recent decades. Often, a good cleaning with mineral spirits or light buffing with fine steel wool and a penetrating oil lubricant is all that’s needed to remove light rust, restoring the tool to fully functional condition.

Other tools, particularly hand planes made after about 1935, are abundant, have little historical significance, and are therefore frequently restored solely for renewed use. For these, the extent of restoration depends primarily on the personal preference of the woodworker who intends to use it. Refinishing to like new condition might be important to one person, while others care only about functionality. Further, since the quality of many planes began a slow decline after the mid 1930s and became largely inferior by 1960, restoration of these later planes for use today often necessitates a more radical approach that extends beyond the mere cosmetic.

As is often quoted on the subject of restoration, ‘you can always go back and do more, but you can’t undo what’s already been done’.  Noting that my terminology is somewhat subjective (even to me) I loosely assign tools I come across to one of four categories:

  1. Rare, Exceptional or Near Mint – A broad category that includes tools that saw little to no use, were stored safely, have no rust or corrosion damage, and need nothing in the way of cleaning or restoration.  Also included in this category are the very rare tools sought by serious collectors.  Other than perhaps wiping off any dirt, I tend not to mess with them at all – they are too valuable.
  2. Fine Collector – These tools may have traces of rust but little or no corrosion damage, and have essentially been maintained/stored in ready to use condition.  The metal may be darkened, the tool may be dirty from use, and the wood may be scarred with a worn finish.  Tools in this category show signs of use but are in excellent original condition and need nothing more than a very light cleaning with natural based cleaners or mineral spirits and penetrating oil to remove dirt and accumulated crud that could cause corrosion if left.  Brass may be cleaned but never polished; wood may be lightly cleaned and waxed but never refinished.  These are good collector grade tools for the average person and the common sizes also make very impressive shop tools.
  3. Collectable User – These tools have moderate rust and and areas of corrosion but are restorable to good user or casual collector status with some careful cleaning and rust removal.  Tools in this category often show signs of heavy use but are in overall good condition.  They may need extensive cleaning with mineral spirits and penetrating oil to remove dirt and accumulated crud.  Wood pieces may be cracked, split or chipped and in need of a careful repair.  Broken, severely damaged or missing pieces may need to be replaced with the correct vintage part.  Brass may be cleaned but never polished; wood may be lightly cleaned and waxed but never refinished.   These are handsome shop tools that may also appeal to casual user/collectors.
  4. Shop Grade – These are tools that have no collectable value other than as a general user in the shop.  These tools typically spent most of the last 40 to 60 years in (or under) a barn and are in very poor condition (ready for the landfill).  They are so far gone that it really doesn’t matter what you do to them – anything is an improvement.  Tools in this condition may require extensive and aggressive restoration efforts in order to save them at all.  Castings might be heavily rusted, japanning mostly gone, parts broken or missing, etc.  In some cases they are simply a lost cause and the best you can do is salvage usable parts.  Others can be restored to shop grade condition through electrolytic or chemical rust removal, re-lapping, and/or replacement or refinishing of damaged parts.  Fun to restore, these tools can end up looking and working great again, but are workshop grade only – although still better than most of what you can buy today and at a fraction of the price.

There is something infinitely rewarding about taking an old forgotten bench plane and giving it a second life decades after it was left to rot.  They are elegant, beautiful, tactile tools.  Each has its own history, its own character.  Like people, tools should be allowed to age gracefully and naturally.  And just like old people, old tools have a story to tell – every paint spot, dent, ding, scratch and chip reflects a different point in time and a different job completed.   I believe restoration efforts should be judiciously limited and intended to stabilize these old tools only as necessary to prevent futher decay, and return them to functional working condition.

Archival Tool Preservation – Cleaning and Tuning

Stanley Bailey No. 4, Type 19 This guide will cover the cleaning, preservation, and tuning of vintage hand tools using primarily natural, archival materials and methods similar, if not identical, to those used by museums and restoration professionals.  I will be focusing on the majority of tools found out in the wild, and save discussion of rare, mint, historically important, or other exceptional tools for a different guide.  Likewise, I won’t be covering restoration of tools found in extremely poor condition, or those that have suffered significant damage.

Opinions on the cleaning and restoration of vintage tools vary proportionally with the number of techniques people employ.  Some take an ultra-conservative approach with a fervor that approaches religious conviction, firmly believing that old tools should not be cleaned at all, rather left in their current state with every molecule of dust, rust, and crud that history has provided.  At the opposite end of the spectrum are those who like their old tools refinished to like new condition.  This typically involves lots of stripping, sanding, painting, polishing, and varnishing.  And, of course, there are near infinite variations between the two extremes.

In my opinion, less is more when it comes to cleaning and restoring vintage tools for use.  It’s easy to clean a little more, but you can’t unclean or undo what’s already done.  Rust is just flat out bad – it’s destructive and there is no justification for allowing it to remain on a tool.  Likewise, dirt is dirt, and unless it was trod upon or wallowed in by a former president or religious deity, it tends to reduce a tool’s effectiveness and can cause additional damage.  Even sawdust, which might be considered benign, is apt to hold moisture, which can cause rust.  Additionally, wood is naturally acidic, and over time can be a caustic and corrosive influence on the metal it contacts.  There wasn’t (and isn’t) a tool made that should not be regularly cleaned, both to prevent corrosion and ensure proper functionality.  The fact that vintage tools were at some point abandoned to modern replacements does not, in my mind, justify allowing them to remain filthy today – whether in use or on display.

So, all that said, how should vintage tools be properly cleaned, preserved, and tuned?  To answer that question you have to consider two primary questions:  1. What job was the tool originally designed and intended to do? and 2. Will this tool be restored for use today or display only?  Hand planes, for example, were intended to shave and shape wood surfaces and edges.  Therefore, vintage models intended for renewed use will need to be adequately cleaned, but more important they need to be tuned in order to function as intended.  The focus on those bound for the display shelf will fall more toward the visual aesthetics of proper cleaning.  Tuning may not be necessary or desired.

Archival Cleaning
My philosophy on cleaning begins with the materials I select and ends with the proper application of these materials to prevent damage and minimize any alteration of the tool’s naturally acquired patina and finish.  Applying the less is more concept, I start every restoration using as many all natural, earth based products as possible.  While not completely exclusive or even always feasible, that’s where I start.  I begin with a citrus based cleaner and degreaser and soft bristle toothbrush to remove accumulated dirt and grime.  As a rule, I always use softer metal against harder metal to prevent scratching and surface damage.  So for heavy or difficult crud, I might go to a nylon or brass bristle brush, but only when necessary.  Spots of heavy rust incrustations generally have to be gently scraped off to get back to undamaged metal, otherwise they will continue to corrode.  For flat surfaces, I typically use a cotton cloth or fine nylon finishing pads with the citrus cleanser followed by an all natural blemish cleaner and clarifier made for wood and metal.

For wooden handles and knobs in average to good condition, I use an all natural concoction based on linseed oil, turpentine, and vinegar (LTV), among other secret ingredients.  For wood in poor condition or heavily soiled, I use mineral spirits with a nylon pad or 0000 steel wool to clean it, followed by a couple of applications of the LTV.  Cracks and breaks are repaired using tinted epoxy and clamps.  Carnauba wax can be applied after the LTV dries, but I tend to not to use it as the LTV does such a nice job.

Completely disassembled, I clean all the steel nuts and bolts by hand, with special attention made to removing rust from the threads and crud from the slots.  Using a light penetrating oil, I brush all the threads using a fine brass or steel brush – but again, I do this by hand to maintain control and not over clean.   The oil creates a nice barrier for future rust prevention.  I use the same oil to clean each screw hole.  Contact surfaces on the tool where parts mate together are also cleaned by hand in the same manner.  For the brass parts, I clean them using the penetrating oil and toothbrush or nylon brush, taking great care to remove dirt only and not abrade the patina or surface.  The oil is crucial here as it provides lubrication and a barrier against scratching.  Once the dirt is removed, there is invariably a lovely naturally aged oxidized patina found hiding beneath.

Finally, I rub down the japanned and exposed metal surfaces with the LTV concoction.  This dries to the touch, helps retard rust, and looks better than oil or wax. That’s pretty much it.  Tools cleaned in this way retain all of their patina, blemishes, and character, while losing the rust and dirt.  Best of all, nothing in the process is destructive, and other than removing the dirt and rust, the tool is left in exactly the same physical condition as when you started.

Tuning for Use
Whether purchased in 2010, or 1910, many hand tools (and virtually all planes) required some degree of tuning before use.  While it’s debatable as to whether the average journeyman of the last century took the time to do so, it’s nevertheless highly recommended.  Planes in general, and vintage planes in particular, require some attention in order to get the best out of them.  Soles were cast iron, and while milled flat during manufacturing, had a tendency to change dimensions, twist, or warp over time.  The smaller the plane, the more critical this can become, but again, depending on use.  I’m not going into great detail on all the methods used to flatten soles, or debate what is or isn’t flat enough.  Just keep in mind that folks used tools for a couple thousand years without 0.001″ tolerances, and didn’t seem to have any problem.  Basically, if you’ve got a reasonable flat surface to work against (jointer table, glass, or granite), you just progress from larger to finer grits to achieve a flat sole.

Generally speaking, the critical thing with all cutting tools is keeping the blade securely fastened to the tool at the proper angle, and of course keeping the blade sharp.  In fact, a plane is nothing more than a device for holding a cutting edge at the correct angle to shave wood.  On hand planes and spokeshaves, etc. the blade, or iron as it is properly called, is seated against an angled base.  On a plane this base is called the frog, and its angled surface must be flat and free of burs or obstructions that prevent the iron from seating completely flush.  Tuning the frog includes assessing its face and lapping it flat if there are high spots.  Similarly, the milled seating surfaces must also be free of corrosion and mate perfectly with the bed where it attaches.  Adjustment hardware must move freely but also be secure so there is no slop, or unwanted movement.

Finer points of tuning include providing proper flow for shavings.  The leading surface of cap irons should ideally be polished smooth to reduce friction as the shavings pass across it.  The mating edge of the cap iron should also sit completely flush against the iron to prevent shavings from jamming between the two.  Additionally, the lower end of the lever cap should rest flat against the cap iron in order to hold it securely and minimize shavings getting caught underneath.  All other knobs, wheels, and adjustments should be refined and lubricated to work smoothly and easily.

Finally, the single most important aspect of tuning is sharpening.  I would go so far as to say a poorly tuned but very sharp tool will consistently outperform a finely tuned but poorly sharpened tool.  Rather than try to go through the basics of sharpening, I highly recommend you get a good book and invest in a sharpening system that matches your needs and preferences.  Excellent references include the books by Lie-Nielson, Leonard Lee, and Ron Hock.  I will say that unlike most woodworkers who view sharpening as a necessary evil, I actually enjoy it and find it to be quite therapeutic and relaxing.

I realize this guide is by no means comprehensive, but it should provide a good start for anyone looking to restore, preserve, and care for vintage tools.