Among the most frequent web searches that lead people to this site come from those looking for information on tuning a hand plane. Admittedly, for those new to the craft, or at least new to using hand tools, the prospect of setting up and fine tuning a hand plane is daunting. After all, the nomenclature of parts is bewildering, the functional mechanics are an exercise in geometry and physics, and then there’s that whole issue with sharpening. It’s no wonder so many people would rather spend an evening prepping for a colonoscopy.
But yea I say unto you, fear not! Tending to a neglected (or new) hand plane is both relaxing and rewarding, and in most cases takes just an hour or two. Best of all, the gratification is instant, the rewards immediate.
Now in the interest of keeping things simple, I’m going to assume that your plane is already in a mechanically functional condition and doesn’t require a full blown restoration. For that level of detail, I recommend reading the posts under Preservation on the menu bar at the top of the page. I’m also going to focus solely on bench planes. I’ll cover black planes in a later post. For simple tuning in one evening, read on…
Step 1 – Pour Drink of Preference
 What you drink is up to you, and moderation is certainly recommended, for while you won’t be working with powered tools, you will be handling very sharp objects. I personally prefer a finer bourbon, perhaps Maker’s 46 or Elijiah Craig 18 year, or if I’m in a particularly festive mood, a little Jefferson Presidential Select 17 year or Pappy Van Winkle. Either way, begin by putting on some relaxing music and have a drink. (5 minutes)
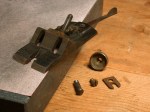
Step 2 – Disassembly & Cleaning
 The second step is to completely disassemble your plane and clean all the parts. Using screwdrivers of the appropriate size, remove all the parts, screw, bolts, washers, etc. If you’re not completely familiar with what and where everything goes or are worried you might have trouble putting it all back together, take pictures or notes. Or just pay attention; it’s not that complicated for heaven’s sake.
Once disassembled, brush off all the sawdust and dirt. If the filth is excessive, use a toothbrush and orange degreaser (available at the hardware or grocery store). Also take a few minutes to clean the threads and slots on all the screws and bolts. I use a small wire bristle brush with a little turpentine or light penetrating oil like WD-40. Once cleaned, wipe them down and set them out of the way so they don’t attract grit. (10 minutes)
Step 3 – Inspect the Sole
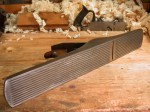 Take a look at the sole (bottom) of the plane. Put a straight edge against it if it makes you feel better. Once you’ve convinced yourself that it’s flat enough (which it undoubtedly is), set it aside and have another drink. Seriously, after owning hundreds and using dozens of planes over the years, I’m convinced it’s rare to come across one with a sole so warped, cupped, or bowed that it’s unusable. If there are any dents or dings with raised points around the edges that risk digging into your wood surface, carefully file them flat with a mill file, followed by a little 220 grit sandpaper. You can also use the sandpaper or steel wool to remove any heavy crud – I suggest lubricating it generously with WD-40, Mineral Spirits, or Turpentine. Working against a dead flat substrate such as a granite or the iron bed of a table saw is recommended. Go easy. No need to overdo it; you just want it to be clean and smooth. (5-30 minutes depending)
Step 4 – Address the Frog
 First inspect the seat for the frog on the top side of the plane’s base. This is the area of contact where the frog attaches to the body of the plane. The mating surfaces must be clean and flat. Use a toothbrush with the degreaser. If there is stubborn crud to be removed, use a brass bristle brush. If the crud is really bad, you can use a small steel brush, but be very careful to to damage the surrounding finish. Mating surfaces on the frog itself should also be cleaned in the manner described above.
The face of the frog is one of the more critical surfaces of the plane. It needs to be as flat as you can get it so the iron sits completely flush against. You don’t want any wiggle or movement, so any high spots or irregularities in the casting need to be filed or sanded flat. I go back to my granite surface and sandpaper for this. Taking care not to damage the tip of the yoke that engages the iron and cap/iron, carefully sand the face surface of the frog until it is as flat as possible. Change directions periodically to keep it even. You only need to do enough to ensure the iron sits flat against it. (15-30 minutes)
Step 5 – Polish the Cap Iron
 The leading edge of your cap iron (also called the chip breaker) will need a little attention. Flatten the leading edge of the cap iron where it contacts the iron so that it seats completely flush against it. You don’t want any gaps that shavings can slip through. While you’re at it, polish the top side of that leading edge as well (the hump) to make it nice and smooth. Less friction makes the shavings pass over it more easily, helping to prevent clogs. The smoother the better, but don’t obsess over this step. (10 minutes)
Step 6 – Sharpen the Iron
 Yes, I know, the step everyone loves to hate. Even for me, it’s often a task that I procrastinate over, but once I get going, I actually enjoy it. Since this is not a sharpening tutorial, I’ll leave the particulars on methodology to another post or reference. But if you do nothing else, take the time to put a keen edge on your plane’s iron. A 25 degree bevel works perfectly on bench planes; add a micro bevel if you’re into that, and don’t forget to polish the unbeveled back edge. (30 minutes)
Step 7 – Lubrication
 Lubrication is a good idea, but should be done sparingly since oil attracts dirt and grit. I add just a drop of light oil to the threads of all the bolts and screws before re-installing them. I also add a drop to all the moving/adjustment parts, but wipe them with a rag afterward so that only a light film is left. They certainly don’t need to be dripping.
Some guys believe in waxing the sole. Nothing wrong with that as long as you don’t use a silicone based wax. However, I just wipe down all exterior surfaces with a little Jojoba oil for storage. (5 minutes)
Step 8 – Assemble, Adjust, Cut
 Time to put it all back together. Re-attach the frog and all its related hardware first, but don’t tighten just yet. Put the knob and tote back on if you took it off. Carefully put the iron and cap iron assembly in place and install the lever cap. It should lock down securely, but not so tight as to inhibit raising and lowering the iron. Adjust the frog forward or backward as needed until the iron’s cutting edge is positioned appropriately for the type of planing you intend to do (see open vs closed mouth). Once set, tighten down the frog and lower the iron into the mouth to take your first test cut. All of your hardware and adjustment mechanisms should move freely and smoothly. (10-15 minutes)
Unless you run into an unexpected problem, the entire tuning and sharpening process can be completed in about 1-1/2 to 2-1/2 hours, and even quicker if you’re tuning a new plane or re-tuning a plane that has already been tuned or well cared for. It’s easy, rewarding, and builds both knowledge and confidence in your ability to master hand planes.
***
Wait! What about the tote and knob, you ask? You can read all about their care and repair right here.


