Preservation Beyond Tools – Digital Restoration of Photographs

Tools are not always the only thing restored at Virginia Toolworks. This is a family photo of my mother and her sisters (c. ~1932) that I restored for her 10 years ago. The original photo shown on the left was scanned at a high resolution.  You can see evidence of the silver oxidation and fading, especially around the edges.  Restoration was accomplished through digital manipulation using Adobe Photoshop . The restored image, shown on the right, was then printed on special 100% cotton paper using archival inks.

Pre-Post Comp - Family Photo

Merry Christmas from Virginia Toolworks


And she brought forth her firstborn son, and wrapped him in swaddling clothes, and laid him in a manger; because there was no room for them in the inn.

And there were in the same country shepherds abiding in the field, keeping watch over their flock by night.

And, lo, the angel of the Lord came upon them, and the glory of the Lord shone round about them: and they were sore afraid.

And the angel said unto them, Fear not: for, behold, I bring you good tidings of great joy, which shall be to all people.

For unto you is born this day in the city of David a Saviour, which is Christ the Lord.

And this shall be a sign unto you; Ye shall find the babe wrapped in swaddling clothes, lying in a manger.

And suddenly there was with the angel a multitude of the heavenly host praising God, and saying,

Glory to God in the highest, and on earth peace, good will toward men.

Luke 2:7-14

Happy Thanksgiving from Virginia Toolworks!

Thanksgiving Farm TableWishing everyone a very peaceful and reflective Thanksgiving!  Whether alone, with family or friends, at home or traveling, Thanksgiving is a day to rejoice and be grateful for what we have.  We are truly blessed as a nation, and as a free people.  Please remember those who protect that freedom, especially those who serve in our military, both home and abroad.  Remember and be thankful for their sacrifice and the sacrifice of their families who gather tomorrow with an empty place at the table.  Not everyone gets to go home for Thanksgiving.

The black Friday sales can wait.  Just give thanks – simple, selfless thanks.  “Give thanks to the Lord, for He is good. His love endures forever.” Psalms 106:1

Happy Thanksgiving!

Renewed Life for My Dad’s Stanley Level

My dad died when I was still a teenager.  Unlike his father, who was a carpenter, my dad wasn’t much of a woodworker.  The few tools he left behind were mostly garden variety homeowner tools purchased from the local hardware store.  So when my brother gifted me my dad’s old level this summer, I didn’t give it much thought.  It was in horrible condition from decades of neglect.  I brought it home and with barely a glance, set it aside on my workbench to deal with later.

With cooler fall temperatures here on the east coast, I recently pulled it out for a closer look.  Upon closer inspection, I found that it is a Stanley no. 3 level, which was somewhat of a surprise in and of itself.   More interesting, the trademark stamp dates it to the 1890s, approximately 30-35 years before my dad was born.  It could have been my grandfather’s, but even he would have had to have purchased it as a teenager, if acquired new.  Of course there is no way to know where it came from or who originally owned it, but it ended up in my father’s hands, then my brother’s, and thanks to him, it now belongs to me.

As you can see from the quick shot I took before I got started on it, virtually all the original finish is gone and the wood faded from exposure to the elements.  It appears to have spent a good deal of time in a shed or barn.  The primary glass vial was intact and serviceable, but the plumb vial was broken long ago.  Otherwise, all the parts were in place and thankfully, the vial adjustment screws were not frozen.

Level Pre-Restoration

My dad’s 1890s vintage Stanley no. 3 Level, partially disassembled

I disassembled and removed all the hardware to better evaluate what needed to be done in terms of cleanup, and to assess the broken plumb vial.  After cleaning the rust off all the screws and the vial adjustment mechanisms, I cleaned the crud off the brass plates and end caps.  I never polish old brass hardware, but I decided in this case to clean off most of the oxidation in order to better see the center scribe line.

With the hardware cleaned up, I moved on to the wood.  Despite its condition, there were numerous paint specks and splatters from years of use that I wanted to protect.  The wood itself is evidently cherry.  I cleaned it lightly with Kramer’s Blemish Clarifier to remove any loose dirt and crud.  I then applied 6 or 8 applications of Kramer’s Best Antique Improver, which I’ve written about before.  It’s great stuff, all natural (no petrochemicals), and restores life to finished and unfinished wood.

In the meantime, I went to work sourcing a proper replacement vial.  I preferred to keep it as close to original as possible, so new acrylic vials were out of the question.  I found a few glass vials for sale on eBay, but the prices were absurdly high.  So, I started trolling for a suitable “donor” level of approximately the same vintage.  It took 2 or 3 weeks, but I finally found one for under $10 that had the plumb vial intact.  When it arrived, I was surprised to find the condition actually better than the photos reflected.  I actually felt a little guilty stripping it of one of its parts.

Plumb Vial Before Repair

Plumb Assembly Before Vial Replacement

Now if you’ve never replaced a vial in an old Stanley level, you might be surprised to learn that they used Plaster of Paris (or something similar) to cement the glass vial in the tube shaped holder.  This both held it in place and also protected the fragile ends.  Getting the vial out of the old plane was much easier than I anticipated.  Pulling the split holder tube open slightly, the vial and plaster slid right out in one piece.  Once out, the old plaster easily released from the glass vial.  The vial has a paper backing that wraps around the back side, but it isn’t attached.  So carefully removing that paper and setting it aside, a quick cleaning of the glass had it looking very much like new in short order.  Positioning the vial along with the paper backing into the assembly on my dad’s plane, I dabbed some plaster into place at each end and allowed it to dry.

I reattached all the hardware, and calibrated both vials using another level as a guide.  Completed, my dad’s old level is once again accurate and ready for the workshop.  You can just make out the replaced vial in the photo on the left.  Now, as to the donor level I bought, it’s still sitting here in need of a plumb vial.  There’s clearly something wrong with this scenario!

Complete Full ViewComplete Full View 2

Virginia Toolworks Facebook Page!

Virginia Toolworks CoverVirginia Toolworks now has a Facebook page!  Come check it out for more information about woodworking and working with hand tools.  You’ll also find an occasional dash of conservative values, guns, whiskey, hunting, fishing, and anything else that strikes my fancy.

Feel free to contribute, comment, and interact!

Virginia Toolworks Facebook Page

“Excelsior” Profile Stanley Block Planes

Ever wonder about the origin of the word “Excelsior” as it refers to the body style on Stanley block planes?  Why Excelsior?  What does it mean?  Was it an official Stanley name or a term that has been applied in recent years?

Me too.

For anyone unfamiliar with the term, the “Excelsior” profile refers to the first body style used on Stanley block planes.  Dating from 1873 to 1898, the Excelsior profile differs from the later profile in that the “hump” in the cheeks is positioned more toward the rear of the plane.  After 1898 the hump was centered in the cheek profile and has the familiar milled Handi-grip indentions.  And yes, there was a very brief period of a few months in 1898 when the excelsior bodies also included the Handi-grip indentions.

Early Excelsior Profile Stanley 9-3/4 Type 1

Early Excelsior Profile Stanley 9-3/4 Type 1

The word Excelsior comes from the latin word excelsus, meaning meaning “ever upward” or “even higher.”  It is the origin for the word Excel, which obviously means to surpass in achievement.  However, more interesting and relevant for us, “Excelsior” is commonly defined as fine curled wood shavings used for packing.  Given that definition, it certainly makes sense that “Excelsior” was the name Stanley assigned to a line of block planes.

The earliest Stanley reference to Excelsior I could find is in the 1867 price list, which lists a “Patent Excelsior Tool Handle,” a wooden multi-tool handle that included 20 Bradawls and tools.  However, the multi-tool handle design more commonly referred to today as Excelsior was patented on March 19, 1867.  That patent design was awarded to Nathan S. Clement, and featured a different method of clamping the tool bits into the handle than the previous Stanley offerings.  As was often the case, the patent was eventually acquired by Stanley Rule & Level and incorporated into their product line, and was reflected in both wooden and the ornate iron handled multi-tool handles.

62938_IMPROVEMENT_IN_AWL_Clement 1867

Stanley also referred to their Bailey’s Patent Adjustable Block Planes as “Excelsior Block Planes” when they were introduced in 1873.   This term only applied to the adjustable mouth planes, such as the no. 9-1/2, no. 9-3/4, no. 15, etc.  The no. 110 and other non-adjustable planes had a different cheek profile, and were simply listed as Iron Block Planes in Stanley catalogs.

I did a little patent search sleuthing but could only find one reference that in any way tied in the term excelsior to hand or block planes.  In 1875, Albion K. Hall of Jackson, MI patented a plane specifically for making excelsior shavings.  However, I found nothing that tied him in any way to Stanley, so I assume there was no relationship between the two.

Stanley continued to use the Excelsior name for their multi-tools until 1902, and their planes until about 1898, when the profile was redesigned, moving the hump toward the center of the cheek.  Today, the Excelsior planes are attractive primarily to collectors.  While certainly usable, their castings tend to be thinner and more fragile than the later models, lending them better to display shelves than workbenches.  Either way, they remain, in my opinion, one of the more attractive plane designs ever devised.

The Excelsior line included the following planes:
no. 9-1/2
no. 9-3/4
no. 15
no. 15-1/2
no. 16
no. 17
no. 18
no. 19

***

Working Within the Limits of Tool Preservation

198 SB3 Type 9 Pre0I spent a long time researching and learning about tool preservation before I ever touched a plane. Even so, it was a couple or three years before I really settled into a comfort zone where the hands on experience I gained began to gel with the “book knowledge” I’d accumulated. For me, the greater appeal has always been geared more toward preservation than restoration (although I use the word restoration more often when casually talking about “cleaning up” a plane or tool). It’s probably a matter of semantics; I think most people equate restoration with refinishing, while preservation, by it’s very definition, speaks to preserving and sustaining. To me, that’s more accurate, and is a key part of my guiding philosophy and approach to tools.

It’s very easy for me to “go too far” when cleaning up a tool, to make it pretty vs. simply making it functional. My underlying intent is to preserve the character, finish, patina, etc. whenever possible. Dirt and rust are not sacred to me (as they are to some collectors), they are destructive elements of neglect. When I’m cleaning up a tool, I try to stay within the same boundaries that a woodworker of 100 years ago would have stayed within. He would have only been interested in preserving his tools, keeping them clean and in good working order, not making them pretty to sell on eBay. I constantly remind myself of that, not because I’m right and everyone else is wrong, but because it’s consistent and true to the values and parameters I defined when I started this venture. It’s my mission statement, if you will.

198 SB3 Type 9 Post7

***

The Confusing Grey Area of Type Study Transitions

Block Planes from the Author's Collection

Block Planes from the Author’s Collection

As I’ve written before, I periodically receive questions from readers.  I really enjoy this, and a few of these questions have led to good friendships along the way.  In a recent correspondence with one of my long distance tool friends, the following question was posed.  I thought it was a good one, and worth sharing…

I have a No 4 type 5 and the iron has the “J” trademark which was allegedly used 1874-1884.  I think it’s original to the plane and the “nut” hole is at the top of the iron. The lateral adj lever is the single piece and everything else adds up. According to the type study (if one goes by that) that particular plane was produced 1885-1888. Now, also according to the type study that plane should likely have an iron with TmP, which I have but the hole is at the bottom of the iron which wasn’t supposed to happen until type 6 planes 1888-1892.  …I know type studies are a modern phenomenon but obviously are used today to determine the approximate time the plane was manufactured and sometimes it has a real effect on the value. …  The type study seems to be a little off on this particular time line but am I putting too much value on the information anyway? I haven’t studied this long enough to understand how the studies determined typing but now I’m not sure that the specificity of subtle changes determining the difference in type is valid. I think my plane has the correct Tm on the iron but a type study would lead someone else to question it.   – Mark

Mark, you nailed it – specificity of subtle changes determining the difference in type is, in fact, NOT always valid.  It’s actually kind of interesting that our brains all seem to want to interpret type studies in a very organized, linear manner.  Strictly speaking, when the type study for Stanley bench planes was created, the transition points from one type to the next were logical from a feature standpoint, but somewhat arbitrary from a date standpoint.  Take your Type 5 to Type 6 transition, for example.  The type study dates the type 5 from 1885 to 1888, and the type 6 from 1888-1892.  While the transition of some features, like the re-design of the frog receiver, probably switched on a specific date, other changes were implemented over time.  And remember that despite what the type study leads us to believe, all the changes implemented (where we mark the transition from one “type” to the next) were not coordinated.

When Roger Smith created the type study, he made judgment calls for when to mark the date of change from one type to the next, which makes sense in the context of a type study.  However, in reality, the transition from one type to the next wasn’t so prescribed, and actually reflects an unspecified period of time in which there would have been a mix of features.  It wasn’t a single month or year in most cases, but likely a period of one to several years.  In a couple of cases, this transition period was so pronounced that the type study includes references to “hybrid” types, as is well documented between types 8 to 9.

The guys at Stanley were brilliant when it came to product differentiation and marketing.  They knew how to keep their line of tools fresh and relevant, and implemented subtle changes to help remain current and sustain demand.  Some of their changes were likely implemented for that reason alone.  The trademark stamp on iron, for example, served no functional purpose.  As such, I imagine that changes from one mark to the next took place independently of most other design changes, and therefore has the least correlation to the type studies.

A lot of people point out that the change from one plane “type” to the next should be interpreted very differently from how we understand the change from one model year car to the next.  This is true.  Comparatively, Stanley’s planes were more like today’s computers, where change is an ongoing evolution rather than a series of annual steps.  Imagine 100 years from now someone trying to create a type study for Microsoft/Intel based personal computers.  I can envision some poor soul trying to understand why his vintage “Type 4” Dell PC has a Pentium IV processor, when the “type study” clearly states it should have a Pentium III.

So, don’t fret, Mark.  What you have is a late type 5 or very early type 6.  The mix of features simply indicates the plane was probably made during that period of transition, and if anything, actually helps narrow the date range.  While you can’t prove it, you’d be quite justified to estimate the date of manufacture to sometime between, say, 1887 and 1889.  And you’d probably be pretty darn close.

 ***

Get a (Handi) Grip on this Stanley no. 18 Plane

Every so often I receive a question from a reader about a tool they own.  I enjoy this.  It gives me a chance to virtually meet folks from across the country and across the world and discuss a topic we both love.   The most recent question came from Vincent Tuinema, an architect in the Netherlands who found a nice vintage Stanley no. 18 block plane with an unusual feature – or lack thereof.

no18_1_tuinemaVincent’s no. 18 is a typical mid-20th century example in every way except one.  There are no handi-grip indentions milled into the sides.  He wanted to know the reason for this and age of the plane.  Let the sleuthing begin!

The first point to keep in mind about the no. 18 is that the body is identical in every way to the no. 9-1/2.  Stanley no doubt used the same casting for both.  Vincent’s excellent photos clearly show the raised Stanley marking at the toe of the plane, and Made in USA marked at the rear of the bed.  This tells us that the plane was made after 1930, the approximate year in which the latter marking was permanently added.

The second clue is found not by what I see, but what I don’t see.  Block planes made after 1947 had the model number stamped into the bottom of one cheek (side).  Since Vincent’s plane is not stamped this way, it indicates it was likely made before 1947.

The third, and in this case, most telling clue is the lack of the milled handi-grip indentions.  Although fairly uncommon, it is well documented that Stanley omitted the hand-grip feature on at least some of their block planes for a brief time during World War II.  Patrick Leach’s Blood and Gore site indicates that this was likely due to the fact that Stanley was using the same machinery to mill similar indentions into Howitzer artillery shells to make them easier to grip.

Similarly, brass was in short supply during the war, and Stanley switched to steel and rubber hardware on many of their planes.  If you click on the photo at the bottom of the page, you can see that the front knob on this no. 18 appears to be made of steel, not the typical nickel plated brass.  I suspect the rear adjustment wheel is probably steel as well.  While the shortage of brass for commercial purposes during the war is understandable (they needed the brass for cartridges), it seems a little surprising that steel was so readily available.  Considering of all the military hardware being produced, you would think steel would have been in short supply as well.

This mystery solved, Vincent’s no. 18 is a nice example of a WWII vintage Stanley block plane.  In the absence of a simple feature that we take for granted is reflected a time of sacrifice and uncertainty in our world.  To me, it symbolizes the united efforts of a country and a world working in partnership to defeat tyranny.  Sure, that sounds dramatic, but those missing handi-grip indentions were not just a mistake or cost cutting measure.  They were omitted for a reason.  They mean something.

no18_2_tuinema

Thanks, Vincent, for sharing your photos and allowing me to use them for this post!

***

Sharpening Angles for Bench & Block Planes

Sharpening Basics

Since sharpening is such an expansive topic in and of itself, I will leave the specific how-to details for other posts.  What you need to know in the context of fine tuning, however, is that any plane, new or old, requires initial sharpening and honing.

At a minimum, new plane irons need to have their un-beveled side flattened and polished to at least 4000 grit and preferably 8000 grit.  You don’t need to fuss with the entire surface; just the first 1/8” to 1/4” along the cutting edge is all that matters.  You also need to put a final honing on the bevel edge itself.  It may look sharp, but it needs to be honed, again, ideally to 8000 grit.  The goal is to get your cutting edge to as close as possible to a zero degree radius.

Sharpening is too often the deal breaker that dissuades woodworkers from trying hand tools.  This in unfortunate, for it requires little monetary investment to get started, is not particularly difficult to learn, and can be accomplished rather quickly with surprisingly good results.  For detailed information on the how-to of sharpening, I recommend investing in one (or both) of the outstanding books on the subject by Ron Hock or Leonard Lee.   Chris Schwarz has also written a number of fantastic articles on planes and sharpening plane irons.

Getting Down to Business

If all you want to know is what bevel angle to sharpen on your plane iron, make it 25º and call it a day.  But if you want to better understand the reasoning behind the geometry and some of the variations possible, read on.  In order to master your tools, it’s helpful to understand the principles behind the geometry at play.  So, first a few concepts and then we’ll tie them all together.

Frog Assembly

The frog is screwed to the body of bench planes

First things First – Before you can determine the optimal angle at which your plan iron should be sharpened, you first need to know the angle at which it sits in the plane.  Plane irons are held in place against the frog via a clamping device called the lever cap.  The frog is attached to the base, or sole, of the plane and provides an immovable seat for the iron.   The angle of the frog face is not adjustable, so it must be considered a constant.  On standard bench planes, the angle is usually 45º while on low angle planes it is typically a very shallow 12º.  This angle is traditionally referred to as the ‘pitch’ of the plane.

Pitch / Angle of Attack – Pitch, or what Ron Hock refers to as the Angle of Attack, is the angle at which the cutting edge engages the wood. [1]   As stated above, most bench planes have  a bed angle of 45 degrees.  This is referred to as ‘common pitch,’  and has traditionally been considered the optimal pitch for bench planes.  A slightly higher 50º pitch is called ‘York Pitch.’  This higher angle pitch is used in some bench planes for working harder woods and woods with difficult grains.  ‘Middle Pitch’ of 55º and ‘Half Pitch’  (also known as ‘Cabinet Pitch’) of 60º are frequently found in molding planes for soft and hardwood respectively. Angles of less than 45º are referred to as ‘Low Angle’ or ‘Extra Pitch,’ and are used in planes for softwood and for cutting end grain. [2]

Here’s a summary table of the different pitches and their intended use.

Pitch (Angle of Attack) Name Use
60º Half Pitch / Cabinet Pitch Molding planes for hardwood
55º Middle Pitch Molding planes for softwood
50º York Pitch Harder woods with difficult grain
45º Common Pitch Optimal Pitch for most planes
<45º Low Angle Softwood and End Grain

Bevel Up vs. Bevel Down – All planes fall into one of two categories – Bevel Down and Bevel Up.  Bevel down planes have irons that are situated with the bevel angle facing down, while the irons on bevel up planes are positioned with the bevel angle facing up.  Most bench planes are bevel down while most block planes are bevel up.  Specialty planes can go either way, depending on their intended purpose.  There are some advantages to the bevel up configuration, but we’ll cover that later.

Regardless of whether the plane is bevel up or bevel down, the angle of the frog face (upon which the iron sits) is an important determining factor in determining the desired bevel angle.  As stated above, the vast majority of bench planes have frogs with a 45º bed, meaning the cutting iron sits at a 45 degree angle from the work surface.  Since these bench planes are bevel down, changing the bevel angle doesn’t change the pitch, or angle of attack – that’s essentially fixed at 45 degrees.  Changing the bevel angle does, however, change the relief angle, or clearance behind the iron.

SB605 Type 6

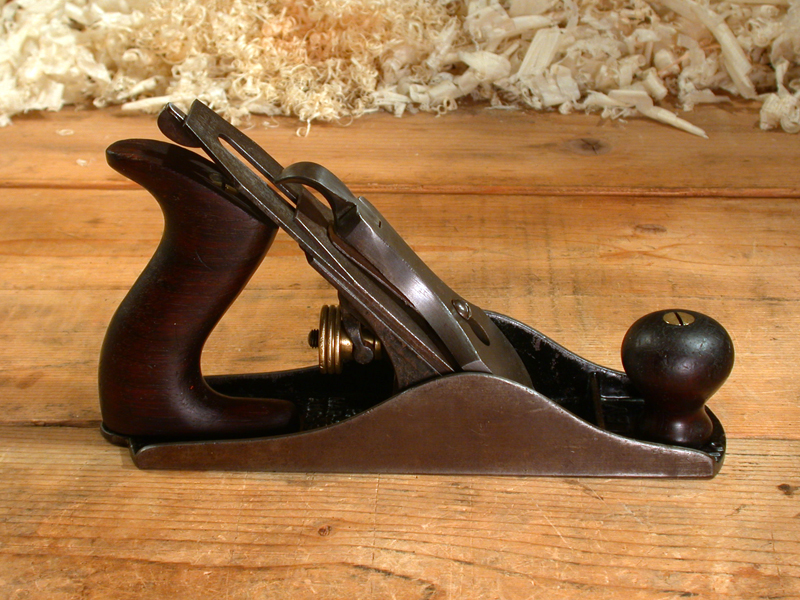
Bevel Down Bench Plane

Bevel Down Planes – Since the irons on most bench planes are positioned bevel down, this is the most common configuration faced when sharpening.   Because the un-beveled side of the iron is positioned up (i.e., bevel side down), the angle of attack is the same regardless of the angle at which the bevel is sharpened.  That doesn’t mean the bevel angle is completely unimportant; durability, for example, is still a consideration.  The bevel angle is, however, less critical than it is on bevel up planes.  That said, there are still a few tricks you can employ to fine tune your angle of cut, but more on that later.

The standard primary bevel angle for bevel down bench planes is 25 degrees.  This offers a good balance of shearing action and durability while providing an adequate relief angle (behind the cut).

SB65.5 Type3

Bevel Up Block Plane

Bevel Up Planes – Block planes have the iron positioned bevel up, but they’re not the only planes with this configuration.  Low angle bench planes, including the Stanley no. 62 and the Sargent no. 514 were bevel up, as are several models made today by Veritas.  There is an advantage with bevel up irons in that the angle of the bevel can be changed to affect a change in the angle of cut.  This provides a measure of flexibility that bevel down planes don’t have, at least not to the same extent.

While there is more to consider in edge geometry than just the angle of cut (i.e., durability), you could reasonably sharpen the bevel on the iron of a low angle block plane iron to 33 degrees.  Given its 12º bed angle, you would end up with an angle of cut of 45 degrees (12º+33º=45º), the same as on a standard angle plane.  By contrast, to accomplish a low angle of cut using a standard angle plane, you’d have to sharpen the bevel at a very shallow 17 degrees (20º+17º=37º).  Durability of such a thin cutting edge would be problematic with most woods.

See “Beyond the Standard” below for information on adding secondary bevels (micro-bevels) and back-bevels.

Common Sharpening Angles

The table below shows the three most common bench and block plane types and the proper angles at which to sharpen the irons.

Common Plane Types Frog Angle Angle to Sharpen Angle of Cut
Bench Plane – Standard Angle 45º 25º to 30º 45º
Block Plane – Standard Angle 20º 25º 45º
Block Plane – Low Angle 12º 25º 37º


Beyond the Standard

Secondary/Micro-Bevels – The terms secondary bevel and micro-bevel refer to the same thing.  Secondary bevels are a very shallow bevel along the cutting edge of the primary bevel.  These angles, usually 1º to 3º, serve primarily as an aid in honing.  It takes considerably less time and effort to final hone a small secondary bevel that it does the entire primary bevel.  They also make honing touch ups a snap.  As long as the edge has not been damaged, it’s quick and easy work to re-establish a keen edge on the secondary bevel with a few strokes on a sharpening stone.

On a bevel down plane, adding a secondary bevel affects no change in the angle of cut.  The only thing it changes ever so slightly is the relief angle – the angle between the back side (bevel side) of the iron and the work surface. It also slightly reduces the total bevel angle on the iron itself, but should not be enough to affect durability of the edge.  On most planes the addition or subtraction of a couple of degrees of bevel angle is not going to make any difference.

Some people will tell you you can’t (or shouldn’t) put a secondary bevel on a bevel up iron.  That’s nonsense.  If you’re that concerned with the cutting angle, sharpen your primary angle a few degrees shallower so the secondary angle brings you back to 25º.  I’ve never experienced a problem with a secondary bevel on a bevel up iron, and it’s a sharpening technique I apply consistently.

Back Bevels – Back bevels can be added for a couple of reasons.  On a bevel down plane, (unlike the secondary bevel) adding a back bevel will affect the angle of cut.  This is something you can use to your advantage.  For example, with the frog fixed at a 45º angle, adding a 5º back bevel increases the angle of cut from 45º to 50º.  This technique can be used if you’re working with harder woods or wood with difficult grain.

Back bevels are also helpful if your plane’s iron has rust damage or pitting to its un-beveled side.  By putting a back bevel of 1º to 2º on the pitted back side, you effectively cut through the pitted surface creating a clean, undamaged edge.  You end up with a cutting angle of about 46º to 47º – not a critical difference for most woodworkers.  If you’re obsessive about your edge geometry and angle of cut, this might not be a satisfactory solution.  Although if that’s the case, you probably shouldn’t be futzing with a vintage plane in the first place, let alone salvaging a pitted plane iron.  But if you’re like me, having one or two extra irons set up for different purposes is a must, and finding good use for old irons suffering from age and neglect makes me feel good.  It’s just a matter of purposing them for the right job.  And again, increasing this angle of attack is actually advantageous when planning wood with difficult grain. [3]

Back bevels on bevel up irons won’t change the angle of cut, but they do change very slightly the relief angle and the bevel angle of the iron itself.  Again, a couple of degrees difference should not adversely effect the  durability of the edge.

Summary

Wrapping up, the vast majority of both bench and block planes can be sharpened with a 25º bevel angle.  However, with a little experimentation, you may find that making some adjustments to the geometry helps overcome challenges presented by both difficult wood and less than perfect plane irons.  Don’t be afraid to experiment.  That’s the best way to learn.

____________________________________

[1] Hock, Ron, Back Bevels and Plane Geometry, 2010.
[2] Whelan, John, The Cutting Action of Plane Blades, 1993.
[3] Hock, Ron, Back Bevels and Plane Geometry, 2010.

***