Restoring Tools and Furniture – The Recipe by John Kramer
September 1, 2014 2 Comments
Restoring Tools and Furniture – The Recipe by John Kramer.via Restoring Tools and Furniture – The Recipe by John Kramer.
Restoration, Preservation, Care and Use of Vintage Hand Tools
July 4, 2014 2 Comments

Words every bit as relevant today as when originally written. On this July 4th, take 2 minutes; read these excerpts carefully and reflect on what this means for your life, for your country, and for our future…
THESE are the times that try men’s souls. The summer soldier and the sunshine patriot will, in this crisis, shrink from the service of their country; but he that stands by it now, deserves the love and thanks of man and woman. Tyranny, like hell, is not easily conquered; yet we have this consolation with us, that the harder the conflict, the more glorious the triumph. What we obtain too cheap, we esteem too lightly: it is dearness only that gives every thing its value. Heaven knows how to put a proper price upon its goods; and it would be strange indeed if so celestial an article as FREEDOM should not be highly rated.
I call not upon a few, but upon all: not on this state or that state, but on every state: up and help us; lay your shoulders to the wheel; better have too much force than too little, when so great an object is at stake. Let it be told to the future world, that in the depth of winter, when nothing but hope and virtue could survive, that the city and the country, alarmed at one common danger, came forth to meet and to repulse it. Say not that thousands are gone, turn out your tens of thousands; throw not the burden of the day upon Providence, but “show your faith by your works,” that God may bless you. It matters not where you live, or what rank of life you hold, the evil or the blessing will reach you all. The far and the near, the home counties and the back, the rich and the poor, will suffer or rejoice alike. The heart that feels not now is dead; the blood of his children will curse his cowardice, who shrinks back at a time when a little might have saved the whole, and made them happy. I love the man that can smile in trouble, that can gather strength from distress, and grow brave by reflection.
‘Tis the business of little minds to shrink; but he whose heart is firm, and whose conscience approves his conduct, will pursue his principles unto death. My own line of reasoning is to myself as straight and clear as a ray of light. Not all the treasures of the world, so far as I believe, could have induced me to support an offensive war, for I think it murder; but if a thief breaks into my house, burns and destroys my property, and kills or threatens to kill me, or those that are in it, and to “bind me in all cases whatsoever” to his absolute will, am I to suffer it? What signifies it to me, whether he who does it is a king or a common man; my countryman or not my countryman; whether it be done by an individual villain, or an army of them? If we reason to the root of things we shall find no difference; neither can any just cause be assigned why we should punish in the one case and pardon in the other.
Let them call me rebel and welcome, I feel no concern from it; but I should suffer the misery of devils, were I to make a whore of my soul by swearing allegiance to one whose character is that of a sottish, stupid, stubborn, worthless, brutish man. I conceive likewise a horrid idea in receiving mercy from a being, who at the last day shall be shrieking to the rocks and mountains to cover him, and fleeing with terror from the orphan, the widow, and the slain of America.
There are cases which cannot be overdone by language, and this is one. There are persons, too, who see not the full extent of the evil which threatens them; they solace themselves with hopes that the enemy, if he succeed, will be merciful. It is the madness of folly, to expect mercy from those who have refused to do justice; and even mercy, where conquest is the object, is only a trick of war; the cunning of the fox is as murderous as the violence of the wolf, and we ought to guard equally against both.
Thomas Paine, An American Crisis – December 23, 1776
June 4, 2014 Leave a comment

Direct Grilled Corn (with Brats)
In my humble opinion, there’s only one way to grill corn – out of the husk and directly over the coals (not gas – that ain’t even real grilling). Now I know a lot of folks, including some very close friends, like to leave the husks on their corn when they grill it. I don’t know, something about sealing in the juices. But the fact is, corn has plenty of water and it’s not like direct grilling it dries it out. Quite the contrary.
Grilling in the husks is basically just steam cooking using heat from the grill. Direct grilling accomplishes something important that steaming doesn’t. When you direct grill corn, the sugars in the water caramelize, resulting in an extraordinary sweetness that is accented by a touch of smoky goodness. Trust me, nothing else compares.
Direct grilling corn is easy. Grill it just like a hot dog, turn it frequently to make sure it cooks evenly. You can tell when it’s ready by the color change and the light charring as shown in the photo. You can top with butter, salt and pepper, but if you really want to impress, mix up some Shadon Beni butter (preferably in advance, it’ll keep all summer):
Spread this on your grilled corn and then spritz it with some fresh lime juice, and I guarandamntee you’ll wish you had grilled more. Please trust me on this; you’ll never want corn cooked and served any other way ever again.
***
June 3, 2014 2 Comments
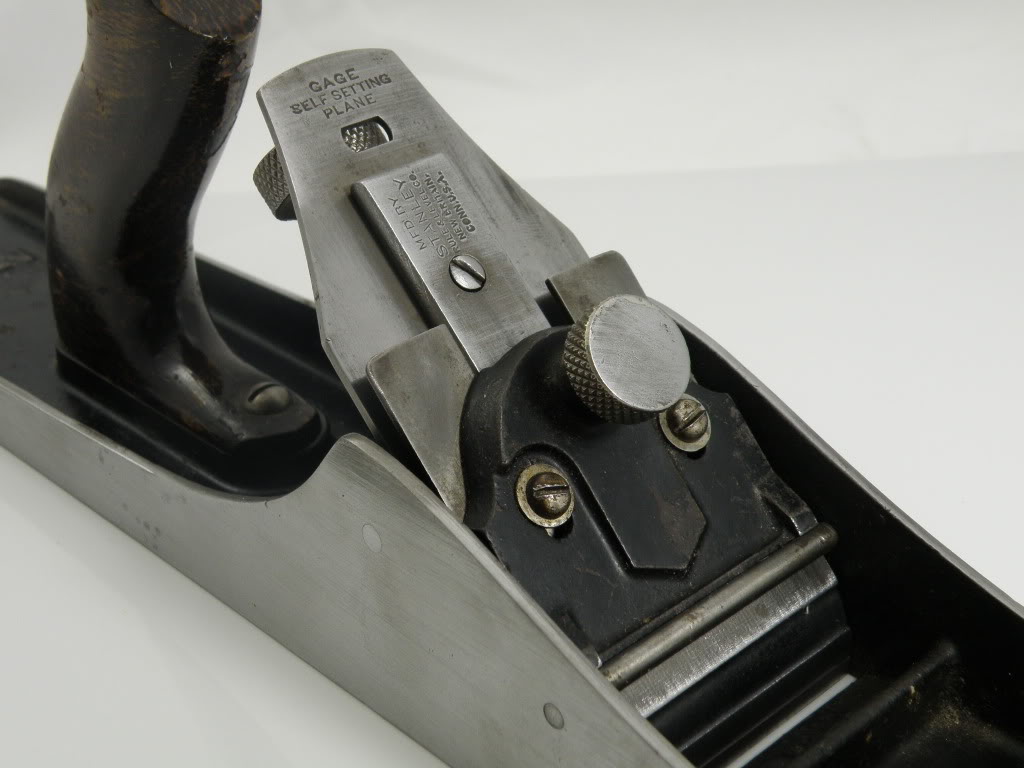
Stanley Gage Plane – Frog and Iron Assembly
Stanley Gage planes are a little finicky to set up initially, but once you get them set accurately, they do tend to stay that way. The main benefit of the design is such that once properly set, you can remove the lever cap, iron and cap iron, and then replace them again, returning to the exact depth adjustment at which you had it set initially. Further, since the iron/cap iron is positioned via an indexing block, there is no slop (movement) from side to side, and therefore no need for a lateral adjustment mechanism.

Indexing Block on Gage Iron
Some people will tell you that in order for the design to work, the cutting edge of the iron must be perfectly perpendicular to its edges. Ideally, that is true. However, I don’t think it’s actually all that critical. What does need to be perpendicular to the cutting edge is the sides of the indexing block, which can be loosened and adjusted via the screw on the top side of the iron (show here on the left).
The indexing guide itself, which is attached to the lever cap, is not laterally adjustable, so in order for the iron to extend properly through the mouth of the plane, the iron’s edge needs to be perfectly aligned. As I said, you ideally want everything to be at perfect right angles, but that’s not always what you end up with. By adjusting the indexing block so that it’s properly aligned in conjunction with the cutting edge on the iron, even a skewed edge can be aligned properly.
I admittedly don’t have a lot of extensive personal hands-on experience with the Gage planes. I’ve owned a couple, and right or wrong, here’s how I set them up for use:
***
May 23, 2014 Leave a comment

Stanley nos. 61 & 63 ~ from the Virginia Toolworks collection
The Stanley no. 61 and no. 63 planes are low angle block planes featuring depth adjustment mechanisms but lacking an adjustable throat plate. Introduced in 1914 and 1911 respectively, neither the 6 inch no. 61 nor the 7 inch no. 63, were ever particularly popular with tradesmen, woodworkers, or carpenters. Offered as less expensive, fixed throat alternatives to the no. 60 and no. 65, very few folks were tempted to purchase a low angle plane without an adjustable throat, especially when that feature could be had for just a few pennies more. Subsequently, their limited popularity constricted demand and production, and so they are fairly hard to find today.
Ironically, these planes are virtually identical to the very first type no. 60 and no. 65, both of which were introduced in 1898 with a similar wooden knob and lacking an adjustable throat. Why then, less than 10 years later, Stanley thought reintroducing this handicapped design under the model nos. 61 and 63 was a good idea is anyone’s guess. Regardless, both the no. 61 and no. 63 are easily distinguished from the Type 1 no. 60 and 65 since their model numbers were cast in relief at the rear of the bed just below the depth adjustment knob. Manufactured for less than 25 years, both planes were discontinued in 1935.
While the no. 61 and no. 63 are very collectible due to their scarcity, users looking for a functional low angle block are far better off sourcing a no. 60 or 65 in good condition.
***
May 19, 2014 15 Comments
John Porcius Gage formed the Gage Tool Co. in 1883, and operated it until 1917, making wood bottom transitional planes. J.P. Gage registered plane patents on 4 August 1885, 13 April 1886 and 8 November 1892. The 30 January 1883 patent of David A. Ridges was also used.

J. P. Gage Patent Drawing
The Gage “self-setting” design eliminated the need for a lateral adjustment feature, which eliminated slop in the blade movement. The adjustment slide was designed to accurately fit into a groove in the frog, and depth adjustment was controlled by a screw at the rear of the frog, similar to a low angle block plane. The two-piece lever cap design also functioned as a chipbreaker. The outer part of the cap serves as the lever cap, with the inner piece functioning as a chipbreaker. The mechanism is adjustable via a two-screw slide to bring it closer to the edge of the blade. The self setting feature allowed the cutter and cap to be removed and reinstalled without adjustment of the cut.
In 1919 Stanley Rule & Level Co. bought the Vineland NJ company, mainly to get the patent for their excellent frog design and to compete with Sargent’s Auto-Set line of planes that are very similar in both appearance and design. Stanley retained the use of the Gage name, producing a line of transitional planes from 1919 to 1935, and metal Gage planes from 1919 to about 1941, when the line was phased out.
The original Stanley Gage line of metal bench planes was numbered 3 through 7, sizes that compared to their Bailey counterparts. The G prefix was added in 1930 to distinguish them from the Bailey line (G3 through G7C). There were 10 different numbers included in the offering, which included corrugated versions that, like Bailey planes, were differentiated with a C suffix appended to the model number (ex. G3C or G7C).

Stanley Gage no. 5, Type 2 (1924-1930)
There are four “Types” of Stanley Gage planes, which are thankfully far less complicated than most of the other Stanley Type studies.
Type 1 (1919-1923) – Plane beds marked “Pat. Appl’d For” in the casting. No “G” prefix to the model number
Type 2 (1924-1930) – “Pat. Appl’d For” removed from the casting. Plane beds are now marked with Schade’s 2-17-20 patent date.
Type 3 (1930-1941) – The “G” prefix added to the model number.
Type 4 – Same as Type 3 but has “Made in USA” added to the casting. (exact date of this is uncertain)
Sellens, Alvin, The Stanley Plane,: A History & Descriptive Inventory, Augusta, KS: Allvin Sellens, 1978.
Walter, John, Stanley Tools: Guide to Identity & Value, Marietta, OH: John Walter, 1996.
***
May 6, 2014 2 Comments
There are definitely artistic elements to restoration, and while mostly technical, I would argue that compositional elements also come into play in an unconventional sense. It’s very much like creating something with found objects. I approach restoration projects with the objective of finding the fine, although often fuzzy, line between age and damage, removing the latter while keeping the former. Instead of graphite, ink, or paint, the media used here were a variety of abrasives, lubricants, and chemicals that effect specific desired changes in metal and wood.
***
April 28, 2014 5 Comments
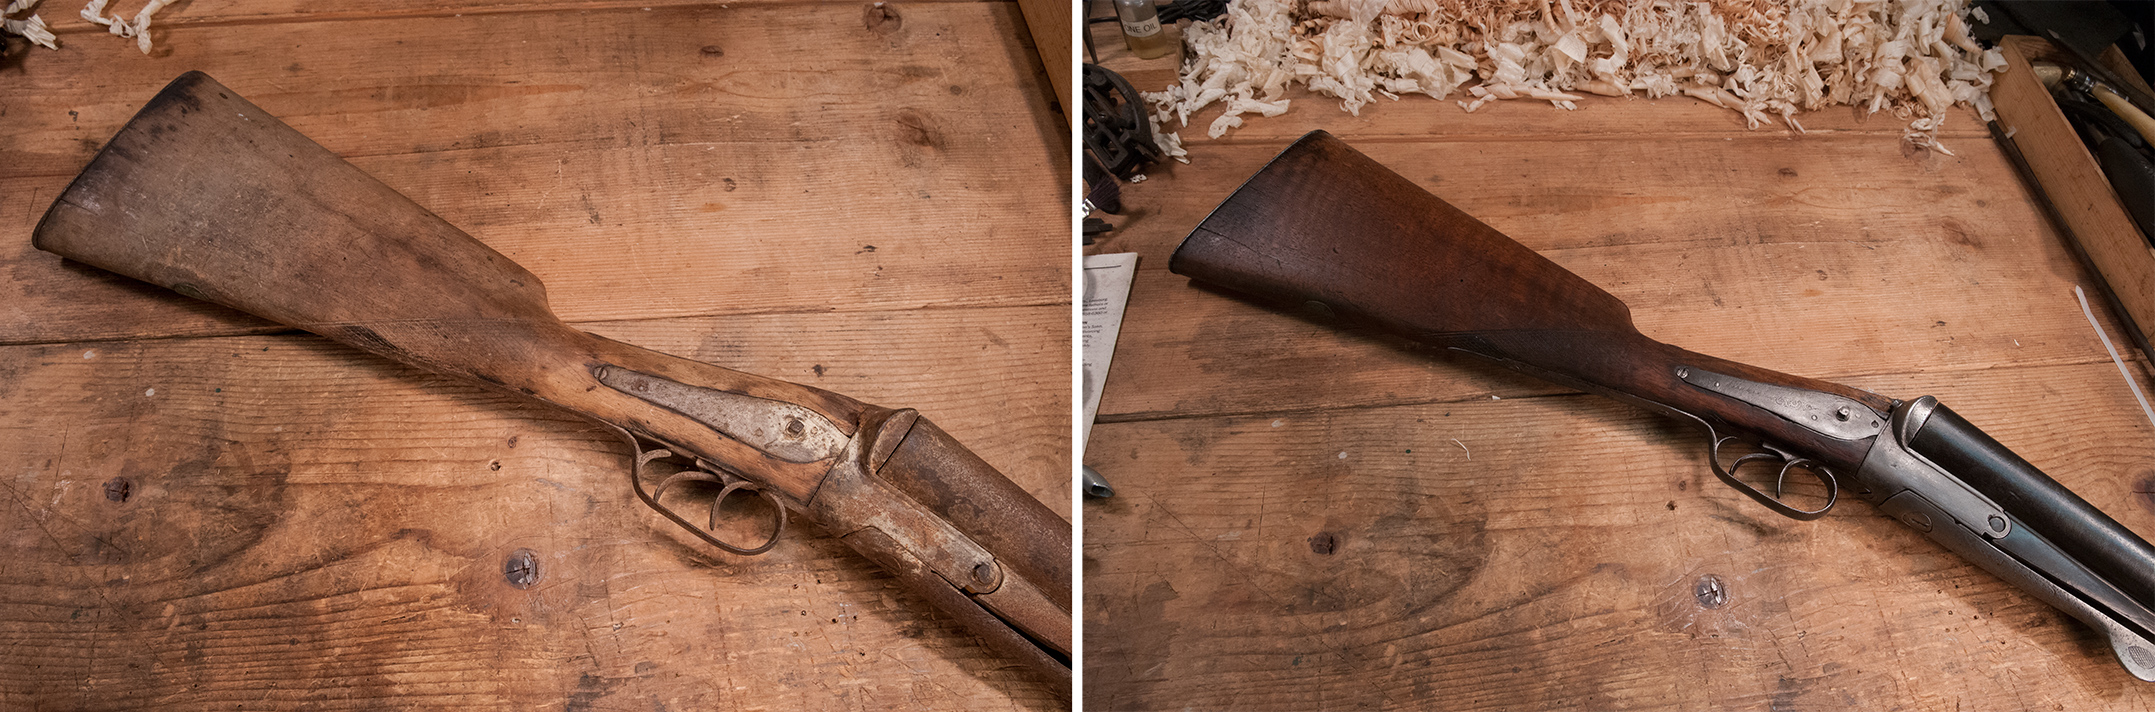
The recent successful completion of the Lee-Enfield restoration has me inspired to work on a couple of other neglected firearms that have been in the family for decades.
My dad was in the navy in WWII and brought home a Japanese Arisaka rifle from the Philippines. He never talked much about the war, and all he had to say about the rifle was that there was a pile of them that were free for the taking. So, he brought one home. Fortunately, he never tried to shoot it; more on that in a moment.

1930s-40s Japanese Arisaka before restoration (bolt removed)
The rifle was stored in our attic from the time the house was built in the late 1950s until 1983, when my mother moved closer to town. It went straight into that attic until 2006, when she moved into a retirement facility. Unbeknownst to my brother and me, she gave it to a family friend. Since each of us thought the other had it, the rifle never came up in conversation until last summer, when I happened to ask about it. Long story short, the family friend graciously returned it to us, along with a side by side shotgun that is in horrendous condition.
I don’t know the rifle’s condition when my dad picked it up in the Philippines, but having spent 70 years in attics since, the Arisaka accumulated a lot of dust and rust. The wood was in fair condition, but very dry; all the metal surfaces were rusty and most of the original bluing was gone.

Detail of the receiver and rear sight
After doing some research, I’m 90% sure this particular Arisaka was strictly a training rifle, and was never shootable. It appears to be some sort of type 38/type 99 hybrid with a mixture of parts from both designs. The biggest giveaways are lack of a serial number and proper hallmarks, and the fact that the barrel isn’t rifled. It is interesting, however, that it does seem to have all the correct mechanical parts of a fully functional rifle, including the firing pin, magazine spring, and the action dust cover, which is normally missing from all Arisakas. That one part, seen in the photo below, is probably worth as much as the rest of the rifle.
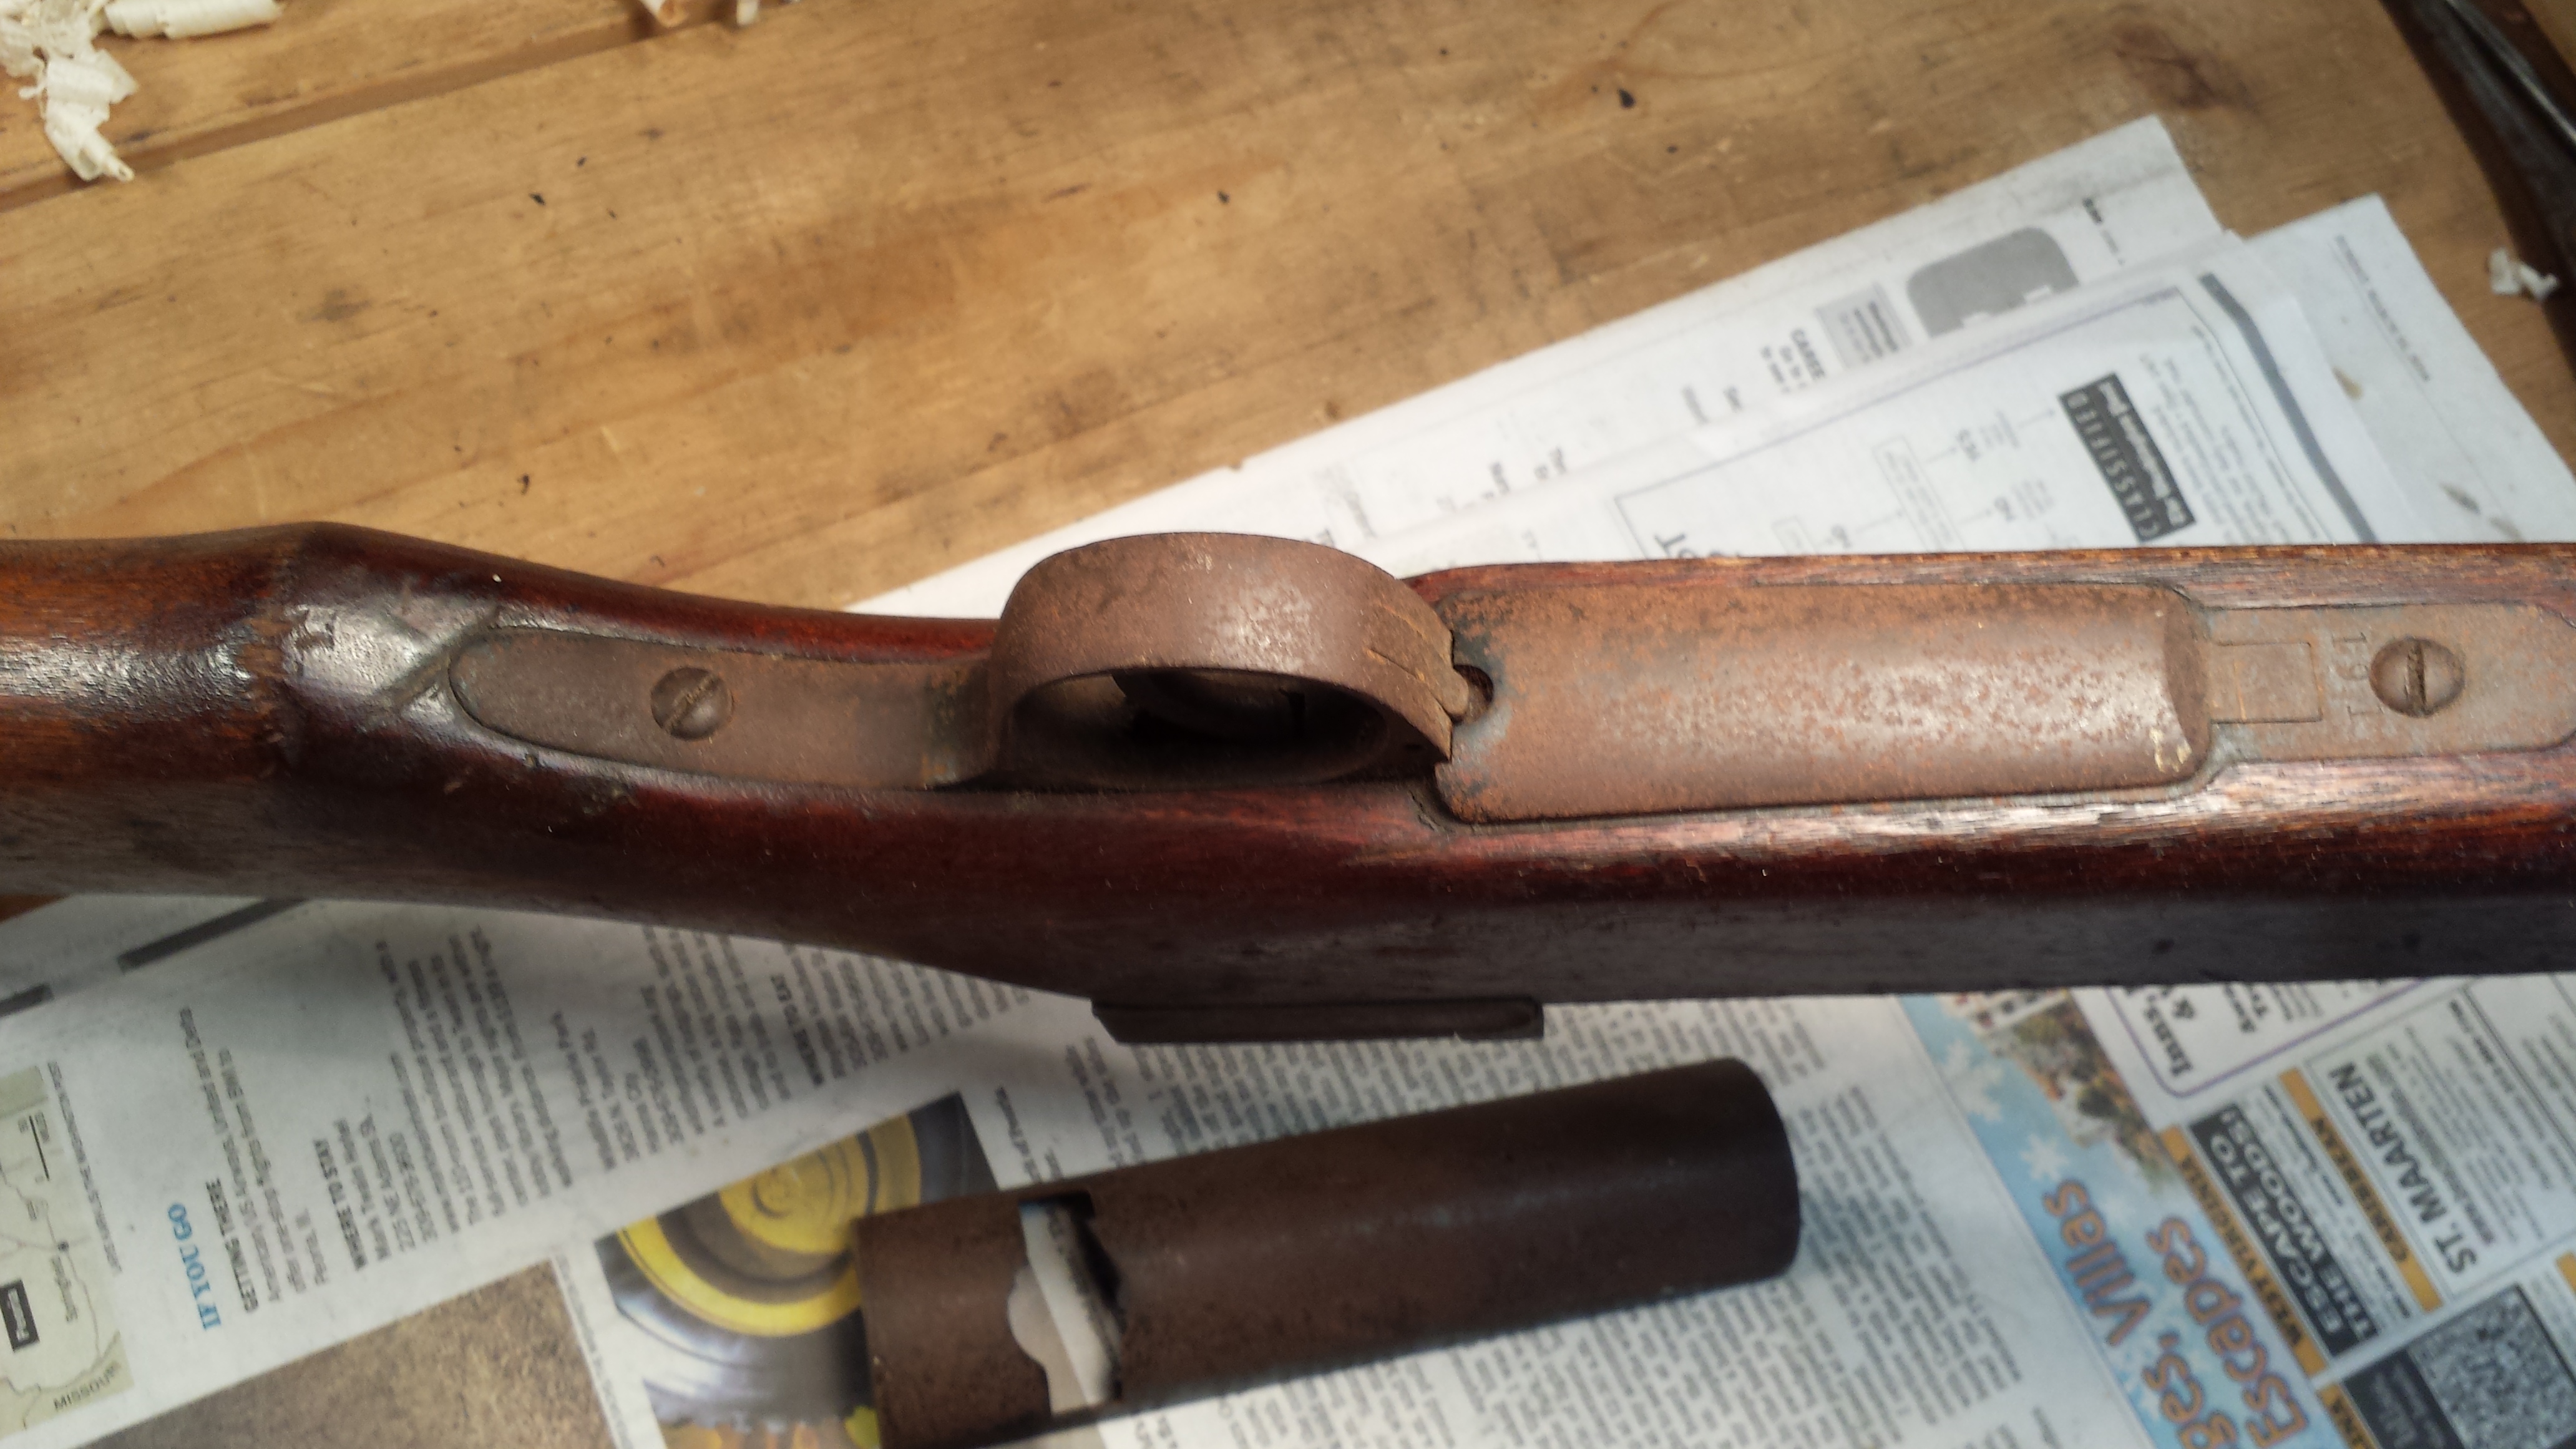
Detail of the bottom, trigger guard and magazine floor plate
These training rifles are not uncommon, but they were not constructed to handle live ammo and are likely to explode if shot. The receivers were made of cast iron and intended for either wooden rounds or low power blanks. Because they are virtually indistinguishable from the real rifles, a lot of GIs who brought them home after the war tried to shoot them. The consequence of doing this was not pretty. This earned the later Arisakas a reputation for being poorly made and these are sometimes (incorrectly) referred to as Last Ditch guns.
Since I didn’t have to worry about shooting it or compromising its value (it’s a $50-$100 gun at best), the restoration focused primarily on the cosmetic, with mechanical function a secondary concern. Fortunately, none of the screws were seized and the rifle disassembled quickly. Compared to the Enfield, taking this one apart was a breeze. The rust turned out to be mainly superficial, and came off pretty easily with some CLP and light brushing. The receiver and barrel required a little more aggressive scrubbing with the CLP and steel wool, but cleaned up very nicely.
 Once cleaned and degreased, I used a cold blue oxidizing agent to darken the metal areas that were overly brightened by the cleaning. This toned it down to a perfect match to the overall patina of this 70-year-old firearm. With a little light surface toning, the result was a rich and lustrous dark blue/gray finish that accurately reflects the age and matches the remaining patina.

Arisaka receiver before & after restoration
The stock, as I said, was overall pretty good, but the wood was very dry and splintery, and there were a lot of scratches and dings from laying bare in attics, etc. A few applications of Kramer’s Best had it looking much better, but I still wasn’t satisfied with the result. After looking at it and thinking about it for a few days, I decided to give it a light application of Watco Danish Oil, which is thin and penetrates well, and is great stuff overall. Unlike many finishes, it builds up very slowly with a low sheen, and plays nice with other existing finishes in my experience. I used a mahogany tint that matched the original finish on the rifle, and gave it just a single application. The result was a remarkable improvement. Scratches faded, tone evened out, and the overall surface just felt better in the hand.
Reassembled, the rifle looks great. Since it’s not shootable, it will never be anything other than a wall hanger, but that’s okay. It’s a piece of history and a link to my dad.

Arisaka after restoration
April 14, 2014 3 Comments
Unless you live in a city apartment, or happen to be wealthy, disinterested, or lazy enough to pay someone to do all of your home maintenance projects, chances are now and then you have need of a hand plane. Even the most ardent power tool minded woodworker can’t escape the reality that some jobs are just easier solved by a couple of passes with a hand plane than with anything you plug into an electrical outlet. Whether you’re an active hand tool user, a neophyte learning to work wood by hand, a weekend woodworker or a casual homeowner, a basic set of good hand planes is essential.
There’s a great deal of generalization that goes into compiling a list like this. Because hand planes tend to be used for specific applications, some woodworkers my find greater utility in some planes than others. Someone who makes musical instruments would obviously need different tools than a furniture maker. But speaking in the broadest sense, these are the 5 essential hand planes that virtually everyone should own. Certainly for anyone interested in acquiring a first set of planes to use around the shop, farm, or house in the suburbs, these tools offer the greatest utility and versatility.

Stanley Bailey No. 5, Type 11 (c. 1910-18)
Fore planes are those ranging from approximately 14 inches to 18 inches in length. In the Stanley bench plane assortment, these include the nos. 5, 5-1/4, 5-1/2, and 6. The term ‘Fore’ dates back several hundred years and is generally assumed to be a contraction of ‘Before’ and interpreted as the plane used first in flattening a surface. “It is called the Fore Plane because it is used before you come to work either with the Smooth Plane, or with the Joynter.” [1]
As the first plane one would use in preparing a surface, the Fore plane takes the most aggressive cut, removing rough saw marks and leveling out low and high spots, etc. The iron is sharpened with a significant camber, or curvature to the cutting edge, with as much as 1/16″ to 1/8″ difference between the center and the edges. This removes the most waste, but subsequently leaves the surface of the wood with a scalloped finish.
While either the Stanley no. 5 or no. 6 will do, the no. 5 is the better choice in our 5 plane roundup. Rough planing is a very physical activity, and the lighter weight of the no. 5 makes it less fatiguing to use. It’s smaller size also makes it more appropriate for the wide variety of other day to day planing jobs that most people likely face. The no. 5 is, in my opinion, the most versatile of all the bench planes and the plane I use most often.
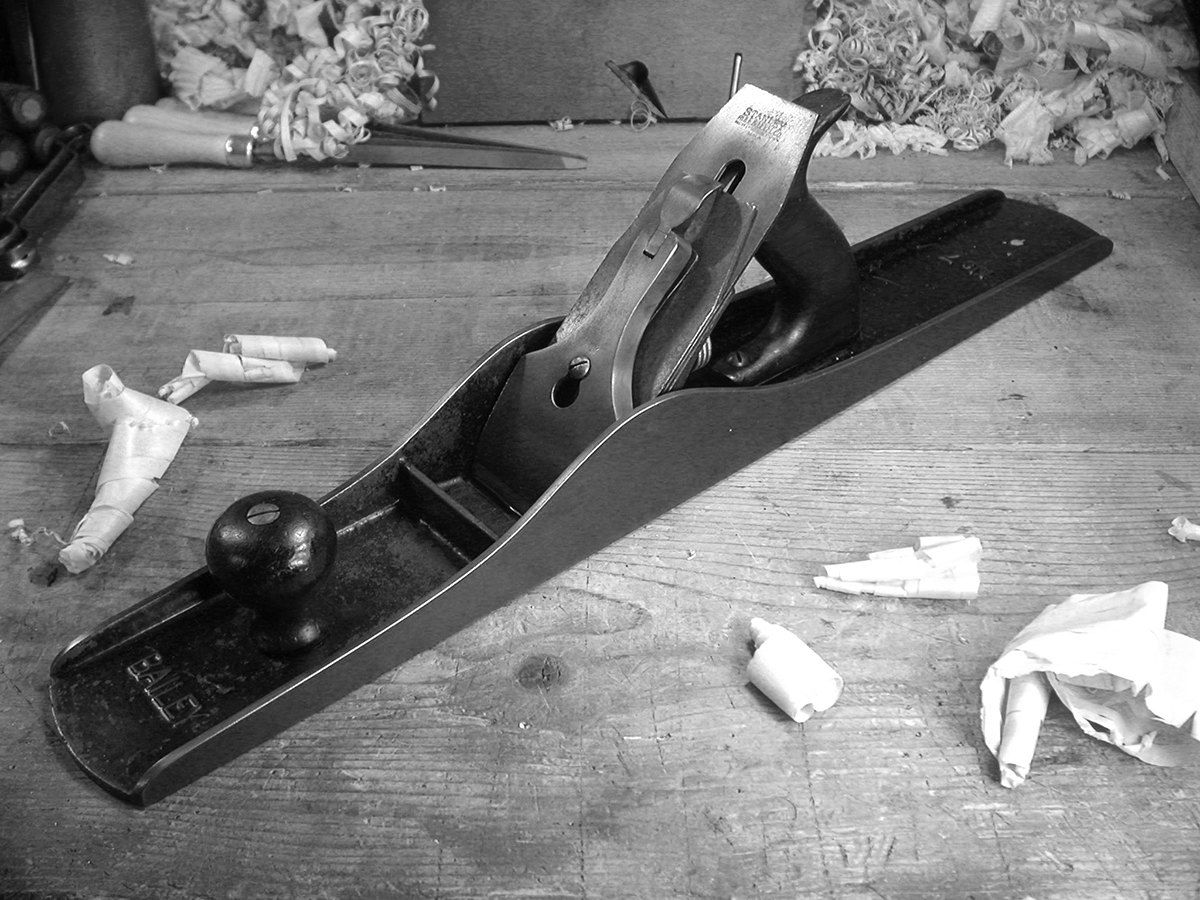
Stanley Bailey No. 7, Type 10 (c. 1907-09)
Try planes, more commonly known as Jointer planes, are those over 18 inches, and are most commonly 22 to 28 inches. Stanley’s offering of Jointer planes are the no. 7 and no. 8, measuring 22 inches and 24 inches respectively.As the name implies, a Jointer plane excels at truing the edges of long boards that will be glued together to make table tops, shelves, and carcasses. But its value and place on the workbench isn’t limited to edge work. The Try, or Jointer, plane is used to flatten and refine the surface left by the Fore plane. Its extra length allows it to true large flat surfaces without riding up over the peaks or dipping down into the valleys created (or left uncorrected) during the initial surface preparation.
Despite its heft, the Jointer should be considered a precision tool. The iron should be sharpened with a slight camber (or perhaps none at all if used exclusively for edge work), and the frog typically adjusted with a fine set for thinner shavings than the Fore plane. Working both across the grain and in all directions, the Try plane leaves a perfectly flat surface that requires only final touch up with the Smoothing plane.
Your choices between the two standards, nos. 7 and 8, are really a matter of personal preference. In this case, Newton’s laws of motion lend a helping hand. The greater heft is actually a benefit, in that once you get it moving the additional mass helps keep it going with less effort. That said, the no. 8 is quite a beast, and my personal preference is for the lighter and shorter no. 7, which I find easier to manage.

Stanley Bailey No. 4C, Type 10 (c. 1907-09)
Smoothing planes include the shorter planes in the lineup, those 10 inches or less. Stanley made a number of planes in this range, from the tiny no. 1 to the most popular no. 4 and its wider sibling, the 4-1/2.The Smoothing plane is the final plane used prior to applying the finish. Executed properly, there should be no need for sandpaper. Used primarily with the grain, the Smoothing plane is normally sharpened with just the slightest camber or left straight with its corners eased to prevent them from digging in or leaving tell tale ‘lines’ along the edge of the cut. The frog is adjusted with a closed mouth for the finest of cuts, and the shavings produced are tissue thin, ideally produced from long strokes covering the full length of the wood. Aside from perhaps a little hand scraping here and there, the surface left by the Smoothing plane should require no further treatment. In fact done correctly, sanding would actually diminish the quality of the surface left by the Smoother.
More so than with the Fore and Try planes, the choice of which size Smoother is really a matter of and comfort and the scale of your work. All of them will do a comparable job, although the nos. 1 and 2 are really only suited for very small surfaces (and very small hands). The no. 4 is considered the most versatile size, and the one I use most often. However, I do have a smaller no. 3 and a wider no. 4-1/2 that I reach for, depending on the size of the project. But since the point of this article is to identify the three core bench planes you’ll need for woodworking, the no. 4 is probably the best overall size choice for a single Smoothing plane for most people.

Stanley Bailey No. 18, Type 17 (c. 1947-50)
This is my go-to block plane for everyday use, the one I always seem to grab first. Mine is a very pristine WWI era model that I’m pretty sure I’ve used more than anyone else in its history. Although it’s almost 100 years old, it looks like it could have been manufactured last year. Both the japanning and nickel plating are pushing 100%, and so I baby it.
The Stanley no. 18 is a standard angle plane, meaning the iron is seated on a 20 degree bed. With a bevel angle sharpened at the standard 25 degrees, you have a cutting angle of 45 degrees, same as a bench plane. It also has an adjustable throat plate, an essential feature in a block plane. The no. 18 is 6 inches long and fits my hand better than its longer, otherwise identical 7 inch brother, the no. 19. And unlike the more popular Stanley no. 9-1/2, it feels more like an extension of my hand.
The no. 9-1/2 plane predates the no. 18 by about 15 years, was in production longer, and was the best selling block plane Stanley ever made. It’s still made today, in fact, although the current design features a completely different mechanism from the original. Admittedly, the no. 9-1/2 was the more popular of the two. I truly don’t know why, though, since the design of the no. 18′s knuckle cap was far superior to the hooded lever cap on the no. 9-1/2, and it’s also more comfortable to hold in the hand. I also find that the hooded cap on the no. 9-1/2 is more prone to slip around a little in use. Not so with the no. 18.
Ironically they are both basically the same plane with two different styles of lever caps. Other than the lever cap and its mounting bolt, all the other parts are interchangeable. Stanley charged a little more for the no. 18 and marketed it as virtually indestructible. This of course was not true, for while the steel cap is arguably more durable, the bodies of both were cast iron and therefore susceptible to breaking if dropped.
I have several vintages of both models in my collection, but find the no. 18 with the knuckle cap superior in both function and comfort. I use this more often than any other block plane I own.
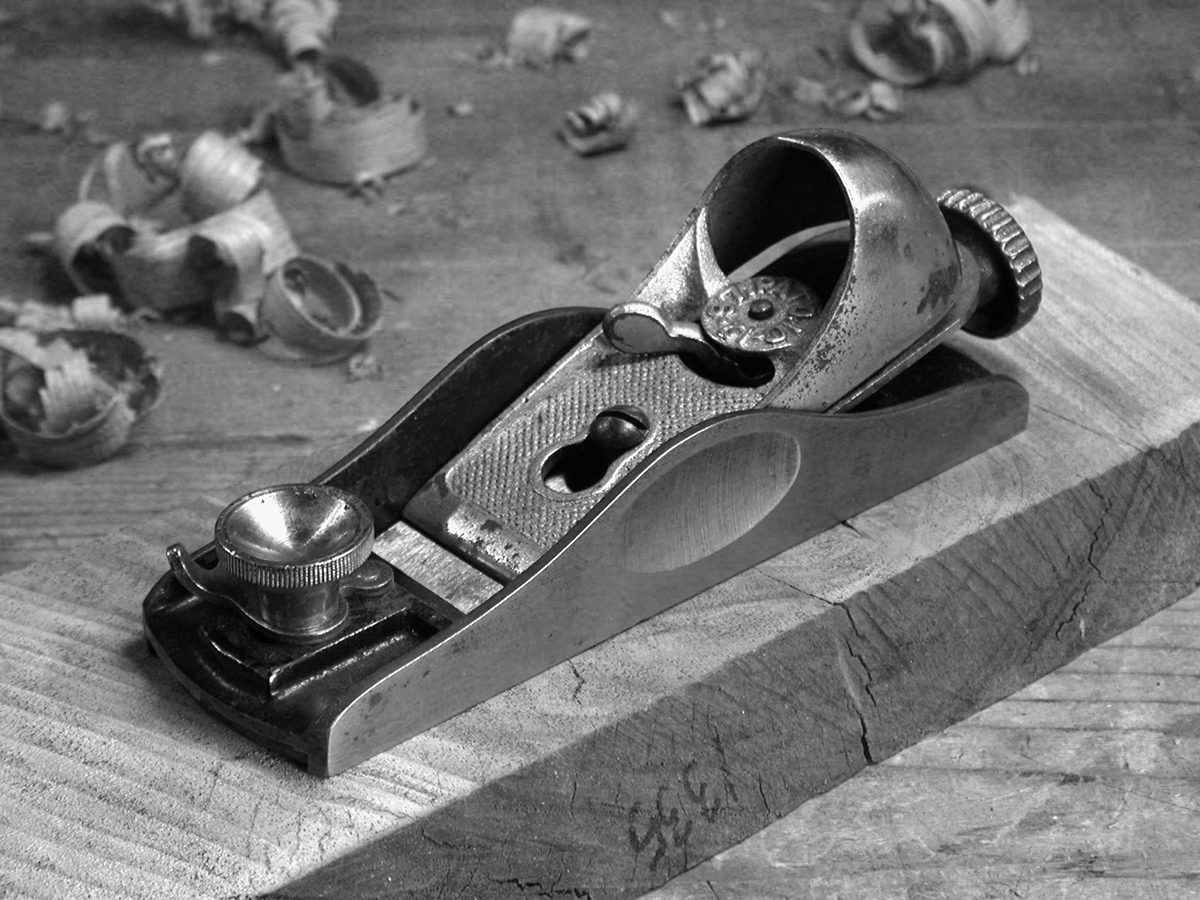
Stanley Bailey no. 60 Type 2 (c. 1901-04)
The Stanley no. 60 (and the identical japanned version 60-1/2) is a low angle plane, meaning the iron is seated on a 12 degree bed. Sharpened at 25 degrees, you have a cutting angle of 37 degrees. The primary advantage of the lower angle of attack is that it excels at shaving end grain.
Like the no. 18, the 60 series of planes are approximately 6 inches long. However, the 60 series are narrower with an iron width of 1-3/8 inches, vs the 1-5/8 inch irons on the standard angle planes, and the 60 series feature a narrower version of the hooded lever cap used on the no. 9-1/2. The 60 series planes also have adjustable throat plates.
Low angle planes are typically used for cutting end grain, i.e., across the end of a cut, verses cutting along the grain, down the side of the wood. The lower angle is perfect for the shearing action needed to cut those end fibers. On cuts that will be visible and finished, this produces a very clean and smooth surface, whereas if left as cut from the saw, the grain tends to be very rough and porous.
On both standard and low angle block planes, the iron is seated bevel up, whereas on bench planes the bevel is usually down. There is a tremendous advantage with bevel up irons in that the angle of the bevel can be changed to affect a change in the angle of cut. While there is more to consider in edge geometry than just the angle of cut (durability), you could reasonably sharpen the bevel on a low angle plane iron to 33 degrees and end up with an angle of cut of 45 degrees (12+33=45), the same as on a standard angle plane. However, to accomplish a low angle of cut using a standard angle plane, you’d have to sharpen the bevel at a very shallow 17 degrees (20+17=37). Durability of such a thin cutting edge would be problematic with most woods.
For this reason, along with a few others, many people consider the low angle plane to be the more versatile of the two. I tend to agree. While I use my standard angle plane more often, if I could only have one block plane, it would have to be a low angle.
***
For more detailed information on the three step process using hand planes, I highly recommend you check out Christopher Schwarz’s outstanding Course, Medium, and Fine, available on DVD.
Tools shown in the photos were returned to functional condition by Virginia Toolworks using museum quality archival preservation techniques. Sharpened and tuned for use, every tool is fully tested and adjusted until perfect.
____________________________________
1. Moxon, Joseph. Mechanick Exercises. London, 1703.
April 12, 2014 2 Comments
Author’s Note: Please excuse and indulge this divergence from the topic at hand, although it is in fact tool related. I wrote this essay about 12 years ago and came across it tonight. Given the time of year, I thought it timely. It brings back some fond memories of my own boys, and also reminds me of a certain nephew of mine who loves to cut grass…

I’ve been cutting grass for as long as I can remember. I guess I must have been about 8 years old when my dad finally consented to let me drive the “riding mower.” It was a red Toro with white trim, not large or powerful, but to an 8 year old boy it might just as well have been a mammoth John Deere tractor. By this age, I had some minor experience with the push mower, a white Briggs and Stratton motor with a hole in the muffler, bolted to the top of a nondescript gray chassis. No bag attachment or height adjustment or self-propelled feature in those days. It had a large semi-circular hole in the upper left side of the mower deck, the product of a violent altercation with large tree root in my grandmother’s yard, which my mother failed to address with the proper respect. You see, everyone cut grass periodically at my house.
We always seemed to have a varied assortment of push mowers from which to choose. This was most likely due to the genetic flaw in my father’s side of the family that makes all of us physically incapable of getting rid of anything regardless of its age, condition, value, or provenance. It was not until my grandmother died in 1998 that we cleaned my grandfather’s clothes out of the closet in the upstairs bedroom of her house. The pockets of his coat still held the cigarettes and buffalo nickel he carried the last time he wore it. He died in 1935.
Oh yes, we had lawn mowers. One had a rotary crank on top that required turning to start. It didn’t run at all as far as I know. However, that did not diminish its value as a “backup mower.” We also had a non-motorized rotary blade mower that I used briefly… once. We even had a mower with no motor, just the mower deck. Actually, that one was mine. I found it in a trash dump in the woods behind Stephen Smith’s house and immediately recognizing its potential value as an object of random retention, faithfully dragged it home.
Cutting grass, at least to me, was always a cathartic experience, a means of purging the day to day evils of childhood. It was never a chore. An interruption, perhaps, of other things I’d have rather been doing, but never a chore. Climbing up on that riding mower, the world took a back seat. I felt like a farmer preparing to plow a field, and I’d ride off to the edge of the yard to begin tilling my rows. I patterned my swaths just as I’d seen the big tractors do. One or two rows across the ends of the yard, and then perpendicular rows up and down the length.
Cutting grass was not a task I took lightly or rushed to complete. I practiced making the endless cuts as straight as possible across the longest part of the yard. This was accomplished by fixing my eyes on a distant point of reference and walking or driving straight toward it without looking at anything in between. Singular focus was essential and distraction a sign of fatal weakness. A straight cut was the epitome of grass cutting perfection and I was relentless in this pursuit. It is something that I unconsciously do even today. I would hone my skills by deliberately cutting curves and arcs, and then straightening them again on the next pass. Missing a clump here or a tuft there was unthinkable and inexcusable.
I learned that, whether riding or pushing, it was best to overshoot the end of the row prior to making my turn. Curved corners were sloppy and left an uneven cut. I also learned that cutting the grass in the same direction every week produced what I privately called a “grain” to the yard that was most unattractive. Alternating directions each week produced better results, and changing the direction by 45 degrees on a weekly basis was preferable above all else. I found that when the grass was too tall, I could get fine results without raking by cutting at twice the normal height, and then crosscutting the yard again at 90 degrees, this time at the normal height. This resulted in a mulched effect long before anyone thought to market mulching as a feature.
In later years, and not too long before he died, my father purchased a “lawn tractor.” It was a very large (by comparison) red Wheel Horse with an 18hp Kohler engine and a 52″ cut. It was delivered on the back of a large flatbed truck with ramps that extended down the back. I must have been 15 or 16 at the time and was in heaven. I cut every damned thing in site for all of 2 or 3 weeks. I even cleaned and cut the ditch on the (country) road between our house and my grandmother’s lane. Beyond the other side of the yard I cut a nice slice of ditch 30 or so feet down the road that gradually curved away from the cornfield to the road itself.
Now I need to jump in here and make clear that our yard otherwise was not what you might call manicured. I’d never seen a bag of fertilizer. In fact, at the time, I was quite perplexed as to why anyone would encourage grass to grow in such a manner. After all, I spent much of my time reducing it to a respectable height. No, the weeds in our yard were healthy and robust and I don’t recall questioning their existence any more than I did the grass itself. My sole artistry was in the cutting, not the growing.
On my 16th birthday, I came home from the DMV with my license, and with determination forthwith headed straight to my first job – cutting grass. It was the “estate” (as I liked to call it) of Dr. and Mrs. Norman Rock Tingle. Dr. Tingle was my doctor. Hell, he was everyone’s doctor in the upper end of Lancaster County, Virginia. I’m recollecting that it must have been about 10 or 15 acres – 10 to 15 acres of viridescent wonderland, fronting the Rappahannock River about 10 miles or so before it emptied into the Chesapeake Bay. Bordering the property along the gravel road leading up to their drive was a long hedge of huge wiry bushes that far exceeded my height. The paved driveway itself wound through towering pines and expanses of slightly rolling grassland that closely resembled a golf course. From many areas of the property the house was not even visible. Standing at the back porch overlooking the river, the yard sloped gently down to the water’s edge, transitioning from earth and fescue to sand and sea grass that bordered the shallow but respectable beach. Extending out into the mile wide river was a dock (pier), whereupon in cooler weather I would have my lunch.
Situated across the parking area that faced the garage doors of the house was the shed that housed the yard tools and mowers. I knew my employers well, if only in a doctor/patient way, but that combined with the innocence of youth precluded any feelings of nervous uncertainty at starting my first job. Besides, the challenge that lay before me was quite clear and I was in my element. The yard was, in my opinion, in a terrible state of mismanagement. My predecessor, a school acquaintance one or two years my senior, obviously had neither the respect nor eye for lawn detail that I had. The yard was suffering from “graining,” the result of constant mowing in one direction. Worse, the grass around the trees and bushes was not properly trimmed, the edges and boundaries of the yard left haphazardly hacked at or conspicuously ignored altogether. My counterpart “worked with me” for a couple of weeks to “show me the ropes.” He gave me his version of what the expectations were and how much and how little I needed to do. It was all completely irrelevant and I found his lazy discourse annoying and lack of pride offensive. My mission was clear before I ever set foot on the property.
Within a month I had the yard much improved and was rewarded with sincere kudos and compliments that the place had “never looked so good…” Though I didn’t say so at the time, I was a little puzzled by this recognition. It never occurred to me that anyone (who cared) should not cut grass the same way. I simply did it the only way I knew how, with attention to every detail, with respect for the magnificence of the property, and with passionate pride in perfection. Partly for my effort, but mostly because the Tingles were nice people, I was rewarded with an open invitation to partake of the soft drinks kept in the bar refrigerator, just inside the lower level of the house. This was a privilege I enjoyed with some constraint and considerable appreciation.
The cutting of grass facilitates a distinct perspective of the world. The very nature of the task isolates the individual and deprives everything auditory; the abrasive drone of the engine allowing only the voice of thought. Yet, while so isolated from the distractions of sound, the operator is paradoxically interconnected to the open expanse of all outdoors. The permeating smell of cut grass and dust, the stifling heat of midday summer sunshine, the tactile vibrations of a mechanical beast rolling over undulating earth overwhelm the senses and lull the driver into trancelike euphoria, facilitating a spectacular playground for the hungry imagination.
The sheer size of the property necessitated long leisurely hours spent atop the big Cub Cadet, time that afforded the sweet luxury of colorful daydreams and inexhaustible adolescent introspection. I concocted endless fantasy dates and detailed romantic relationships with the girls I knew. Relationships ultimately destined to remain confined deep within the fragile chambers of my imagination, bound by the demons of insecurity and low self-esteem, and closely guarded by teenage male ego.
I had a particular romantic interest those days in a young lady who quite by chance, lived within bike riding distance of the doctor’s estate. She knew that I worked there and I made a point of mentioning the days and times I’d be around in hopes that she might wander by, perhaps on her bicycle and perhaps wearing “Daisy Dukes” and a bikini top. She gave all appearances of being superbly, magically and magnificently mammiferous, and of this I was enamored.
She was an odd sort of girl, a loner, very shy in a group and not at all popular. She was not beautiful in the cheerleader sense, but pretty enough in my 16-year-old opinion. She had amazing deep auburn hair, sparkling blue eyes, and the skin on her freckled face was the softest thing I’d ever felt. There was something about her that I found irresistibly charming. One on one, she was delightful – funny and chatty, yet always mysterious. I still remember her laugh. I liked that she was not popular. Being with her felt… less competitive, more comfortable. She was surprisingly easy to talk to, and with her I could just be myself without the high school machismo. I probably could have fallen in love with her. There was just something about her…
Of course she never came by while I was working, and despite my mostly honorable and completely sincere feelings of affection for her, we drifted apart after 6 or 8 months of periodic dates. For whatever reason, Joan was not interested in me, would never even let me kiss her on the lips – only her cheek. My heart could only take so much rejection. There were other yards to cut, other bushes to trim. I mowed on.
I guess I cut the grass on that estate for four, maybe five years before college got in the way, even during the summer break. I didn’t know it at the time, but it would be some years before I would again cut grass. Being young and distracted by new adventures of life on my own as a college student, I never looked back at the life I was leaving. I suppose that is normal. Still, I cannot remember the last time I cut the doctor’s yard. There was a last time. There would have to have been. I just can’t remember it. I had already moved on and I missed it, even as I put the mower away for the last time.
Last Sunday, I got my mower out of the garage. A black Briggs and Stratton motor bolted to a nondescript gray chassis. No bag attachment or self-propelled feature. My 11 year old followed at my heels and asked when he would be allowed to cut our grass. I cut around the outside boundary of the yard for him, and then showed him how to cut straight lines in neat rows up and down the length. “Go past the end of the row prior to making your turn. Curved corners are sloppy and leave an uneven cut…”

***
