Restoring a WWII Vintage Lee-Enfield Rifle – Part 3 (Bayonet)

I bought this WWII vintage Enfield Bayonet to go with the rifle, because… well… who doesn’t want a bayonet?  This one is date stamped 1943, so it was made three years after the rifle, but it’s period correct and close enough.  Besides, it was never used and still caked in 70 year old cosmoline.  As you can see below, while the bayonet was in pristine condition, the scabbard looked pretty rough.

Enfield Bayonet, c. 1943

Enfield Bayonet, c. 1943 ~ Before cleaning

As I’m prone to do, I researched how best to clean leather scabbards, and of course came up with a whole lot of opinions that varied considerably.  In the end, I decided to use saddle soap.  The scabbard is 70 years old and will never again see a hard life, so I don’t think saddle soap is going to do it much harm.

Starting with the bayonet itself, I used mineral spirits with a cotton rag and toothbrush to clean the cosmoline off the metal surfaces.  Using a non-abrasive brush ensured I didn’t scratch the bluing, which is absolutely perfect.  The cosmoline melted right away and I was quickly rewarded with a stunning mint condition WWII vintage bayonet.  If the wooden scales ever had any finish on them, it was long gone, so after everything was dry and wiped clean, I rubbed them down with some of the linseed oil finish I’ve been using on the stock.  The rest of the metal surfaces got a wipe with Kramer’s Best, which is a linseed oil, turpentine, and vinegar based solution that is an outstanding wood and metal conditioner.

After cleaning and conditioning

After cleaning and conditioning

The scabbard required some additional care since most of it is comprised of hard leather.  I cleaned the metal surfaces first, removing the cosmoline and leaving the natural patina of the metal.  Then I went to work on the leather surface itself using the saddle soap.  It was a very slow process with little apparent progress at first.  After a half dozen or so cycles of applying it, wiping it off, buffing it out, I felt like I had reached a point of diminishing returns.  At this point the leather was sufficiently clean, but very dull in appearance.  So I went out on a limb and rubbed it down with shoe crème (not shoe polish).  The shoe crème has always been recommended to me by the place that sells Allen Edmonds.  It’s basically a leather conditioner with some black dye.  It has no wax so it lends itself well to subsequent treatment.  I also doesn’t shine like wax, which is perfect in this case.

The result, which you can see in the image above as well as below, is pretty remarkable.  It’s hard to see in the photos, but the leather looks like it’s brand new.  Yours truly is a happy camper, and I’m looking forward to seeing my boys’ reaction to the transformation.

I’m cycling through the daily application of oil on the rest of the rifle’s furniture, and in fact think today is probably the last one.  I may just go ahead and reassemble the whole thing tomorrow and make sure everything fits properly.  I only wish I’d done a better job of labeling all those parts on my work table.

Bayonet and Scabbard completed

Bayonet and Scabbard completed

***

Restoring a WWII Vintage Lee-Enfield Rifle – Part 2

It’s been a couple of months since I first wrote about restoring the old 1940 vintage Lee Enfield no. 1 MKIII rifle.  (See the earlier post)  I managed to source all of the missing parts, including a new forearm and hand guard set.  I found an unused set of unknown date, but I figured I’d be better off fitting a new stock than buying an old one and hoping it would fit properly.  Enfields, especially the no. 1, are notoriously finicky when it comes to proper stock fit.

Relacement Wood

The Enfield with original furniture in place, just before disassembly

In the photo above, you can see the rifle in its original, butchered forearm.  The lower forearm was cut off and the hand guard discarded, along with the entire nose cap assembly.  The new replacement stock, forearm, and hardware are shown above the rifle.  The new wood appears darker in the photo, but once I work on the buttstock a little and the oil finish is applied, I think it will look okay.

After removing the entire lower forearm, I found that the action in excellent condition.  There was a couple of traces of light rust, but nothing of any consequence and no corrosion damage.  I tried to remove the buttstock, but the screw that attaches it is deep inside the stock itself, and requires a very long screwdriver. Unfortunately, the screw is locked up pretty tight, and rather than risk buggering up the slot, I decided to just leave it on and refinish the stock in place.

The first order of business was fitting the new stock. It wouldn’t seat at all on the first try and required some fine tuning to get it to slide over the receiver.  Going slow, I had it properly adjusted and fitting like a glove in short order.  Moving on to the upper hand guard, I had to take a little off the inside of the ears to get it to slide easily into place around the rear sight.  This is not supposed to be a tight fit, and I may have to take a little more off after it’s finished.

Enfield New Stock Fit

The new stock slides right into place after fitting

With everything looking good, I put both forearm and hand guard in place and slipped on the nose cap for a dry fit assessment.  As you can see in the photo below, the upper hand guard sits too high for the nose cap to slide on properly. Using some folded paper, I was able to determine that I had about 0.5mm of surplus height within the hand guard to work with.  By sanding the bottom edge of the hand guard on my trusty flat granite sharpening surface, I reduced the height enough to let that nose cap slide into place.   Everything looks good at this point, so onto cleaning the action and applying the finish.

The hand guard sits too high for the nose cap to slide on all the way

The hand guard sits too high for the nose cap to slide on all the way

All of the wood on this rifle was stripped at some point in its past and scrubbed with a heavy wire brush, leaving a lot of marks in the wood.  I lightly sanded the worst of these marks, but didn’t want to lose all the character of the wood, so I really did just enough to open the grain a little for the new finish.  At this point, I went ahead and cleaned the action and barrel thoroughly.  There was some crud, but not as much as one might expect from a gun this old.  Thankfully, I think the gun was cleaned after it was last shot, so it didn’t take a whole lot of effort to get it looking good.

Action cleaned up.  I'll lightly clean and oil it again before final assembly to remove any dust or grit that accumulated during finishing

Action cleaned up. I’ll lightly clean and oil it again before final assembly to remove any grit that accumulated during finishing

I decided a while back to use the original type of oil finish that was applied when this gun was made (or as close as I could reasonable come).  In WWII and earlier, most military gun stocks were finished with linseed oil, or something close to that.  Although not very effective against the elements, it is very easy to maintain. Rather than use Boiled Linseed Oil common today, which is modified with petroleum distillates to speed drying, I’m using artist grade linseed oil, which I assume is basically raw oil.  I happened to have an unopened can that is about 35 years old and it doesn’t specify.

Starting with a 50/50 ratio of oil to turpentine (to help it dry), I began applying coats with 4-0 steel wool.  I really hate steel wool.  It just makes a mess with steel wool fibers everywhere.  I abandoned the wool after the first application and just rubbed it on by hand after that.  Using the old adage, once a day for a week, once a week for a month, and once a month for a year, I’m on day three and the wood looks fantastic.  I don’t think I’m going to go for the full seven applications.  This morning I upped the ratio of oil to turpentine to about 70/30.  If it doesn’t dry within 24 hours or so, I might add a little japan dryer to the next batch.

The stock and hand guard with 3 coats of oil applied

The stock and hand guard with 3 coats of oil applied

The next update will cover cleaning up the 1940s vintage bayonet I found for this gun!

***

New Address: www.virginiatoolworks.com

Virginia Toolworks can now be accessed directly through the domain name virginiatoolworks.com!

It’s a humble achievement, I know, but it reflects the growth and increasing popularity of this site.  Thanks to all who visit, and a very special thanks to those who follow this blog and the Virginia Toolworks Facebook page.

Thank You!

Stanley Bailey no. 60, Type 2, c. 1901-04

Stanley Bailey no. 60, Type 2, c. 1901-04

***

Something Different – Restoring a WWII Vintage Lee-Enfield Rifle

I’m starting a new restoration project this week, and a first for Virginia Toolworks – a firearm. This Lee-Enfield No. 1 MK III rifle chambered in .303 British was made in England in 1940, right smack in the middle of the Battle of Britain!  It quite literally was a rifle that helped save Great Britain from the Nazi onslaught, and then saw service throughout the war.  Pretty cool!

Enfield Receiver

Lee-Enfield No. 1 MK III (c. 1940)

Enfield Model MarkThe Lee-Enfield bolt-action, magazine-fed, repeating rifle was the British Army’s standard rifle from its official adoption in 1895 until 1957.  This one is in excellent condition overall, complete with matching serial numbers. If you look closely at the photos, you can see the barrel was painted olive drab. This was a common practice with WWII era Enfields that were used in humid climates such as Africa and the Pacific.

The only apology is the unfortunate attempt on someone’s part to “sporterize” it by removing the upper hand guard and cutting off the lower forearm. This was a common, albeit ill-conceived practice after decommissioning to make Enfields look more like hunting rifles.  Tens of thousands, if not more, of these rifles were converted in this manner, a practice that is not unheard of even today.  In fact, there are companies now making modern style synthetic stocks for these old rifles.  Enfields are among the most beautiful military rifles of the 20th century, and given its lineage and condition, this one deserves to be properly restored.

Enfield Armory Marks

The “40” stamp indicates the barrel is original

Enfield rifles have a somewhat distinct look in that the barrel is shrouded in wood from the receiver to the end of the barrel.  Since the wood on this one has been sawed off, I will need to replace the damaged and missing pieces and source another nose cap, which is also long gone. Since millions of these guns were made, wood of the correct model shouldn’t be too hard to find.  The nose cap is the most unfortunate missing part because they were stamped with the gun’s serial number, so it will always be that one mismatched part.

I am by no means a gunsmith, but I do know my way around weapons at little. Fortunately, there is very little rust, no visible rust damage that I can find, and the action and bore appears to only need a good cleaning.  The one part in the photo above that shows rust is a retention clip for the rear hand guard.  This is an easy fix.  I’m looking forward to putting this rifle back into its original condition, or at least as close as it can get.  Now, if I can just find some ammunition for it…

Enfield Cutoff

Bubba’d cutoff (ugh!) – Olive drab paint was applied in tropical climates to inhibit rust. It will stay!

Preservation Beyond Tools – Digital Restoration of Photographs

Tools are not always the only thing restored at Virginia Toolworks. This is a family photo of my mother and her sisters (c. ~1932) that I restored for her 10 years ago. The original photo shown on the left was scanned at a high resolution.  You can see evidence of the silver oxidation and fading, especially around the edges.  Restoration was accomplished through digital manipulation using Adobe Photoshop . The restored image, shown on the right, was then printed on special 100% cotton paper using archival inks.

Pre-Post Comp - Family Photo

Renewed Life for My Dad’s Stanley Level

My dad died when I was still a teenager.  Unlike his father, who was a carpenter, my dad wasn’t much of a woodworker.  The few tools he left behind were mostly garden variety homeowner tools purchased from the local hardware store.  So when my brother gifted me my dad’s old level this summer, I didn’t give it much thought.  It was in horrible condition from decades of neglect.  I brought it home and with barely a glance, set it aside on my workbench to deal with later.

With cooler fall temperatures here on the east coast, I recently pulled it out for a closer look.  Upon closer inspection, I found that it is a Stanley no. 3 level, which was somewhat of a surprise in and of itself.   More interesting, the trademark stamp dates it to the 1890s, approximately 30-35 years before my dad was born.  It could have been my grandfather’s, but even he would have had to have purchased it as a teenager, if acquired new.  Of course there is no way to know where it came from or who originally owned it, but it ended up in my father’s hands, then my brother’s, and thanks to him, it now belongs to me.

As you can see from the quick shot I took before I got started on it, virtually all the original finish is gone and the wood faded from exposure to the elements.  It appears to have spent a good deal of time in a shed or barn.  The primary glass vial was intact and serviceable, but the plumb vial was broken long ago.  Otherwise, all the parts were in place and thankfully, the vial adjustment screws were not frozen.

Level Pre-Restoration

My dad’s 1890s vintage Stanley no. 3 Level, partially disassembled

I disassembled and removed all the hardware to better evaluate what needed to be done in terms of cleanup, and to assess the broken plumb vial.  After cleaning the rust off all the screws and the vial adjustment mechanisms, I cleaned the crud off the brass plates and end caps.  I never polish old brass hardware, but I decided in this case to clean off most of the oxidation in order to better see the center scribe line.

With the hardware cleaned up, I moved on to the wood.  Despite its condition, there were numerous paint specks and splatters from years of use that I wanted to protect.  The wood itself is evidently cherry.  I cleaned it lightly with Kramer’s Blemish Clarifier to remove any loose dirt and crud.  I then applied 6 or 8 applications of Kramer’s Best Antique Improver, which I’ve written about before.  It’s great stuff, all natural (no petrochemicals), and restores life to finished and unfinished wood.

In the meantime, I went to work sourcing a proper replacement vial.  I preferred to keep it as close to original as possible, so new acrylic vials were out of the question.  I found a few glass vials for sale on eBay, but the prices were absurdly high.  So, I started trolling for a suitable “donor” level of approximately the same vintage.  It took 2 or 3 weeks, but I finally found one for under $10 that had the plumb vial intact.  When it arrived, I was surprised to find the condition actually better than the photos reflected.  I actually felt a little guilty stripping it of one of its parts.

Plumb Vial Before Repair

Plumb Assembly Before Vial Replacement

Now if you’ve never replaced a vial in an old Stanley level, you might be surprised to learn that they used Plaster of Paris (or something similar) to cement the glass vial in the tube shaped holder.  This both held it in place and also protected the fragile ends.  Getting the vial out of the old plane was much easier than I anticipated.  Pulling the split holder tube open slightly, the vial and plaster slid right out in one piece.  Once out, the old plaster easily released from the glass vial.  The vial has a paper backing that wraps around the back side, but it isn’t attached.  So carefully removing that paper and setting it aside, a quick cleaning of the glass had it looking very much like new in short order.  Positioning the vial along with the paper backing into the assembly on my dad’s plane, I dabbed some plaster into place at each end and allowed it to dry.

I reattached all the hardware, and calibrated both vials using another level as a guide.  Completed, my dad’s old level is once again accurate and ready for the workshop.  You can just make out the replaced vial in the photo on the left.  Now, as to the donor level I bought, it’s still sitting here in need of a plumb vial.  There’s clearly something wrong with this scenario!

Complete Full ViewComplete Full View 2

Working Within the Limits of Tool Preservation

198 SB3 Type 9 Pre0I spent a long time researching and learning about tool preservation before I ever touched a plane. Even so, it was a couple or three years before I really settled into a comfort zone where the hands on experience I gained began to gel with the “book knowledge” I’d accumulated. For me, the greater appeal has always been geared more toward preservation than restoration (although I use the word restoration more often when casually talking about “cleaning up” a plane or tool). It’s probably a matter of semantics; I think most people equate restoration with refinishing, while preservation, by it’s very definition, speaks to preserving and sustaining. To me, that’s more accurate, and is a key part of my guiding philosophy and approach to tools.

It’s very easy for me to “go too far” when cleaning up a tool, to make it pretty vs. simply making it functional. My underlying intent is to preserve the character, finish, patina, etc. whenever possible. Dirt and rust are not sacred to me (as they are to some collectors), they are destructive elements of neglect. When I’m cleaning up a tool, I try to stay within the same boundaries that a woodworker of 100 years ago would have stayed within. He would have only been interested in preserving his tools, keeping them clean and in good working order, not making them pretty to sell on eBay. I constantly remind myself of that, not because I’m right and everyone else is wrong, but because it’s consistent and true to the values and parameters I defined when I started this venture. It’s my mission statement, if you will.

198 SB3 Type 9 Post7

***

Tune Your Block Plane Tonight

Following the popularity of the recent post, Tune Your Hand Plane Tonight, let’s now talk about block planes.  Much of the information will be the same, but block planes are different enough to warrant a dedicated set of instructions.  Besides, since there are probably more block planes owned today and sitting unused in garages and workshops than there are bench planes, they deserve a little love of their own.

As I’ve written before, I have a particularly strong affinity for block planes.  They are  the sexy two seater sports cars of the hand plane world – quick, nimble, and fun to handle.  But more than that, they are extraordinarily versatile and practical for many handy-man chores around the house, as well as indispensable tools in the wood shop.  Even the most ardent power tool user, and certainly the average homeowner, should have at least one or two block planes in his or her arsenal.

Keeping a block plane in good working order is quite easy.  Tuning one for optimal performance is a simple proposition that can be accomplished in an hour or so, if not less.  As I did with the bench plane instructions, I’m going to assume that your block plane is already in a mechanically functional condition and doesn’t require a full blown restoration.  For that level of detail, I recommend reading the posts under Preservation on the menu bar at the top of the page.  Since there are multiple mechanical styles and configurations of block planes, I’m going to try to keep it fairly generic, so you may need to interpolate for your specific plane.

Step 1 – Pour Drink of Preference

High-West-WhiskeyFor working on block planes, let’s go with something a little more exotic than the bourbon we enjoy with our bench planes.  I recommend Rendezvous Rye from the High West distillery.  It is… complex and superb.  Of course, what you drink is up to you, but moderation is certainly recommended, for while you won’t be working with electrically powered tools, you will be handling very sharp objects.  (5 minutes)


Step 2 – Disassembly & Cleaning

064 SB9.5 -Type 18 Post8The second step is to completely disassemble your plane and clean all the parts.  Using screwdrivers of the appropriate size, remove all the parts – lever cap, cap bolt, lateral lever, eccentric lever, adjustment screws, knobs, etc.  If you’re not completely familiar with what and where everything goes or are worried you might have trouble putting it all back together, take before pictures or notes.

Once disassembled, brush off all the sawdust and dirt.  If the filth is excessive, use a toothbrush and orange degreaser (available at the hardware or grocery store).  Also take a few minutes to clean the threads and slots on all the screws and bolts.  I use a small wire bristle brush with a little turpentine or light penetrating oil like WD-40. Once cleaned, wipe them down and set them out of the way so they don’t attract grit.  (10 minutes)

Step 3 – Hello Froggy

160 SAR5306 Post7Unlike frogs on bench planes, the frogs on block planes are usually fixed platforms cast into the body of the plane.  The top of the frog provides a small platform for the iron to sit, while the flat area behind the mouth offers support near the cutting edge.  Both surface areas should be clean of dirt and debris.  A toothbrush or brass bristle brush with degreaser works well, although you can also use WD-40 or turpentine.  The face of the frog is one of the more critical surfaces of the plane.  Once clean, fit the iron against the frog and verify that it sits flat and securely with no wobble.   You don’t want any wiggle or movement, so any high spots or irregularities in the casting need to be carefully filed or sanded flat.   (5-15 minutes)

Step 4 – Adjustimability of the Mouth

165 SB9.5 Type 12 Post7Many “premium” models of block planes feature an adjustable mouth opening.  This typically means the front section of plane’s sole is a separate piece than can be positioned toward the toe (thus opening the size of the mouth) or closer to the iron (closing the size of the mouth opening).   It is necessary to periodically remove this piece to clean out sawdust that has accumulated, and to clean and lubricate the tracks upon which the plate rides.  If it doesn’t adjust easily forward and back, it needs attention.

Since you’ve already disassembled the plane, make sure both the plate itself and the receiver in which it sits are both clean of debris.  Brush the edges of the plate and tracks of the receiver with a brass or wire bristle brush lubricated with light oil or turpentine.  Fit the plate in place and verify that it moves fairly freely.  It is not normally necessary (nor desirable) to sand the edges of the plate to make it move more easily, although this is sometimes necessary if the plane is vintage and the plate a replacement.  If you decide metal removal  is absolutely necessary, be careful and go very slow.  You can’t un-sand.  (5-15 minutes)

Step 5 – Inspect the Sole

165 SB9.5 Type 12 Post5Take a look at the sole (bottom) of the plane.  Inspect for dents or dings with raised points around the edges that might dig into your wood surface when planing.  If you find any, carefully file them flat with a mill file, followed by a little 220 grit sandpaper.  Unlike bench planes, which have a lot more surface area, flattening the sole of a block plane is a relatively painless process.  Although not usually a critical requirement, flattening the bottom will often provide superior results in use.

First, temporarily re-install the iron and lever cap and tighten to normal pressure.  This ensures the body will be under the same stress (and any possible distortion) as when in actual use.  Working against a dead flat substrate such as a granite sharpening block or the iron bed of a table saw,  start with 60 grit and go through progressively finer grits until you are satisfied that the toe, heel, and areas just in front of and behind the mouth are all completely flat and smooth.  I usually stop with 320 grit.  Aluminum Oxide sandpaper is my preference. If you don’t want to invest in a granite sharpening block, granite floor tiles from your local home center are just the right size and cost around $5 each.  (30-45 minutes depending)

Step 6 – Time to Sharpen

Sharpening SetupYes, sharpening is the step everyone loves to hate, the step that prevents so many people from ever trying a hand plane.  The trick is not to wait until you need to use the tool.  Make time for sharpening in advance, and make a party out of it!  Okay , so maybe not a party, but there is something truly rewarding about getting an edge you can shave with.  It’s relaxing and I really do enjoy it.  Since this is not a sharpening tutorial, I’ll leave the particulars on methodology to another post or reference.  But if you do nothing else, take the time to put a keen edge on your plane’s iron.  A 25 degree bevel works perfectly on most block planes – both low angle and standard angle models.  The angle of the plane’s bed varies on these models, usually either 12 degrees for low angle planes or 20 degrees for standard angle planes.  Add the 25 degree bevel and you end up with a 37 degree low angle of cut, or a 45 degree standard angle of cut (same as bench planes).  Add a micro bevel if you want, and don’t forget to polish the unbeveled back edge. (30 minutes)

Step 7 – Lubrication

Pure Oil 1Lubrication is a good idea, but should be done sparingly since oil attracts dirt and grit.  I add just a drop of light oil to the threads of all the bolts and screws before re-installing them.  I also add a drop to all the moving/adjustment parts, but wipe them with a rag afterward so that only a light film is left.  They certainly don’t need to be dripping.

Some guys believe in waxing the sole.  Nothing wrong with that as long as you don’t use a silicone based wax.  However, I just wipe down all exterior surfaces with a little Jojoba oil for storage.  (5 minutes)

Step 8 – Assemble, Adjust, Cut

187 SB18 Type 14 Post1Time to put it all back together.  Re-attach the eccentric lever and front plate (if it has one), adjustment wheel, lateral lever, knobs, etc. and all related hardware.  Carefully put the iron and cap iron assembly in place being careful not to fould the newly sharpened edge, and install the lever cap.  It should lock down securely, but not so tight as to inhibit raising and lowering the iron.  Adjust the front plate (if it has one) forward or backward as needed for the type of planing you intend to do (again, see open vs closed mouth).  Once set, lower the iron into the mouth to take your first test cut.   All of your hardware and adjustment mechanisms should move freely and smoothly. (10-15 minutes)

Unless you run into an unexpected problem, the entire tuning and sharpening process can be completed in about 1 to 2-1/2 hours, and even quicker if you’re tuning a new plane or re-tuning a plane that has already been tuned or well cared for.  It’s easy, rewarding, and builds both knowledge and confidence in your ability to master hand and block planes.

***

Stanley No. 7 Reflects Secret History

Some months back I purchased a particularly beautiful old Stanley no. 7 jointer plane dating from the late 1880s with the intention of reselling it. It was sharp, clean from decades of proper care, and looked like it was still being used a week ago – absolutely amazing condition for its age. The original owner’s initials were neatly stamped on one side and it came from his family’s estate, which was sadly being liquidated. The plane was remarkably perfect by all accounts – except one…

At some point, almost certainly early in its life, the plane was dropped, breaking off the top quarter of the frog. In a classic reflection of those parsimonious times and testament to the care the owner gave to his tools, he went to unusual lengths to repair that frog, fabricating a perfectly fitting replacement section out of brass, secured with handmade copper rivets. Normally I shy away from tools with such repairs, but the complexity and care given to this one fascinated me. It was extremely well executed, having no doubt taken the better part of a day (perhaps even two) to complete, with an aesthetic effect that was detectable only upon close inspection. More important, it also returned the plane to perfect working order.

I was so conflicted I let the plane sit in my shop for weeks as I tried to decide what to do with it. Obviously treasured by its original owner, whether through necessity or nostalgia, it was used and handed down within his family for numerous generations. I hated to think of it being sold for scrap or parts after 130 years, especially given its impeccable working condition. Eventually reason and practicality prevailed, and I reluctantly decided to just list it at a fixed price on eBay, hoping I would find a buyer who could appreciate it as it was. And find a buyer I did… one with a surprising affinity for this particular plane.

Turns out the guy who bought it already had at least one other plane from the same estate with the same owner’s initials stamped on the side. He wrote and told me he was so intrigued at the care the owner had given his tools, he felt compelled to own this no. 7 just for the repair it featured. For him, the repair reflected the respect and value afforded the tool, and that little bit of history made it all the more desirable. He was excited to get it and I was thrilled to have found it a home with a new owner who ‘gets it’ – who appreciates that tool for the secret history it carries in an exceptionally well executed repair. You have to love that!

What to Look for When Buying Vintage Hand Planes

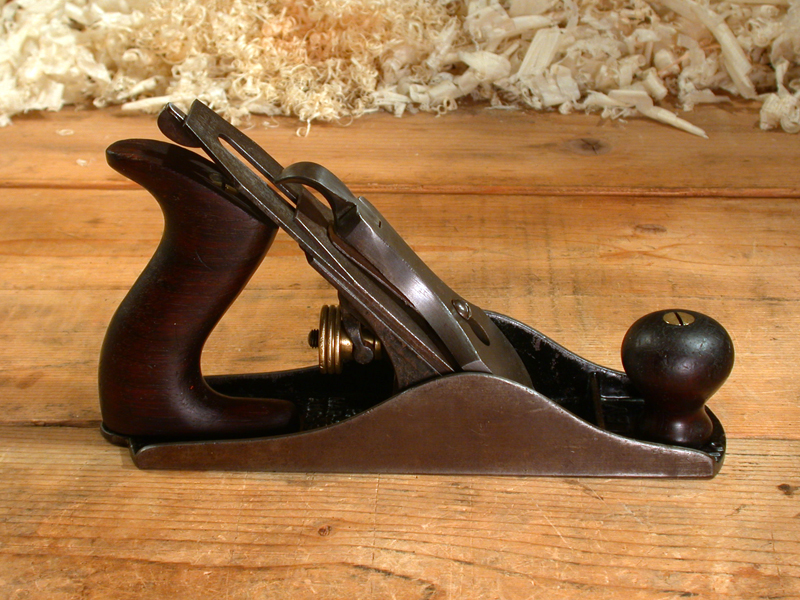
c. 1940s Stanley No. 5 Jack Plane

When I first started buying and collecting vintage hand planes, much of the available information I read online included ominous warnings about warped, twisted soles, unstable frogs, and mangled throats. Sounded more like a Stephen King movie than a discussion about tools! With recommendations for evaluation that involved engineering squares and feeler gauges. I was convinced that no vintage plane I purchased could ever possibly work correctly until I lapped the sole and re-machined every contact surface. It only took me suffering through flattening one or two planes to come to my senses and question just what the heck I was trying to accomplish.

Once I actually started sharpening, tuning, and using hand planes, I realized that most of these warnings were just a lot of unwarranted hooey. The vast majority of vintage planes I’ve owned and used over the years were actually just fine. Naturally, using a nice new Lie Nielsen or Veritas plane provides a noticeably different experience, but at a substantial cost premium. I’m just not there yet, and may never be. Here’s why…

The quality of the tool doesn’t contribute nearly as much to the end result as does the skill of the user. Craftsmen of 100 or so years ago made do just fine with the planes that were available. The average woodworker at the turn of the century didn’t own a micrometer or a machined straight edge. Many didn’t even use a measuring device, instead relying on dividers, marking gauges, and geometry. They used the tools and technology of the day, and produced some of the finest furniture in the world.

That’s not to say that tool quality isn’t important. Or more precisely, it’s not even so much the quality of the tool itself, but the quality of the tool’s tuning combined with proper technique that produces the desired result. As many others have pointed out before, a plane is really nothing more than a jig for holding a cutting implement at a consistent angle. With the appropriate ‘jig-o-metrics’ (tuning) applied, a properly sharpened cutting edge, and skillful application by the user, even the cheapest home center hand plane can competently get the job done. What quality of design, machining, and related workmanship gets you is ease of use and greater versatility. With tighter tolerances you get less slop and greater precision. While a high quality tool won’t improve the results of an unskilled user, it can certainly improve the results of one who has mastered its use.

All that said, there are some red flags to look for when shopping for hand planes, and with the abundance of vintage planes available on eBay, yard sales, and tool swaps across the country, there’s no reason to settle for a tool with serious problems. The challenge is knowing what is serious, and what isn’t. So let’s take it part by part. I’ll try to keep it simple.

Stanley No. 7, Lever Cap & Iron/Cap Iron

Body & Sole
Also sometimes referred to as the ‘base’ or ‘shoe,’ the body of the plane, as the name implies, is the main frame. The sole is the surface that comes in contact with the wood when using the plane. The main thing to look for on the body is cracks and/or repairs. Planes with this sort of damage are best avoided. Small chips along the top edges (cheeks) don’t affect usability, but are cosmetically undesirable. With so many planes available, why settle? The other thing to inspect on the body is the opening where the iron (blade) protrudes. It’s important that the opening, called the mouth or throat, isn’t chipped and hasn’t been repaired or enlarged through filing. The throat opening affects your ability to properly set the iron, and is one area of the plane where precision is extremely important.

Pitting is usually high on the list of problems to avoid. Again, with so many planes available, there’s no reason to settle for a tool with heavy pitting. Pitting is damage from rust that has eaten into the metal. In my experience, unless the pitting is very heavy, it doesn’t usually have much effect on a plane’s performance. Like all the normal scratches, scars, and dings from use that you’ll see, very light areas of pitting are not uncommon and are of little concern with regards to practical usability.

Some folks might disagree, but I don’t worry too much about the flatness of the sole. Having owned more than 250 vintage planes over the course of the time, I’ve only had a few that were unusable, and each of them had other issues more critical than the flatness of the bottom. Slap a ruler or straightedge against it if it makes you feel better or if you’re spending more than $75-$100 on a standard bench plane to use. However, if your need for critical tolerances is that great, I recommend you invest in a modern Lie-Nielsen or Veritas plane. They are machined to engineering grade tolerances, but you’ll pay a premium for them.

Knobs and Totes
The wooden knobs and totes (handle) on planes are frequently found with chips, cracks, and breaks. Aside from the obvious preference that they be perfect, minor damage is usually just cosmetic. Functionality is only compromised when the damage is so bad that they are unstable or inhibiting a proper grip on the plane. Breaks and cracks can often be repaired, even if the damage is severe, and replacements are abundant. If the tool is in otherwise good condition, a damaged or missing knob or tote isn’t a deal breaker for me. For more information check my post on repairing knobs and totes.

Stanley #7 Frog

Frog
The frog is the part of the plane that attaches to the top side of the base and provides an angled seat for the iron (blade), as well as a mechanism to adjust the depth and lateral positioning of the iron. I have no idea why it’s called a frog. Damage to look for is a missing lateral adjustment lever, which was a feature on the frogs of most Stanley (and other) bench planes manufactured after the mid 1880s. The lateral lever sticks up from the top of the frog and enables lateral (side to side) positioning of the iron. Every now and then this lever is missing. Ideally it should be straight and tight, although bends can be straightened and if it’s wobbly, it can be tightened by carefully tapping its rivet with a small ball peen hammer.

Broken and chipped frogs are the main concern and should be avoided. Look close at the bolt hole in the front center of the frog to make sure there are no chips around the edge. Once again, replacement frogs are fairly plentiful, but you will need to find one from the same period of manufacture to ensure proper fit since the design changed over the years.

Iron and Cap Iron
The iron, also referred to as the ‘cutter’ or ‘blade,’ is the tool’s cutting implement. The main things to look for are how much usable length remains and the condition of the surface metal. Pitted irons are not necessarily a lost cause (see my post on salvaging irons), but are problematic. Again, period irons are abundant, but if you’re buying the plane to use, you’ll want to invest in a modern replacement from somewhere like Hock, Lie-Nielsen, or Lee Valley Tools. They are far superior and will make a significant difference in the plane’s performance.

The cap iron, which is sometimes called the chipbreaker or double iron, attaches to the top of the iron and provides both stability and a raised surface to literally break the shaving as it’s cut from the wood. Other than very heavy pitting or a hack grinding job, I’ve rarely seen one of these that wasn’t usable.

Lever Cap
The lever cap sits on top of the iron/cap iron assembly and provides tension to hold them against the frog. Lever caps are sometimes found with chips along the bottom edge, either from having been dropped or used as a screwdriver to loosen the wide screw that attaches the iron and cap iron. While unsightly, a chip along the bottom edge doesn’t really affect its functionality. Again replacements are plentiful. Of greater concern is if it’s missing the tab lever at the top, which acts as a cam that locks the lever cap against the frog. It’s rare that this is missing, but the lever cap cannot function without it.

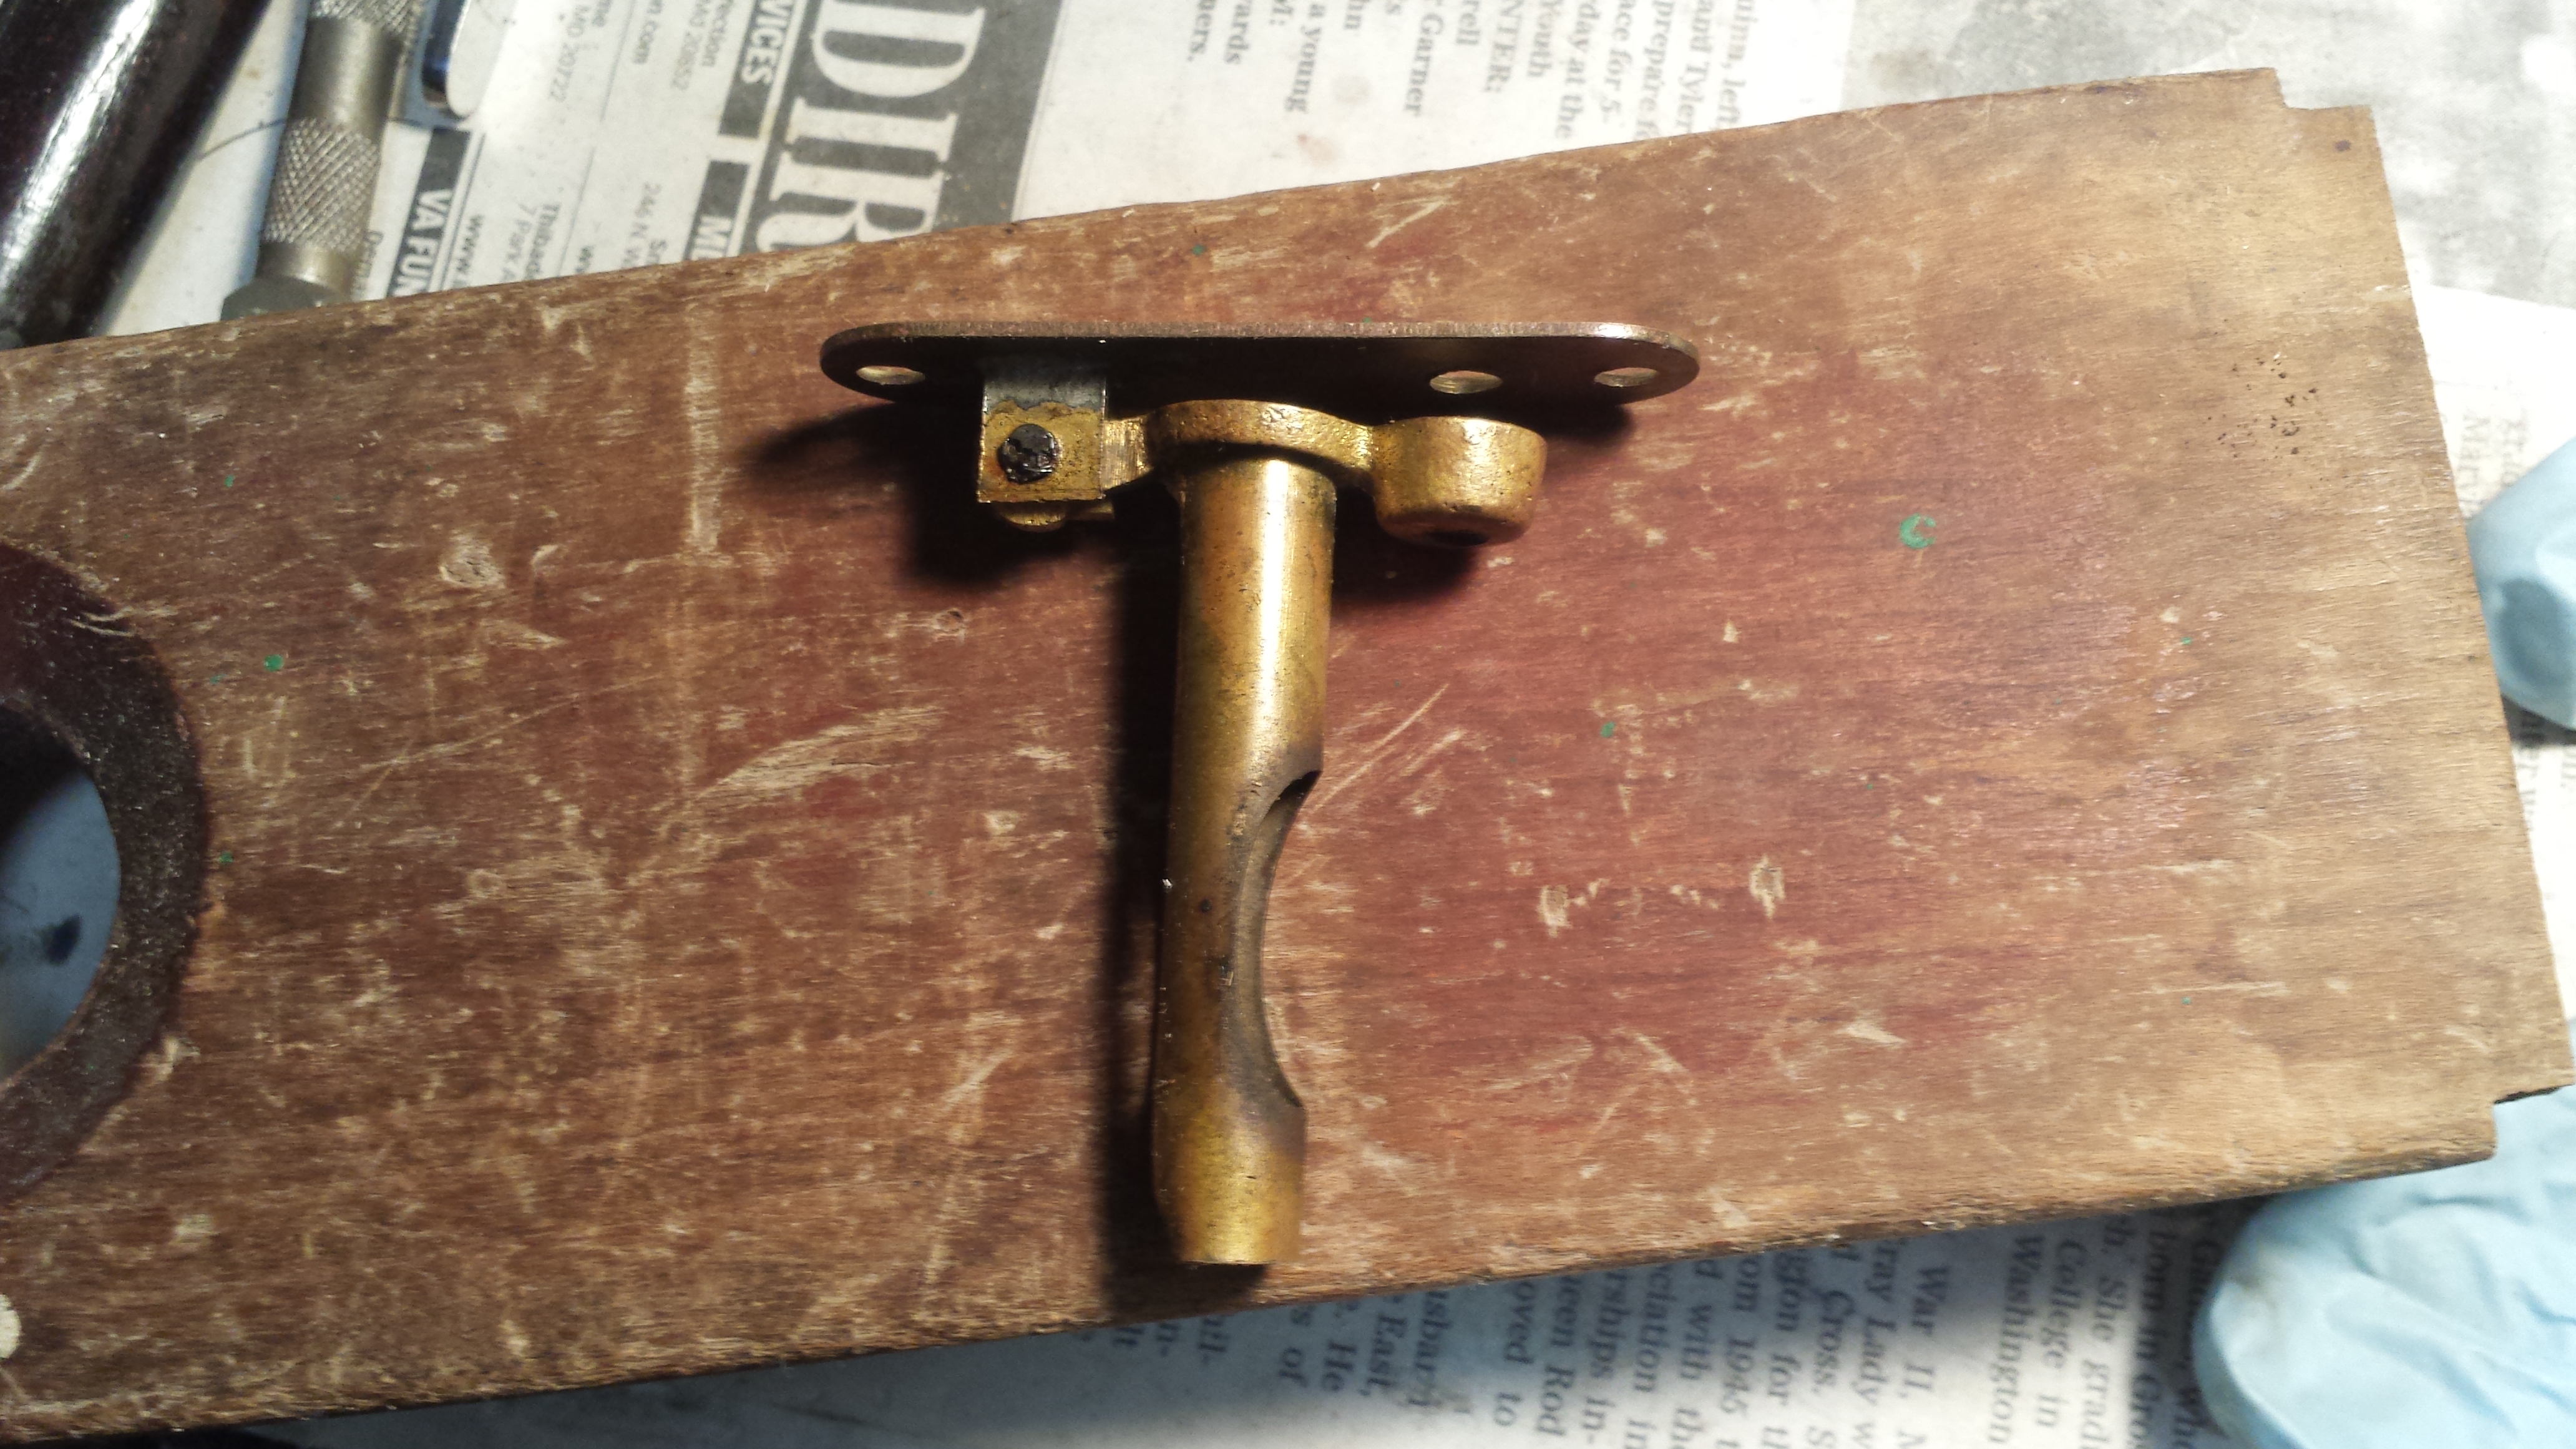
Frog Adjustment Hardware

Hardware
I’ve covered all the major functional parts, so all that remains is the miscellaneous hardware on the plane – screws, bolts, brass knob, etc. You will want to make sure all the parts are there in order for the plane to function, unless you’re willing to buy replacements on eBay. Since Stanley and others used a very unusual threading on their hardware, you won’t find replacements in your hardware store.

The knob and tote are attached to the plane with a bolt that is threaded on both ends, topped with a brass nut that is visible from the top. Models made during WWII may have single piece steel bolts.

The frog should have a bolt sticking out of the front of it that holds the iron/cap iron via the lever cap. The frog itself is attached to the base with two smaller bolts with washers. At the rear of the frog should be a large brass knob that is used to raise and lower the iron through the throat. It’s important that this knob turn freely across the full length of its bolt, although it’s not unusual to have to clean this area thoroughly before it will work as intended.

On Stanley bench planes made after 1907, there will be an adjustment bolt that engages a small plate attached to the bottom rear of the frog. This enables fine forward/backward adjustments to the frog, which has an effect similar to closing the throat of the plane for fine cuts. Since most bench planes did not have an adjustable throat as found on some of the better block planes, this frog adjustment allowed movement of the entire frog, which accomplished the same thing. Moving the frog back opens the throat for thicker cuts, while moving it forward closes the throat for very fine shavings. It’s actually pretty rare to find this feature permanently frozen due to rust and corrosion, but it’s something to look out for. While it may take a few days of soaking in penetrating oil, they almost always free up.

That’s pretty much it. Very few vintage hand planes are in perfect condition, so it’s important to have realistic expectations. Almost all show the effects of age and use. This is what gives them character. Perhaps most important for new buyers shopping for a first hand plane is to first understand how they function and how they are used. That will make evaluating condition much easier and the assessment more relevant. Additionally, all new hand plane purchasers need to understand that no tool they buy, whether 100 years old or manufactured yesterday, is going to function effectively without proper tuning. That discussion I will save for another post.

***

Tools shown in the photos were returned to functional condition by Virginia Toolworks using museum quality archival preservation techniques.  Sharpened and tuned for use, every tool is fully tested and adjusted until perfect.