“Excelsior” Profile Stanley Block Planes

Ever wonder about the origin of the word “Excelsior” as it refers to the body style on Stanley block planes?  Why Excelsior?  What does it mean?  Was it an official Stanley name or a term that has been applied in recent years?

Me too.

For anyone unfamiliar with the term, the “Excelsior” profile refers to the first body style used on Stanley block planes.  Dating from 1873 to 1898, the Excelsior profile differs from the later profile in that the “hump” in the cheeks is positioned more toward the rear of the plane.  After 1898 the hump was centered in the cheek profile and has the familiar milled Handi-grip indentions.  And yes, there was a very brief period of a few months in 1898 when the excelsior bodies also included the Handi-grip indentions.

Early Excelsior Profile Stanley 9-3/4 Type 1

Early Excelsior Profile Stanley 9-3/4 Type 1

The word Excelsior comes from the latin word excelsus, meaning meaning “ever upward” or “even higher.”  It is the origin for the word Excel, which obviously means to surpass in achievement.  However, more interesting and relevant for us, “Excelsior” is commonly defined as fine curled wood shavings used for packing.  Given that definition, it certainly makes sense that “Excelsior” was the name Stanley assigned to a line of block planes.

The earliest Stanley reference to Excelsior I could find is in the 1867 price list, which lists a “Patent Excelsior Tool Handle,” a wooden multi-tool handle that included 20 Bradawls and tools.  However, the multi-tool handle design more commonly referred to today as Excelsior was patented on March 19, 1867.  That patent design was awarded to Nathan S. Clement, and featured a different method of clamping the tool bits into the handle than the previous Stanley offerings.  As was often the case, the patent was eventually acquired by Stanley Rule & Level and incorporated into their product line, and was reflected in both wooden and the ornate iron handled multi-tool handles.

62938_IMPROVEMENT_IN_AWL_Clement 1867

Stanley also referred to their Bailey’s Patent Adjustable Block Planes as “Excelsior Block Planes” when they were introduced in 1873.   This term only applied to the adjustable mouth planes, such as the no. 9-1/2, no. 9-3/4, no. 15, etc.  The no. 110 and other non-adjustable planes had a different cheek profile, and were simply listed as Iron Block Planes in Stanley catalogs.

I did a little patent search sleuthing but could only find one reference that in any way tied in the term excelsior to hand or block planes.  In 1875, Albion K. Hall of Jackson, MI patented a plane specifically for making excelsior shavings.  However, I found nothing that tied him in any way to Stanley, so I assume there was no relationship between the two.

Stanley continued to use the Excelsior name for their multi-tools until 1902, and their planes until about 1898, when the profile was redesigned, moving the hump toward the center of the cheek.  Today, the Excelsior planes are attractive primarily to collectors.  While certainly usable, their castings tend to be thinner and more fragile than the later models, lending them better to display shelves than workbenches.  Either way, they remain, in my opinion, one of the more attractive plane designs ever devised.

The Excelsior line included the following planes:
no. 9-1/2
no. 9-3/4
no. 15
no. 15-1/2
no. 16
no. 17
no. 18
no. 19

***

Working Within the Limits of Tool Preservation

198 SB3 Type 9 Pre0I spent a long time researching and learning about tool preservation before I ever touched a plane. Even so, it was a couple or three years before I really settled into a comfort zone where the hands on experience I gained began to gel with the “book knowledge” I’d accumulated. For me, the greater appeal has always been geared more toward preservation than restoration (although I use the word restoration more often when casually talking about “cleaning up” a plane or tool). It’s probably a matter of semantics; I think most people equate restoration with refinishing, while preservation, by it’s very definition, speaks to preserving and sustaining. To me, that’s more accurate, and is a key part of my guiding philosophy and approach to tools.

It’s very easy for me to “go too far” when cleaning up a tool, to make it pretty vs. simply making it functional. My underlying intent is to preserve the character, finish, patina, etc. whenever possible. Dirt and rust are not sacred to me (as they are to some collectors), they are destructive elements of neglect. When I’m cleaning up a tool, I try to stay within the same boundaries that a woodworker of 100 years ago would have stayed within. He would have only been interested in preserving his tools, keeping them clean and in good working order, not making them pretty to sell on eBay. I constantly remind myself of that, not because I’m right and everyone else is wrong, but because it’s consistent and true to the values and parameters I defined when I started this venture. It’s my mission statement, if you will.

198 SB3 Type 9 Post7

***

Get a (Handi) Grip on this Stanley no. 18 Plane

Every so often I receive a question from a reader about a tool they own.  I enjoy this.  It gives me a chance to virtually meet folks from across the country and across the world and discuss a topic we both love.   The most recent question came from Vincent Tuinema, an architect in the Netherlands who found a nice vintage Stanley no. 18 block plane with an unusual feature – or lack thereof.

no18_1_tuinemaVincent’s no. 18 is a typical mid-20th century example in every way except one.  There are no handi-grip indentions milled into the sides.  He wanted to know the reason for this and age of the plane.  Let the sleuthing begin!

The first point to keep in mind about the no. 18 is that the body is identical in every way to the no. 9-1/2.  Stanley no doubt used the same casting for both.  Vincent’s excellent photos clearly show the raised Stanley marking at the toe of the plane, and Made in USA marked at the rear of the bed.  This tells us that the plane was made after 1930, the approximate year in which the latter marking was permanently added.

The second clue is found not by what I see, but what I don’t see.  Block planes made after 1947 had the model number stamped into the bottom of one cheek (side).  Since Vincent’s plane is not stamped this way, it indicates it was likely made before 1947.

The third, and in this case, most telling clue is the lack of the milled handi-grip indentions.  Although fairly uncommon, it is well documented that Stanley omitted the hand-grip feature on at least some of their block planes for a brief time during World War II.  Patrick Leach’s Blood and Gore site indicates that this was likely due to the fact that Stanley was using the same machinery to mill similar indentions into Howitzer artillery shells to make them easier to grip.

Similarly, brass was in short supply during the war, and Stanley switched to steel and rubber hardware on many of their planes.  If you click on the photo at the bottom of the page, you can see that the front knob on this no. 18 appears to be made of steel, not the typical nickel plated brass.  I suspect the rear adjustment wheel is probably steel as well.  While the shortage of brass for commercial purposes during the war is understandable (they needed the brass for cartridges), it seems a little surprising that steel was so readily available.  Considering of all the military hardware being produced, you would think steel would have been in short supply as well.

This mystery solved, Vincent’s no. 18 is a nice example of a WWII vintage Stanley block plane.  In the absence of a simple feature that we take for granted is reflected a time of sacrifice and uncertainty in our world.  To me, it symbolizes the united efforts of a country and a world working in partnership to defeat tyranny.  Sure, that sounds dramatic, but those missing handi-grip indentions were not just a mistake or cost cutting measure.  They were omitted for a reason.  They mean something.

no18_2_tuinema

Thanks, Vincent, for sharing your photos and allowing me to use them for this post!

***

Greatest Table Saw Quote Ever

I was doing some research today and ran across the following quote on sawmillcreek.org by a guy named Jonathan McCullough.  Dating back to 2010, it is quite simply the grandest description I’ve ever read of the table saw beast, and I thought it too good not to share.  So Jonathan, whoever you are and wherever you are, here’s to you!

“I wish someone would pop up at my door with a pickup truck saying how much they wanted a table saw.  No doubt. Mine is powerful, well tuned, has all sorts of doodads, and I hate it. Hate It. It’s dangerous and spews out a choking cloud of microfine particles. It dominates the garage like a cast iron miasma of self reproach, with tendrils reaching out and stinking up the place with all sorts of jigs and crap that take up even more room.”

 ***

Tune Your Hand Plane Tonight

Among the most frequent web searches that lead people to this site come from those looking for information on tuning a hand plane.  Admittedly, for those new to the craft, or at least new to using hand tools, the prospect of setting up and fine tuning a hand plane is daunting.  After all, the nomenclature of parts is bewildering, the functional mechanics are an exercise in geometry and physics, and then there’s that whole issue with sharpening.  It’s no wonder so many people would rather spend an evening prepping for a colonoscopy.

But yea I say unto you, fear not!  Tending to a neglected (or new) hand plane is both relaxing and rewarding, and in most cases takes just an hour or two.  Best of all, the gratification is instant, the rewards immediate.

Now in the interest of keeping things simple, I’m going to assume that your plane is already in a mechanically functional condition and doesn’t require a full blown restoration.  For that level of detail, I recommend reading the posts under Preservation on the menu bar at the top of the page.  I’m also going to focus solely on bench planes.  I’ll cover black planes in a later post.  For simple tuning in one evening, read on…

Step 1 – Pour Drink of Preference

PVW-trio-4What you drink is up to you, and moderation is certainly recommended, for while you won’t be working with powered tools, you will be handling very sharp objects.  I personally prefer a finer bourbon, perhaps Maker’s 46 or Elijiah Craig 18 year, or if I’m in a particularly festive mood, a little Jefferson Presidential Select 17 year or Pappy Van Winkle.  Either way, begin by putting on some relaxing music and have a drink.  (5 minutes)


Step 2 – Disassembly & Cleaning

Disassembled Plane, Ready for TuningThe second step is to completely disassemble your plane and clean all the parts.  Using screwdrivers of the appropriate size, remove all the parts, screw, bolts, washers, etc.  If you’re not completely familiar with what and where everything goes or are worried you might have trouble putting it all back together, take pictures or notes.  Or just pay attention; it’s not that complicated for heaven’s sake.

Once disassembled, brush off all the sawdust and dirt.  If the filth is excessive, use a toothbrush and orange degreaser (available at the hardware or grocery store).  Also take a few minutes to clean the threads and slots on all the screws and bolts.  I use a small wire bristle brush with a little turpentine or light penetrating oil like WD-40. Once cleaned, wipe them down and set them out of the way so they don’t attract grit.  (10 minutes)

Step 3 – Inspect the Sole

Stanley No. 7 Jointer PlaneTake a look at the sole (bottom) of the plane.  Put a straight edge against it if it makes you feel better.  Once you’ve convinced yourself that it’s flat enough (which it undoubtedly is), set it aside and have another drink.  Seriously, after owning hundreds and using dozens of planes over the years, I’m convinced it’s rare to come across one with a sole so warped, cupped, or bowed that it’s unusable.  If there are any dents or dings with raised points around the edges that risk digging into your wood surface, carefully file them flat with a mill file, followed by a little 220 grit sandpaper.  You can also use the sandpaper or steel wool to remove any heavy crud – I suggest lubricating it generously with WD-40, Mineral Spirits, or Turpentine.  Working against a dead flat substrate such as a granite or the iron bed of a table saw is recommended.  Go easy.  No need to overdo it; you just want it to be clean and smooth.  (5-30 minutes depending)

Step 4 – Address the Frog

Lap frog face on edge of stone to protect yokeFirst inspect the seat for the frog on the top side of the plane’s base.  This is the area of contact where the frog attaches to the body of the plane.  The mating surfaces must be clean and flat.   Use a toothbrush with the degreaser.  If there is stubborn crud to be removed, use a brass bristle brush.  If the crud is really bad, you can use a small steel brush, but be very careful to to damage the surrounding finish.  Mating surfaces on the frog itself should also be cleaned in the manner described above.

The face of the frog is one of the more critical surfaces of the plane.  It needs to be as flat as you can get it so the iron sits completely flush against.  You don’t want any wiggle or movement, so any high spots or irregularities in the casting need to be filed or sanded flat.  I go back to my granite surface and sandpaper for this.  Taking care not to damage the tip of the yoke that engages the iron and cap/iron, carefully sand the face surface of the frog until it is as flat as possible.  Change directions periodically to keep it even.  You only need to do enough to ensure the iron sits flat against it.  (15-30 minutes)

Step 5 – Polish the Cap Iron

Cap IronThe leading edge of your cap iron (also called the chip breaker) will need a little attention.  Flatten the leading edge of the cap iron where it contacts the iron so that it seats completely flush against it.  You don’t want any gaps that shavings can slip through.  While you’re at it, polish the top side of that leading edge as well (the hump) to make it nice and smooth.  Less friction makes the shavings pass over it more easily, helping to prevent clogs.   The smoother the better, but don’t obsess over this step.  (10 minutes)   

Step 6 – Sharpen the Iron

Sharpening SetupYes, I know, the step everyone loves to hate.  Even for me, it’s often a task that I procrastinate over, but once I get going, I actually enjoy it.  Since this is not a sharpening tutorial, I’ll leave the particulars on methodology to another post or reference.  But if you do nothing else, take the time to put a keen edge on your plane’s iron.  A 25 degree bevel works perfectly on bench planes; add a micro bevel if you’re into that, and don’t forget to polish the unbeveled back edge. (30 minutes)

Step 7 – Lubrication

Pure Oil 1Lubrication is a good idea, but should be done sparingly since oil attracts dirt and grit.  I add just a drop of light oil to the threads of all the bolts and screws before re-installing them.  I also add a drop to all the moving/adjustment parts, but wipe them with a rag afterward so that only a light film is left.  They certainly don’t need to be dripping.

Some guys believe in waxing the sole.  Nothing wrong with that as long as you don’t use a silicone based wax.  However, I just wipe down all exterior surfaces with a little Jojoba oil for storage.  (5 minutes)

Step 8 – Assemble, Adjust, Cut

Stanley Bailey no. 5, Type 17 - WWII VintageTime to put it all back together.  Re-attach the frog and all its related hardware first, but don’t tighten just yet.   Put the knob and tote back on if you took it off.  Carefully put the iron and cap iron assembly in place and install the lever cap.  It should lock down securely, but not so tight as to inhibit raising and lowering the iron.  Adjust the frog forward or backward as needed until the iron’s cutting edge is positioned appropriately for the type of planing you intend to do (see open vs closed mouth).  Once set, tighten down the frog and lower the iron into the mouth to take your first test cut.   All of your hardware and adjustment mechanisms should move freely and smoothly. (10-15 minutes)

Unless you run into an unexpected problem, the entire tuning and sharpening process can be completed in about 1-1/2 to 2-1/2 hours, and even quicker if you’re tuning a new plane or re-tuning a plane that has already been tuned or well cared for.  It’s easy, rewarding, and builds both knowledge and confidence in your ability to master hand planes.

***

Wait!  What about the tote and knob, you ask?  You can read all about their care and repair right here.

Open vs. Closed? Mouth vs Throat? – The Adjustable Plane Facts

Adjustable Mouth?  Open or Closed Throat?  Say what?

What’s all the ruckus about adjustable mouth planes? What are they? Do I need one? How do I use it? What’s the difference between adjustable throat planes and adjustable mouth planes?  Good grief, it’s enough to give any new galoot a headache!

Stanley no. 60 with mouth open on left; Stanley no. 18 with mouth closed on right.

What’s the difference?  To clear up the confusion, let’s start with the nomenclature. Both ‘adjustable throat’ and ‘adjustable mouth’ actually refer to the same feature. Both terms are used interchangeably, which is confusing and in my opinion, technically incorrect. The mouth is the rectangular opening that you see when looking at the bottom of the plane. The throat is the area above the mouth on the top side of the plane. The part that is adjustable is the mouth, not the throat.  That said, even Stanley wasn’t consistent in its terminology, listing ‘adjustable throat‘ planes in their catalogs some years and ‘adjustable mouth‘ planes other years.  Far be it from me to argue the point one way or the other, but for the rest of this post, I’m sticking with adjustable mouth.

What is it?  An adjustable mouth on a plane means that the size of the mouth opening can be adjusted, i.e., opened to make it larger or closed to make it smaller. Typically, this is accomplished by sliding the toe section of the plane forward (away from the iron) to increase the size of the mouth opening, or backward toward the iron to decrease it.

Not all planes have adjustable mouths. In the world of vintage tools, adjustable mouths were most commonly featured on the various manufacturers’ premium lines of block planes and a few of their specialty planes. Modern manufacturers like Lie Nielsen and Veritas understand the value of adjustable mouths to woodworkers and feature them on many of their bench planes as well their block planes.

Why do I need it?  The value of having an adjustable mouth on a plane is the ability to increase or reduce the space between the leading edge of the mouth opening and the cutting edge of iron. If you’re making a heavy cut and taking thicker shavings, you want more open space in front of the iron for the shaving to pass. If you’re making a fine cut, taking thin shavings, you need less space in front of the iron.  In fact, you want the opening to be just marginally larger than the thickness of the shaving.

How do I use it?  In practice, the leading edge of the mouth presses down on the wood fibers as you make a cut. Having a ‘fine set’ to your plane (meaning a closed mouth and very shallow depth of cut) keeps the wood in front of the iron tightly compressed.  This enables a very thin shaving with less chance of tear out, in which the wood fibers split well ahead of and below the cut. Opening the mouth accomplishes just the opposite. With less compression, the iron is able to take a thicker cut, and the larger opening allows the shaving to pass through unobstructed up into the throat area.

Naturally, the size of the mouth opening is only half of the equation – you also need to decide how far down to extend the iron based on how deep you want to cut. If you try to take a heavy a cut with the mouth too tightly closed, the shaving will be too thick to pass through the opening and will quickly clog the mouth opening or simply come to a screeching halt.  This effect can be more or less pronounced depending on the type of wood you are working on.

The trick, of course, is finding the right balance between set of the iron and opening of the mouth, but this is truly not as difficult as it might sound. A little trial and error will quickly build experience and give you a ‘feel’ for how to set your plane for the cut you desire. Once you have it set appropriately for what you’re trying to accomplish, the results will be superior to what you would get from a plane with a fixed aperture mouth, which lacks the flexibility for making fine adjustments to the cut.

As a final thought, it is worth pointing out that many planes without adjustable mouths can still be adjusted.  Virtually all bench planes have adjustable frogs.  Moving the frog forward or backward decreases or increases the size of the mouth opening, accomplishing the same goal as an adjustable mouth, even if the process is a little more involved.  Still, that is precisely why Stanley added the frog adjustment feature to their planes in 1907.

Unlike bench planes, the frogs of block planes are fixed, so unless they have an adjustable mouth, you’re stuck with the fixed size opening.  This is why adjustable mouth block planes are more highly regarded and valued by woodworkers.

Common* Vintage Planes with Adjustable Mouths

Stanley nos. 9-1/2, 15, 16, 17, 18, 19 standard angle block planes
Stanley nos. 60, 60-1/2, 65, 65-1/2 low angle block planes
Stanley no. 62 low angle jack plane

Millers Falls nos. 16, 17, 26, 27, 36, 37 standard angle block planes
Millers Falls nos. 46, 47, 56, 57 low angle block planes

Sargent nos. 306, 307, 1306, 1307, 4306, 4307, 5306, 5307 standard angle block planes
Sargent nos. 606, 607, 1606, 1607 low angle block planes
Sargent no. 514 low angle jack plane

Modern Plane Makers

Lie-Nielsen – makes block plane models with adjustable mouths
Veritas/Lee Valley – makes both block and bench planes with adjustable mouths
Stanley – makes modern variations of their vintage counterparts
Wood River/Woodcraft – makes block plane models with adjustable mouths

* This is not a complete list, but includes the most common planes for use.

For more information on plane nomenclature, please refer to the Plane Terminology page for a full dictionary of plane parts and terms.

***

The Restoration of Tools and Refinement of People

The following post was originally published on The Character of Leadership in 2010:

“I have a thing for old tools.  Not the ones with cords and plugs, mind you, but old hand tools that predate electricity.  The ones guided by hand, powered by muscle, carefully honed and meticulously cared for to retain their edge and effectiveness at doing the job for which they were intended.  These are elegant, tactile tools of history, character and quality – tools upon which the livelihood of their owner depended.  These tools didn’t sit collecting dust on shelves in garages, used casually or occasionally and allowed to rust.  These were tools of journeymen and tradesmen, carpenters, cabinet makers, shipbuilders, and carriage makers – tools that were passed down through multiple generations.  Every one has a story to tell; every paint spot, dent, ding, scratch and chip reflects a different point in time and a different job completed.

Sadly, most of these tools eventually fell victim to post-WWII modern industrialization when mass production, cheap technology, and the population explosion shifted consumer culture from quality and durability to speed and ease of use.  Today, we’ll spend $200 on a cordless drill and toss it out when the battery no longer holds a charge.  All the while, the noble tools of iron, steel, and wood that built this country sit quietly idle, rusting away in barns and workshops and garages.  Few know how to use them, fewer still know how to restore them to functional condition, and just about everyone else wonders why bother doing either.  I am one of the relative few who does both.

Opinions on the restoration of old tools vary widely and are frequently debated within their communities of interest.  I personally believe that less is more when it comes to restoration. I like the idea of retaining a tool’s character – its scars and marks from use, its patina, etc.  I believe a tool should be cleaned and maintained in the same manner as the original craftsman who owned it would have done. A hundred years ago, these tools represented the livelihood of the owner. They were relatively expensive and the woodworkers who owned them relied on them to make a living. They would not have allowed rust to accumulate and would have cleaned and oiled them regularly.

Refining people is not unlike the restoration and care of vintage tools.  Regardless of age or experience, there are always rough edges to be eased, working mechanisms in need of adjustment, and business implements to be sharpened to produce the desired result.  People in an organization require constant tuning and ongoing maintenance in order to function at their peak capacity.  Good leaders exist, not simply as masters of the tools they wield.  Rather in the manner of fine craftsmen, they are charged with refining, tuning, and honing the tools in their care, through the edification and development of the men and women they lead.

The refinement of these human tools requires a firm but gently touch.  In time, their mettle (pun intended) is reflected in a patina developed through experience, accomplishment, and occasional failure.  Skills develop through hands on instruction and are shaped by practice.  The quality of results improves as the tool is tuned to achieve the task intended.   Adjustments are made, impurities cleaned, and accomplishment is rewarded until eventually the tool attains a confidence, character, and integrity all its own.  Shavings are gossamer thin, lines are cut straight and true, and revealed in every achievement is the precision of the tool and the influence of its custodian.

Without constant care, tools become dulled by use – corrosion slowly creeps in, alignment is eventually lost, and the ability of the tool to perform as expected is compromised.  Just as the journeyman of 100 years ago was personally responsible for the care and maintenance of his tools, so are the business leaders of people today.  In a culture where tools are deemed disposable, easily replaced by a trip to the local home center, leaders of people cannot afford to be so cavalier.  These human tools represent the livelihood of the organization. They are relatively expensive and the companies that employ them rely on them to sustain and grow the business. They must not be allowed to fall idle and rust.”

***

Tools shown in the photos were returned to functional condition by Virginia Toolworks using museum quality archival preservation techniques.  Sharpened and tuned for use, every tool is fully tested and adjusted until perfect.

Stanley Type Studies and More Now Posted!

I’ve just about finished uploading the Bailey and Bed Rock type studies, specification charts, and block plane dating information to the site.  There’s a wealth of information here, both summarized and broken down in detail by the major individual components.  The Bailey and Bed Rock type studies are relatively easy to find elsewhere online, but you won’t find the specification charts or information on dating your block plane anywhere but here!

Look for more information like this coming to the site over the next month or so, including specifications, conversion charts, and type studies for other models and manufacturers including Millers Falls, Sargent,  and Record.

By the way, if you’re new to collecting, don’t miss the post on understanding type studies.  It takes some of the mystery out of the madness.

Specification Charts

Stanley Bailey Bench Plane Chart
Stanley Bed Rock Plane Chart
Stanley Block Plane Chart

Type Studies

Bailey Type Study
– Bailey Detailed Identification
Bed Rock Type Study
Block Plane Dating

Understanding Type Studies

***


Understanding Type Studies

Catalog Image of Stanley Bailey Smoothing Plane, c. 1880sLet’s be honest, Type Studies are confusing to a lot of people, especially those new to tool collecting. One reason for this is that by their very nature, Type Studies attempt to identify very specific points in time that correspond with transitions in the design and manufacturing process of tools made in the past. There are many problems with this.  First and foremost, manufacturers never imagined that anyone in the future might care about tracking changes in the evolution of their designs.  Subsequently, even veterans who know better sometimes lose sight of just how blurry those lines of delineation are along the historical manufacturing timeline.

The first thing to clearly understand is that Type Studies are a present day construct. They were not a production guide used by manufacturers to identify, notate, or track changes in design.  Stanley and their competitors didn’t follow Type Studies.  Why, you ask?  Because Type Studies didn’t exist at the time the tools were made.  Did you get that?  Type Studies are a present day guide.

It was not until the 1970s and ’80s that people really started thinking about collecting vintage hand tools. And it’s only in the last 10 or 15 years, when woodworking with hand powered tools has enjoyed a resurgence, that vintage tool collecting has started to explode in popularity.  The big name hand tool aficionados (Roger Smith, Alvin Sellens, Clarence Blanchard, and others) conducted extensive research, pouring over company records and old catalogs and detailing the physical variations of thousands of tools in order to begin piecing together timelines for various models.

These timelines, delineated by significant and important changes in the design and manufacture of a tool are referred to as Type Studies.  Different ‘Types’ within a Type Study refer to a defined period of manufacture in which a particular set of features was unique.  That said, the change from one Type to another doesn’t mean the entire tool was redesigned.  In fact, virtually all feature changes overlapped others, and a given feature or set of features might extend over several Types.  A good example can be illustrated with the lever caps used on Stanley’s Type 13-15 bench planes made between 1925 and 1932.  While the same design cap was used on all three types, there were other feature changes that delineate the three different date ranges on the Type Study time-line.

Summing it all up, here are five important confusion-busting facts about Type Studies that should provide clarity:

    1. Type Studies are modern-day timelines used to identify the age of a tool by referencing important changes in its design, manufacture, and physical characteristics.  Different ‘Types’ within a Type Study refers to a particular period of manufacture in which a particular feature or set of features was unique.
    2. Manufacturers didn’t adhere to Type Studies because Type Studies did not exist at the time.  They simply manufactured tools and made periodic changes to design and manufacturing processes, just like manufacturers today.  We identify those periodic changes in the Type Study, and subsequently assign ‘Types’ based on the time period in which they were made.
    3. Type Studies are not interchangeable.   They only apply to a specific model or series of tools.  Different tools and different lines will have different Type Studies.  For example, Stanley’s Bailey line of bench planes have a completely different Type Study from the Bed Rock series.   Some tools, like the no. 71 router plane, have their own individual Type Study.  Many tools have never been studied in depth and don’t have a Type Study at all.
    4. Type Studies are approximations.  The manufacturing timeline was constantly evolving.  Even when design changes were made, existing (old) stock parts were used until their supply was depleted before moving to new parts.  Therefore, the changeover of features sometimes took months or even years, resulting in multiple variations of the same product being released at the same time.  While Type Studies imply that these changes were aligned with a specific date or year, collectors need to understand that the transitions were more evolutionary than revolutionary.
    5. Type Studies are not all-inclusive.  With some manufacturers and some tools, and some tools made during certain periods, features and materials varied quite a bit.  A good example of this is Stanley’s offering of Bailey bench planes made during World War II.  Brass was in short supply, and subsequently, the so-called Type 17 planes made during the war years have a variety of inconsistencies.  Some had brass hardware, where others have steel.  Some have rosewood knobs and totes, while others have painted hardwood.  Some have frog adjustment mechanisms while others don’t.   All made during this period, however, are considered Type 17, regardless of features.

***

An Inexplicable Affinity for Low Angle Block Planes

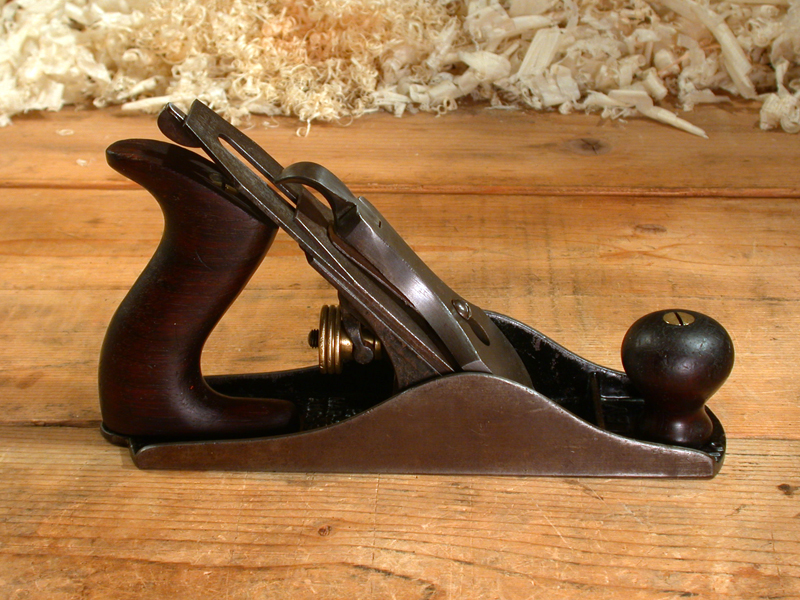
Stanley no. 65, c. 1913-19 (Left), no. 65, c. 1904-13 (Center), no. 65-1/2, c. 1905-10 (Right)

There’s something inexplicably sexy about low angle block planes.  Arguably the more versatile of all the block planes, low angle blocks were not historically the best-selling models in the lineup.  Stanley, and their counterparts at Millers Falls and Sargent (among others), were relatively conservative in their low angle offerings, at least compared to the standard angle variants they made.

If you include their more exotic models, Stanley produced a total of just 8 different variations of low angle block planes:

Model Length Width Adj. Throat Trim
No. 60 6 inches 1-3/8″ iron Yes Nickel
No. 60 1/2 6 inches 1-3/8″ iron Yes Japanned
No. 61 6 inches 1-3/8″ iron No Nickel
No. 62 14 inches 2″ iron Yes Nickel
No. 63 7 inches 1-5/8″ iron No Nickel
No. 64 12-1/2 inches 2″ iron No Nickel
No. 65 7 inches 1-5/8″ iron Yes Nickel
No. 65 1/2 7 inches 1-5/8″ iron Yes Japanned

Setting aside the extraordinary no. 62 ‘low angle jack’ and its oddball (and extremely rare ) short-lived brother, the no. 64, which were only called block planes due the bevel-up orientation of their irons, we’re left with six contenders.  Let’s review them in order…

The no. 60 & no. 60-1/2

Stanley nos. 60-1/2 & 60

The 60 series of Stanley planes includes the no. 60 and the no. 60-1/2.  Both planes are identical in every way other than their trim.  The no. 60, introduced in 1898, featured nickel-plated trim, while the no. 60-1/2, introduced in 1902, had japanned trim.  Just to avoid any possible confusion, the beds were japanned on all Stanley planes.  Trim refers to the lever caps, which came nickel-plated on the no. 60 and japanned on the no. 60-1/2.  Likewise, the knobs and adjustment wheels were nickel-plated on both the no. 60 and the no. 60-1/2. [1]

The ‘Type 1’ version of the no. 60, originally introduced with a rosewood front knob and no adjustable throat plate, was updated in 1902 with a brass front knob and an adjustable throat plate with an upturned eccentric adjusting lever.  Iron width on these planes is stated to be 1-1/2 inches prior to 1913, but I’ve never seen an example of this.[2]  Every one of this vintage that I’ve owned has featured a 1-3/8 inch iron with the J trademark stamp, which is correct for the period and dates from prior to 1909 on block planes (as far as I can tell).

These are my favorites of the low angle block planes.  I prefer their smaller 6 inch length for trimming end grain, an application at which low angle blocks excel.  Additionally, since their beds are set at 12 degrees and their irons positioned bevel up, you have the flexibility of changing the bevel angle to affect a change in the angle of cut.  With its bevel sharpened at the standard 25 degrees, you get a 37 degree angle of cut (12 + 25 = 37).  However, you could reasonably sharpen the bevel at 33 degrees and get a 45 degree cut, the same as a standard angle plane.  With two irons sharpened at different angles, you could conceivably get by with just one block plane for both standard and low angle cuts.

A note of caution… low angle planes are a little more fragile than standard angle planes for two reasons.  First, the angle of the bed is much sharper, making the leading edge (back edge of the mouth) more prone to chipping and cracking, so go easy on them when planing.  Second, don’t tighten the lever cap too much.  It puts a strain on the threads of the depth adjustment mechanism at the rear when you adjust the iron depth.  If it’s too tight, those threads can strip.

The no. 61 & no. 63

Stanley nos. 61 & 63

Introduced in 1914 and 1911 respectively, it appears that neither the no. 61 nor the larger no. 63 were particularly successful for Stanley.  Very few folks were tempted to purchase a low angle plane without an adjustable throat, especially when that feature could be had for just a few pennies more.  Subsequently, their limited popularity constricted demand and production, and so they are fairly hard to find today.  While collectible due to their scarcity, users looking for a functional low angle block are far better off sourcing a no. 60 or 65 in good condition.

Ironically, these planes are virtually identical to the very first type no. 60 and no. 65, both of which were introduced in 1898 with a similar wooden knob and lacking an adjustable throat.  Why then, less than 10 years later, Stanley thought reintroducing this handicapped design under the model nos. 61 and 63 was a good idea is anyone’s guess.  Regardless, both the no. 61 and no. 63 are easily distinguished from the Type 1 no. 60 and 65 since their model numbers were cast in relief at the rear of the bed just below the depth adjustment knob.  Manufactured for less than 25 years, both planes were discontinued in 1935.

The no. 65 & no. 65-1/2

Stanley 1935 Catalog

The 65 series includes the highly regarded no. 65 and less common no. 65-1/2.  Measuring about 7 inches long with 1-5/8″ irons, these planes are the bigger brothers to the 60 series of low angle blocks.

Like the 60 series, the lineage of the no. 65 series is equally convoluted.  Introduced in 1898, the no. 65 was first offered with a nickel-plated hooded style lever cap, wooden front knob, and non-adjustable throat.  The first major change happened in about 1905 when the wooden knob was replaced with the same brass knob used on all the other blocks, and an adjustable throat was added.  The third major change took place around 1913 when the hooded lever cap was replaced with Bodmer and Burdick’s newly designed knuckle joint lever cap, the same that was updated on the no. 18 and no. 19 standard angle planes.  50 years later, in 1964, the lever cap was changed back to the hooded type found on the no.  9-1/2, before the plane was discontinued altogether in 1969.

Considered one of the best block planes Stanley ever made, the no. 65 is sometimes referred to as the ‘Cadillac’ of block planes by vintage tool enthusiasts today.  While I prefer the smaller no. 60, the no. 65 is indeed an exceptionally well designed plane and a pleasure to use, using the same care considerations noted above for all the low angle blocks.

The no. 65-1/2 version is a bit of an oddball, at least in my opinion, in that it retained the original japanned hooded style lever cap throughout its entire lifespan.  While I don’t see nearly as many of them as I do the more popular no. 65, they were certainly made for a very long time (1902-1950).

There appears to be some inconsistencies in some very reputable published references, which imply that the 65-1/2 was offered with nickel trim.  I don’t believe this was ever the case.  Stanley catalogs from back in the day all list the no. 65 as having nickel trim and the no. 65-1/2 with japanned trim. It’s a little hard to see, but click on the image above to view a page taken from Stanley’s 1935 catalog.  Center left on the page lists the no. 60-1/2 and no. 65-1/2 together, both with japanned trim.

_____________________________
1. Depending on the reference, it appears that Stanley might have used both polished brass and nickel-plated knobs and adjustment wheels at various times.  While it is very common for the nickel plating on these parts to be well worn, I’ve seen enough examples both with traces of nickel and others with no trace whatsoever that lead me to believe that Stanley wasn’t always consistent across models.

2. Walter, John, Stanley Tools: Guide to Identity and Value, 1996.

***

Tools shown in the photos were returned to functional condition by Virginia Toolworks using museum quality archival preservation techniques.  Sharpened and tuned for use, every tool is fully tested and adjusted until perfect.